Add/Modify Associated File
To get to this screen, click either the Add or Modify Action Buttons in the middle of the View Client With Files Screen.
Add/Modify Associated File Overview
This screen allows you to link a file to a name record in Advisors Assistant. These files can be anything from scanned images of applications to pictures of your client's grandchildren. You can select any file that your computer has access to.
As an example, if you are on the View Client With Files Screen, the File that you link would be associated with that particular Contact Name. If you were on the View Policy With Files Screen, the File that you link would be associated with that particular Policy.
You can also add entire folders to your list. The add just like the files explained below. See Adding An Associated Folder for more information.
Adding Files
To add a new file link to a name, click on the Add Action Button in the middle of the View Client With Files Screen.
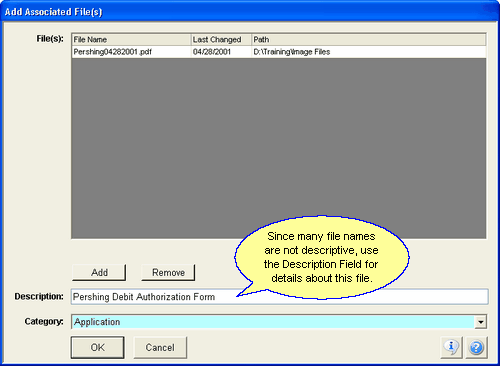
The Windows Locate File Screen will open - browse to the location of your file and select it. Then the Add Associated File Screen will open.

Description
Use this field for a brief description of what the File contains and its relation to the Name, Policy, or Account.
Examples
Completed Medical Exam
Account Disclosure Form
Signed Mutual Fund Prospectus
Category
You can assign a Category to this file to further describe the type of file, and to allow you to sort files on the View Client With Files Screen. The Category drop down list contains different types of category codes. If you don't see the option that you want, if you have access to adding codes click on Edit List... to add the category code.
Examples
Application
Reports
Picture File
Click OK to add the File Link to the Name, Policy, or Investment Account.
From the Add Associated File Screen you can click on the Add Button to add another file, but it will have the same Description as the first file. If you wish to add a new file with a different description, click OK to add the first file then click the Add Action Button from the View Screen to add another file.
Modifying Files
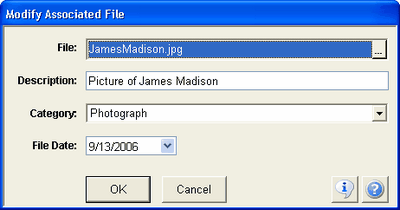
To Modify an existing file link, highlight the file description and click on the Modify Action Button in the middle of the View Screen.

Details about each field are below:
File
Click on the Browse Button (![]() ) on the right of the File Box to bring up the standard Windows Explorer interface. You can use this to browse to any file that your computer has access to. When found, highlight the File and click on the Open Button. The Filename will then be displayed in the File box.
) on the right of the File Box to bring up the standard Windows Explorer interface. You can use this to browse to any file that your computer has access to. When found, highlight the File and click on the Open Button. The Filename will then be displayed in the File box.
Description
Use this field for a brief description of what the File contains and its relation to the Name, Policy, or Account.
Examples
Completed Medical Exam
Account Disclosure Form
Signed Mutual Fund Prospectus
Category
You can assign a Category to this file to further describe the type of file, and to allow you to sort files on the View Client With Files Screen. The Category drop down list contains different types of category codes. If you don't see the option that you want, if you have access to adding codes click on Edit List... to add the category code.
Examples
Application
Reports
Picture File
File Date
The File Date field defaults to the Date that the File was last modified. While this information is kept track of by the Windows File System and can be viewed through Windows Explorer, if necessary, the File Date can be changed for the purposes of Advisors Assistant by either typing in a new Date or clicking on the drop down arrow and using the pop up calendar.
Deleting Files
To delete a File link, highlight the file description on the View Client With Files Screen and click the Delete Action Button.
Only the link to the file will be deleted from Advisors Assistant. The file itself on your computer is not deleted.
See Also
|
The Files Screens are used by Client Marketing Systems' Imaging Assistant to help with electronic document storage. For more information regarding this, please contact our Sales Team at (800) 799-4267. |
