Formatting Mail Merge Fields
Formatting Overview
Please note that our technical support does not include how to operate Microsoft Word. The following information is provided to get you started. The link shown below provides all kinds of information on formatting merge fields.
You don't have to be a programmer to do some basic formatting of Mail Merge fields you put into your Word Documents.
The date of birth is formatted as mm/dd/yyyy (in the USA) or mm/dd/yyyy in British format countries.
Instead of 6/16/1951, the default, what if you wanted to display Saturday, June 16, 1951? You can do that.
Or you could just write, You were born on a Saturday, or you could format it as June 16, 1951 without the Saturday.

Standard Mail Merge Display
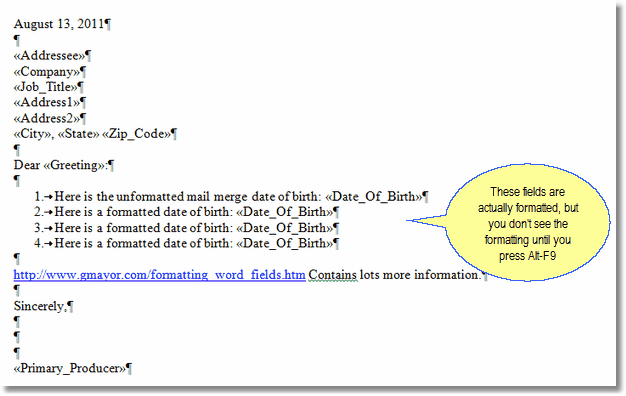
The Mail Merge letter above contains 4 different formats for the exact same date of birth field.

Previewing The Mail Merge Results
Clicking the Preview Button on Word's Mail Merge Tool Bar displays the 4 formats.
All the different formats that you might want to use are on the web at http://www.gmayor.com/formatting_word_fields.htm. The date formatting is at the very end of the page.

Pressing Alt-F9 Displays The Formatting
In order to change the formatting, you first have to display the formatting of the Mail Merge fields in Word.
Step 1: Press Alt-F9 To Display Formatting
Before you can change the formatting, you have to display the document in the format mode. Press Alt-F9 (Function Key 9) to change display the Merge Fields.
Step 2: Modify The Format
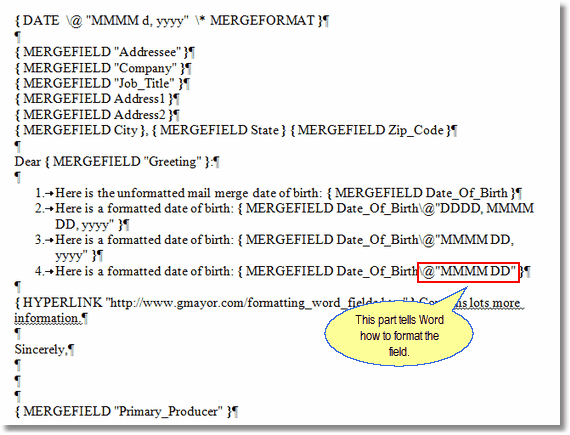
Then just click into the format and add the backslash, @ character, double quote, and the format string. Then close out the string with the double quote. Be sure that you do all of this to the left of the curly bracket, }.
On the screen above, format #1 shows the Merge Field with no additional formatting. Format #2 shows how we put the insert cursor just to the left of the curly bracket and added the \@"DDDD, MMMM DD, yyyy"
The \@ tells word that you want to do a date format.
The quotes are required to tell word the beginning and end of the format string. The two commas are printed because we wanted a comma after the day of the week and one after the day of the date. We put a space between MMMM and DD because we wanted Word to print a space there. The codes DDDD and MMMM and DD and yyyy are the actual formatting instructions included at http://www.gmayor.com/formatting_word_fields.htm.
Step 3: Press Alt-F9 To Return To Standard Display
Press Alt-F9 after you have changed to format so that you can test. If you get it right the first time, you are doing very well.
Step 4: Preview Results
To preview the results, click on the Preview Icon at the top of the screen. In Word 2010 it is on the Mailing Tab and is labled "Preview Results."
Today's Date
To insert today's date, go to the Insert Tab, Quick Parts. Then choose Fields. (Microsoft calls fields Quick Parts!) Then chose Date and Time fields and insert the "Date".
After pressing Alt-F9 to show formatting, just change {MERGEFIELD Amount} to {MERGEFIELD Amount \# "$,0.00;($,0.00)" to show dollars and negative dollars in parenthesis. "Amount" is the number value passed to Word.
See http://www.gmayor.com/formatting_word_fields.htm for more info.
Formatting Percentages
After pressing Alt-F9 to show formatting, change {MERGEFIELD Amount} to {MERGEFIELD Amount \# "0%"}
Conclusion
You can do all kinds of things in Word and this is just one example. You can format numbers, also, but pulling information out of dates is very useful.
