Setting Up Gravity Forms

Contents
Overview
Gravity Forms lets you put a form on your web site and capture data. Gravity Forms will then create an email and send the data to your email box.
Advisors Assistant's Gravity Forms plugin takes this process to the next level and will automatically put the data into Advisors Assistant.
The Advisors Assistant plugin will do the following:
•Send the data to Advisors Assistant.
•Let you suppress sending the data and only send an email based on conditions that you can set up.
•Map the Gravity Forms fields to Advisors Assistant fields.
•Capture free-form entry to Notes and set the Note Topic.
•Initiate a workflow in Advisors Assistant based on a the submission of a form on your web site.
•Detect duplicates and add a note rather than create a new contact.
Step 1: Get the Gravity Forms Plugin
You can purchase the Gravity Forms plugin for $39 at the site below.
Step 2: Get the Advisors Assistant Plugin to Gravity Forms and install and activate it on your web site
This is a free plugin, so all you have to do is download and install it. Your website programmer will know how to do this. Normally the owner of the website would not be doing these functions.

Add the new Advisors Assistant Plugin
In WordPress, on your website, go to the Plugins section.

Searching for the Advisors Assistant Forms plugin
There are thousands of plugins available and you will see some of them listed. Use the keyword search in the upper right corner and type Advisors Assistant. You will see Advisors Assistant Forms appear in the list.
You can see more information about the AdvisorVault plugin by clicking on the More Details button.
To install the plugin, click on Install Now and the plugin will automatically be copied to your web site.

Activating the plugin
After installation, the Install Button will change to Activate. Just click on Activate to activate the Advisors Assistant plugin.

Advisors Assistant Forms Plugin is now activated and ready to hook up to your web site.
Once activated, you will see the Advisors Assistant appear on your list in alphabetical order.
Step 3: Credentials
There are two sets of credentials used to keep your data safe. One set lets you access our OAuth Server, a separate server from Advisors Assistant. The second set are your Advisors Assistant login and password that gives access to the authorization server which creates the credentials to send the data to Advisors Assistant.
Get the OAuth Client Credentials and API Credentials
These come from Advisors Assistant. When you email us requesting credentials to use Gravity Forms with AdvisorVault, we will send these.
There are two sets of credentials you need to obtain.
1.Log into your WordPress site as your WordPress Admin user.
2.Click on Plugins | Installed Plugins
3.Under "Gravity Forms Advisors Assistant Forms" click on Settings as shown above.
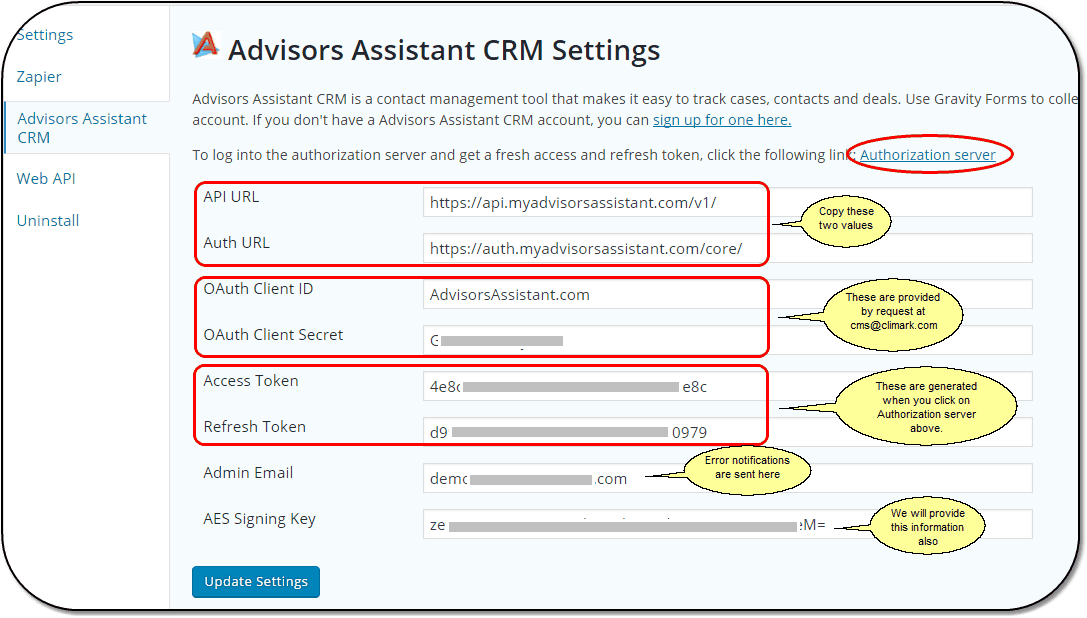
API URL
This is the same for All USA Advisors Assistant hosted databases. Just enter the value shown above into the field.
Auth URL
This is the same for All USA Advisors Assistant hosted databases. Just enter the value shown above into the field.
OAuth Client ID
This value is provided by a Advisors Assistant developer. You will receive it as part of setting you up for the API.
OAuth Client Secret
This value is provided by a Advisors Assistant developer. You will receive it as part of setting you up for the API.
Access Token & Refresh Token
All you need to do is click on the authorization server link as shown circled on the screen above. Log into that site using your Advisors Assistant user id and password. This is the combination you use every day to log into Advisors Assistant..
Creating Access Tokens
Click on the authorization server link circled on the screen shown above.to get the screen below. You don't have to change any of the defaults.

This is the Authorization Server Screen. All you need to do is click the Yes, Allow button.
When you click Yes, Allow, above, the Access Token and Refresh Token are automatically filled in. They must be filled in and left unchanged. You can visit this screen more than once and change them, but ONLY by using the Yes, Allow button. If you use your keyboard to change the Access Token or Refresh Token, they will not work.
Admin Email
Enter the email address where you want to get errors. This would usually be the programmer responsible for your site. This is NOT the email that will receive Gravity Form notices when someone submits a form.
AES Signing Key
This is an additional layer of security which "signs" the requests and replies between the plug-in and the API Server. It makes sure that the data being sent and received has not been tampered with.
We will provide you with the value of this key.
Update Settings
Before you leave the Advisors Assistant CRM Settings screen, be sure to click on the Update Settings Button.
Step 3: Have your web site developer create the form on your web site using Gravity Forms
The Advisors Assistant Gravity Forms plugin supports more fields than shown below. This is just a sample form .

Sample form without all of the fancy headings and logos that you would put on your site
Step 4: Map the form fields to Advisors Assistant fields
This is where it all comes together and you tell the Advisors Assistant plug-in where to put the fields in the form when the data gets to Advisors Assistant.
1.In WordPress, Click Forms
2.Choose the Name that you used when you named your form. It might be called "Contact Us."
3.Go to Settings and then click Advisors Assistant CRM
4.Hover the mouse over Advisors Assistant CRM Feed and Click Edit

This tells Advisors Assistant where to put the data from the form
The fields in the red box on the left are the fields you can send to Advisors Assistant from the form.
When the Gravity Form sends the data to the Advisors Assistant API, this screen tells the API where to put the data.
Full Name and Last Name Field
If your form only has one name field where the full name is entered into that field, only map the name on the form to the Last Name in Advisors Assistant. However be sure you check the box to have the API Split the name your contact enters into Advisors Assistant's first and last.
We recommend that your form ask for first and last name separately because parsing the full name can get complicated with some entries.
Note Topic
If you enter a free form-note field, you can choose a Note Topic in Advisors Assistant for the note to be added. If the note topic does not exist for the contact, it will be created.
Primary Name Type
When a contact is added, you'll want to provide a name type, such as "Prospect From Website" or "Website Referral." This way you can search on names and get lists of names from your site. If the prospect becomes a client, just change the Primary Name Type to Client and make the website name type an additional type and you'll always know it came from your form!
Master Workflow GUID
You can identify a Master Workflow in Advisors Assistant and have it automatically initiated for the contact in Advisors Assistant. The workflow is identified using a field called the GUID, which is a Global Unique Identifier. To get the GUID for the Master Workflow:
1.In Advisors Assistant click Tools | Workflows | Workflow Masters
2.Double click on the name of the Workflow Master you wish to use.
3.Click on the Information Icon in the lower right ![]()

The Master Workflow's GUID
Use the Copy Button next to the GUID so you can paste it into the mapping screen.
Split "Last Name" into First and Last?
If your form only has one name field where the full name is entered into that field, only map the name on the form to the Last Name in Advisors Assistant. However be sure you check the box to have the API Split the name your contact enters into Advisors Assistant's first and last.
Feed Conditional Logic
You can tell the feed to only send the data to your Advisors Assistant database if certain conditions match.
For Example: You may have a drop down list on your form that has a choice of "Sales" or "Service." In the sample form above, we have the field "I am looking to speak with someone in the" and the contact can choose Sales Department or Service Department.
You can set a condition that says to only add the information to Advisors Assistant if they choose Sales Department. Gravity Forms will still send the email to your company with the form data, but it will not send the data to Advisors Assistant if Service Department is chosen.
You can have more than one condition by clicking on the little + sign.
You can tell the API that all of the conditions must match or to send the data if any of the conditions match.
Step 5: Test the Form
We can't overstate how important it is to test the form. Do not just rely on the developer testing the form, and don't just test one name. Try various ways of putting in information. Use test names so you can remove them from Advisors Assistant after you test.
Things to Keep In Mind & Feedback
There is an email backup to the form, so be sure that you check every contact record in Advisors Assistant created by your form(s). There will be some "back filling" to do, as the Advisors Assistant Gravity Forms interface does not support every field in Advisors Assistant, and it never will.
HOWEVER, we do want to hear from you if there are things you would like to see added to the Gravity Forms interface.