Add / Modify Event Templates
Click on Admin at the top of the screen and select Workflow Event Templates.
Add/Modify Event Template Overview
Event Templates make your Workflow Events reusable as you set up your Master Workflows. Set up a template when you will be using the same event with the same instructions in several Master Workflows.
Since these templates are used over and over, care should be taken to make sure they are complete, especially in the Instruction Note.
Setting Up A New Event Template
Follow these simple steps to set up a new template:
Step 1: Select Workflow Event Templates from the Admin Menu
You need to have the Task Security to add and modify master events in order to be able to set up Event Templates. Administrators always have this security, but other users can be assigned the security.

If you are modifying a template double click on it from the list, otherwise click Add
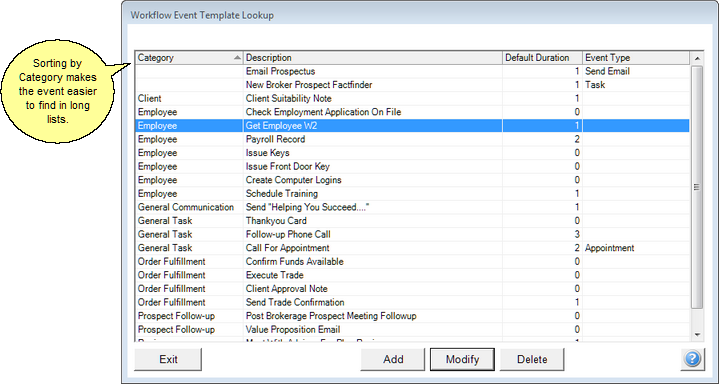
You can also use this screen to Modify an existing event template by clicking on the Modify Button.
The screen above shows all of the Workflow Templates currently in Advisors Assistant. To add a new template, click on the Add Button.

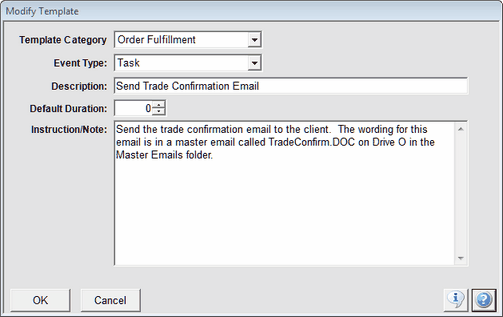
New Event Template Screen
Step 3: Complete The Add New Template Screen
Complete the screen above and click OK to add the new template.
Event Type
Select the type from the drop down list. This field is controlled by Advisors Assistant and the list is not changeable by users. We will entertain any suggestions for items to be added to the list.
The type is a way to show the user a short description of the nature of the task.
Appointment
The objective of the event is to set up an appointment with the contact.
Phone Call
The objective of the event is to call the contact.
The objective of the event is to send an email to the contact.
Correspondence
The objective of the event is to send some other type of physical correspondence to the contact, such as an application, or a notice.
Task
The objective of the event is to perform a task associated with the contact, such as setting them up on the computer, or assigning a password.
Event Category
This field is designed to be able to group the Event Templates on the lookup list. If you have a hundred or so templates, assigning categories will allow you to sort the list and locate the template you want more easily.
Category Examples
Annual Review
Order Execution
Welcome Process
New Prospect
Description
This field is a longer description of what gets accomplished in this step of the process.
Description Examples
Send Welcome Packet
Transcribe Meeting Notes
Confirm Appointment
Set Up Review Appointment
Default Duration
This is the number of days which is usually assigned to the event. The duration must be 1 or greater.
Instructions
This is a very important field as it will save the time of the person executing the workflow event and it will also reduce the amount of training and memory that is needed to execute various workflows.
Example of Email Instructions
1. Go to the Contact's View Screen In Advisors Assistant.
2. Click on the Contact's email address.
3. Type "Welcome" into the subject.
4. The text for this email is located in a word document called "Welcome Email Text.DOCX and it is located on Drive L:\Master Emails.
5. Highlight the text and click Edit | Copy or just press Ctrl-C on the keyboard.
6. Start a new email in Outlook.
7. Paste the text into the body of the email with Ctrl-V or click Edit | Paste.
8. Be sure the email is not being sent from your personal email box and that it is being sent from the company email address.
9. Add the Primary Producer's email address to the BCC field.
10. Send the email by clicking Send.
See Also
Calendar Interaction With Workflows
|
The Instruction notes are one of the most important part of this screen. |
