Add / Modify Master Workflow

Contents
Click on Admin at the top of the screen. Then click on Workflow. Next click on Maintain Workflow Masters.
Add/Modify Master Workflow Overview
Master Workflows get copied to a client and then become Active Workflows. This section describes how to set up or change a Master Workflow.
![]() Setting Up A Master Workflow (8:32)
Setting Up A Master Workflow (8:32)
Adding or Modifying A Master Workflow
Whether you are adding or changing a Workflow Master, the steps are very similar. You must have Security Task Rights in order to be able to Add or Modify Master Workflows.
Step 1: Use the Workflow Master Lookup Screen
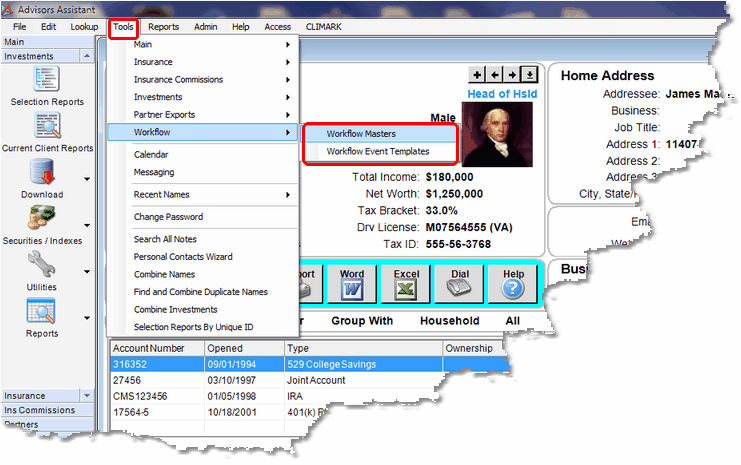
From the top of any View Screen, click Tools | Workflow | Maintain Workflow Masters.
Step 2: Click On The Add Button Or Modify Button
This Lookup Screen shows you what Master Workflows are already in Advisors Assistant. You can sort the list by clicking on the column headings.
When you are adding an entirely new Workflow Master, click on the Add Button. If you want to modify the events or add an additional event to an existing master, highlight the Master Workflow and click on Modify.

Your list of current Workflow Masters
Step 3: Add or Modify The Events Within A Workflow Master
The screen below shows an individual Workflow Master. If you are adding a new Master, the screen will be blank.
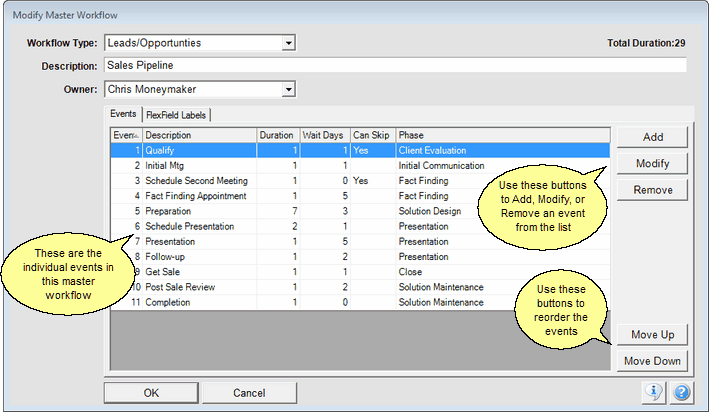
Workflow Type
This field is a list that is editable by users who have the security rights to edit lists.
Examples of Workflow Types
Review
Order Execution
Form Completion
Total Duration
This is the total duration for all steps in the workflow. It is calculated by Advisors Assistant based on the duration of each event and the Wait Days between events.
Description
Use this field to describe the Workflow itself. This field will get copied into the Active Workflow as its description.
Description Examples
Quarterly Review Preparation
Annual Review Checklist
Sales Pipeline
New Client Setup
New Employee Setup
Owner
The owner of the workflow is the person who is responsible for how the master was set up.
Detail
This is the list of each event in the Master Workflow. You can use the buttons to the right of the Detail list to modify the events, reorder them, or to add new events.
Step 4: Add or Modify A Master Event
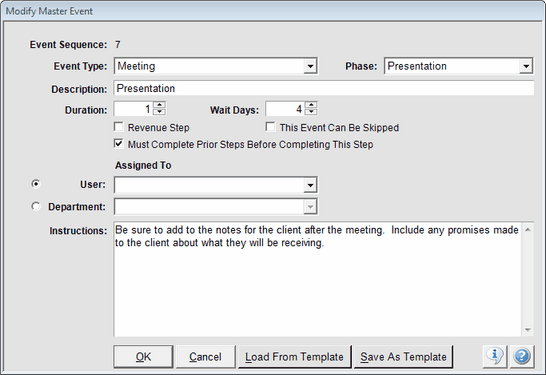
If you clicked Add on the previous screen, the screen below will be blank. If you highlighted one of the events and clicked the Modify Button, you can change the event in the Master.
Changing an event in the Master will have no effect on the active workflows that had been previously created from this master workflow.
Event Sequence
This field is maintained by Advisors Assistant and represents the step number in the sequence of events.
Event Type
The Event Type describes the general nature of the task.
This is a drop down list which cannot be added to by users. It is maintained by Advisors Assistant. However, you can use suggestions@climark.com to suggest additions to the list.
Examples of Event Types
Appointment
Phone Call
Correspondence
Task
Description
This is a longer description of the event. It should provide enough detail so the associate will generally know what is involved when looking at the description on a list, but not too long that it will not fit on one line of a list. The Instruction field is provided for details of how to execute the event.
Description Examples
Welcome Email
Employee Computer Setup
Prospect Setup On Computer
Duration
This is the number of days allocated to accomplish the event. The duration cannot be less than 1.
This is the number of days AFTER the completion of the event before the next event should start. This number cannot be less than 0.
When the next event is to be executed during the same time as the current event, use 0 wait days.
This should only occur when the next event is to be executed by a different user than the current event.
Note: If you use 0 Wait Days, you must use a Duration of 1 day for the system to be able to calculate the begin date of the next non-zero event.
Dependent And Independent Events
The Wait Days are what makes an event dependent on the previous event or independent of the previous event. If you put 1 or more Wait Days between event B and C, then C is dependent on the completion of B and will not become active until B is completed, However, even though it is not active, it can become overdue as a pending event. This is because the person who set up the master has set the timetable and it is assumed it should be adhered to.
Check this box if revenue is expected to be generated by this step. An additional field will appear on the Active Workflow Screen so that the amount of revenue can be entered.
This field can be filled in or left blank. When a Workflow Master is copied to an Active Workflow, the Advisors Assistant User assigned to the event can be changed. Default users can be filled in at that time.
If this box is checked, all events with lower sequence numbers must be completed before this event can be completed. When the "Must Complete Prior Steps" event is on the same day as a prior event, all of the events on that day may be completed in any order.
A later sequence number due on the same day can be completed.
Prior Steps Example 1
Sequence Number 3, 4, and 5 are all due on the same day. Sequence Number 6 is due 3 days later. Only number 5 is marked that prior events must be completed.
Sequence Numbers 3, 4, or 5 can be completed in any order. You can complete 5 before 3 or 4. Since number 6 does not have the box checked, there is no requirement that prior events are completed, so number 6 can be completed at any time.
Prior Steps Example 2
Sequence Numbers 1, 2, and 3 all have due dates 2 days apart. Number 1 is due on Sep 5, number 2 is due on Sep 7 and number 3 is due on Sep 9. Sequence Number 3 is marked that you must complete prior steps.
You will not be able to complete Sequence Number 3 until numbers 1 and 2 are completed.
Prior Steps Rules
If the "Must Complete Prior Steps" box is checked, Advisors Assistant looks back at all prior steps and you must complete them before completing this step. The exception is steps that are due on the same day as the step that is checked.
Steps is plural, so the rule applies to ALL prior steps.
If the "Must Complete Prior Steps" box is NOT checked, Advisors Assistant does not look back to check any prior steps.
Instructions
This is an important field because it allows the person who owns the Workflow Master to provide details about how they expect the event to be executed. It will help prevent mistakes and streamline training.
Load from Template Button
When adding a new event to your Workflow Master, you can click on the Load From Template Button to get a list of the Event Templates in your library of templates. When you are modifying an event in the Workflow Master, and an Event Template was used, the name of the template will be on the list shown.
If you are modifying an event here, you should consider modifying the event template if the modification is permanent.
This button will be available if you left the Event Template blank. If this event will be reused in other Master Workflows, you can create a template from it.

Creating The New Template
When you create a new template, all you need to do is to give the Workflow Event a Category so that it will be easier to find on the Workflow Event Template Lookup Screen. Click on the field to pull down the list.
The export feature allows you to share workflows with others Advisors Assistant license holders in a group you may belong to. When you export the Master Workflow, data such as the default Advisors Assistant user is left blank because the database that imports the master workflow will not have that same user.
To Export A Workflow:
| 1. | From the Workflow Master Lookup Screen, click on the Export Button. |
| 2. | Choose the File Name And Location for the export file. The File Name will default to the name of the Master Workflow, but you can change it. Remember the location on your Hard Drive. Do not change the file type. It will be XML. |

Setting The File Name
| 3. | Click the Save Button. |
Note: If you email the file, some emailers will not allow an XML file type to be received and will filter the email. You may need to rename the file to .TXT when emailing. Tell the person on the other end to rename the file back to XML. To rename, right click on the file in Windows Explorer and change the "XML" to "TXT": Leave the dot before the XML alone.
Importing Workflows
To import a workflow, you will need to know where the workflow file that you received is stored. Just use the Import Button to locate the file and it will import automatically.
After importing, you should edit the workflow to do the assignments that would be custom to your company.
See Also
Calendar Interaction With Workflows
|
When setting up Workflow Masters, involve the associates who actually perform the tasks. Careful planning will prevent the need to revisit the masters to make adjustments. |