Add / Modify Master Event

Contents
From the Admin Menu (top of screen) click on Workflow | Maintain Workflow Masters. Choose (or Add) a Master Workflow. Then click on the Add or Modify Button to add or modify an event.
Add/Modify Master Event Overview
Events can only be added through setting up Master Workflows. You cannot not add NEW Workflow Events to Active Workflows. It is assumed that the steps of a workflow have been thought out well in advance and that those executing workflows should not be adding events.
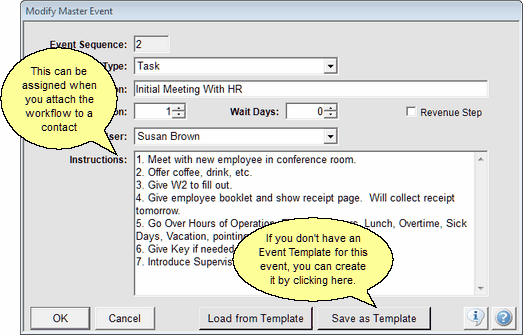
Event Sequence
This field is maintained by Advisors Assistant. It is the numeric number of the step in the workflow.
Template Category
The Category is used to group the Master Event Templates so they can be found in the list easier. The field is on this screen for information only. It cannot be changed.
Event Template
Event templates are like master events so that, when setting up an event in a master workflow or an active workflow, you don't need to fill in all the details of an event. This makes events reusable. You can add and modify Event Templates.
Event Type
The event type gives tells you the nature of the event for that particular step. The Type Field List cannot be edited by users. It is maintained by Advisors Assistant. If you would like a type added to the list, please contact suggestions@climark.com with how the new list item will be used.
Event Types
Set Appointment
Phone Call
Send Correspondence
Task
Event Description
This is the short description of the event. Actual instructions and more descriptions can be put into the instructions field. This is different from the Workflow Description which defines the entire process.
Duration
The duration is the number of weekdays that are allocated to accomplish the event. A day is defined as the work day. When you assign a Begin Date while you assign a new active workflow, the Duration and Wait Days control the begin and Due Dates of all of the events.
Wait Days
This is the number of weekdays between the Due Date of the event and the Begin Date of the next event. It is the number of days before the next event is scheduled to start.
Revenue Step Check Box
Checking this box designates the step as a Revenue Event. It means that this event should produce revenue. When you check this box, the event's Revenue Field will become active. If the box is unchecked, the Revenue Field is inactive and cannot be filled in.
Default User
The Default User is the person that, at the time you are setting up the Master Workflow, you KNOW will be performing the Event. There may be only one person in the entire organization or a particular department that you know will be performing the Event. You can assign that person here.
For Example: Setting up a new employee on the computer system or adding a person to the payroll system.
Leave this field blank and the field will be filled in when the workflow is assigned to a client.
Instructions
This is a very important field and it is only available to edit on the Master Workflow. It cannot be edited after the workflow is assigned to a contact.
The purpose of this field is:
| • | Guide the person performing the event on how to execute the task(s) |
| • | Provide the location(s) for documents and tools needed to perform the task. |
| • | Reduce the training and supervision needed. If the instructions are right there, it is easier for the person to perform the task. |
| • | Increase efficiency. The person will not have to go ask people for the location of master documents, programs that need to be executed, brochures to send, etc. |
Example Of An Instruction
Send the Welcome Aboard letter to the new client. The letter is located in K:\Master Letters. The letter is called New Client Welcome.DOCX.
If the client has multiple addresses, address the letter and envelope (K:\Master Letters\Master Envelope.DOCX) using the HOME address.
Use the engraved letterhead.
Put the unsigned letter on the Account Executive's desk for review and signature.
Load from Template Button
When adding a new event to your Workflow Master, you can click on the Load From Template Button to get a list of the Event Templates in your library of templates. When you are modifying an event in the Workflow Master, and an Event Template was used, the name of the template will be on the list shown.
If you are modifying an event here, you should consider modifying the event template if the modification is permanent.
Save As Template Button
If you don't have an Event Template set up for this procedure, just leave the field blank. When you're finished with the event, you can create a template by using the Save As Template Button.
When the Event Template Field is filled in, this button will dim and it won't be selectable.
See Also
Assigning Workflows To Contacts
Calendar Interaction With Workflows
|
Before you create a template with the Create Template Button, be sure the instructions have been discussed with one of the associates who will be doing the task so you have their input. |