Configuring Your Dashboard
Click on the Dashboard Button on the Menu Bar near the bottom left of the screen. Then click on the Setup Button at the bottom of the Dashboard.
OR, just right click on the Dashboard Button to go directly to the Dashboard Setup Screen.
Setting Up Your Dashboard
Setting up your dashboard involves two steps:
| 1. | Deciding which Widgets to place on your Dashboard. |
| 2. | Setting up each Widget to display the data you want it to. |

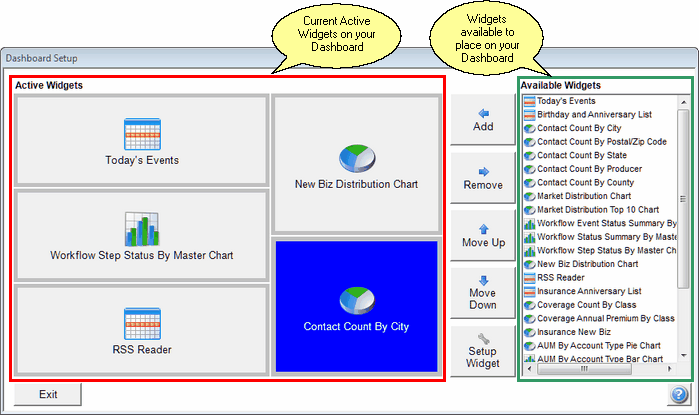
Dashboard Widget Setup Screen
Placing Widgets On Your Dashboard
Before you place a Widget, you have to make sure there is enough room. On the screen above, there are already 5 Active Widgets, so to add a new one, you would need to remove one of the Widgets.
Active Widgets are those which are on the left of the setup buttons, outlined by the red rectangle above.
Available Widgets are the Widgets on the right side of the screen, outlined by the green rectangle above.
Remove A Widget From The Active Widgets 
To remove a Widget, just click once on the Active Widget, and then click on the Remove Button.
Add A Widget To Your Dashboard 
Once you have a space available, highlight a widget on the list of Active Widgets and click on the Add Button.
Repositioning Widgets 

You can move Widgets up and down as long as there is an empty space into which you want to move the Widget.
Setting Up Each Widget
After you have set up the Widgets and positioned them on your dashboard, you should configure each Widget, customizing it to meet your specific needs.
| 1. | Highlight the Active Widget you want to configure. Active Widgets are to the left of the buttons. |
| 2. | Click on the Widget Setup Button.  |
Individual Widget Setup
Here is a description of how to set up each widget.
Today's Calendar Events
This widget takes no setup, but double clicking on an event will open up the details of the event.
See Also
