Import List Wizard Page 3

Contents
Import Mailing List Wizard Step 3: Map Fields
In Step 3, you need to tell Advisors Assistant where to put the data that is being imported from your mailing list. This is called "mapping the fields."
This screen has four columns. The first two columns are referring to the data that is being imported from your list, the Source File. The second two columns are used for you to tell Advisors Assistant where to put that data in the Advisors Assistant database - the Target Fields. You can click on a column to sort the data by that column - you may wish to click the Source Field Column to group the data from your import file together by field name.
This Map Fields Screen also allows you to
| • | Load a mapping from a previous import |
| • | Save the current mapping for use with future imports |
| • | Map one field from your source file to more than one field in Advisors Assistant's Target Fields |
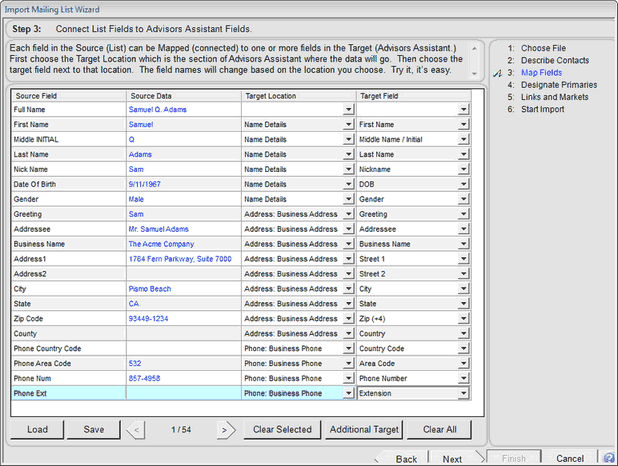
Basically, you will be selecting a Target Location and Target Field for each field being imported from your import file. This tells Advisors Advisors where to put the data in the Advisors Assistant database.
Source Field
The Source Field Column will be the list of fields from your import file. If your import file has field names listed in the header file, you will see the actual field names listed in this column. If your import file did not have field names included in the header file, you will see F1, F2, F3 to indicate the different fields.
Source Data
The Source Data Column will list the actual data in your import file. So you should see names, addresses, etc. in this column. This data is shown to help you map the source fields to the target fields in Advisors Assistant.
You can also scroll through the names in your file by using the arrow keys located at the bottom of this column. You'll see a Back Arrow and Forward Arrow, with the current record number and the total records in the file in the middle of the arrows. If you have a question about what is in a particular field, scroll through the records to see sample data to help you figure out what the source field contains.
Target Location
The Target Location Column is used to tell Advisors Assistant the main location for the data from the Source File. Before you can select the field for the data from your import file, you must first narrow down the location. This allows you to add multiple addresses and phone numbers into Advisors Assistant. Click the Down Arrow Button to see the list of Target Locations.
If the data from your import file is basic name data, such as a first name, birthdate, or occupation select the Name Data option. If the data from your import file is custom, and there is not a field in Advisors Assistant for that data, you can select the Name FlexField option and select one of the 30 FlexFields in which to import the data (if you import into FlexFields make sure you write down what data you're putting into the FlexFields so that you can name the FlexField Labels later.)
The Target Location List will also show the Address and Phone Location codes that are in your Advisors Assistant. So if you are importing the Home Address, be sure to select the Home Address option from the list to have the address imported correctly. You will be able to import any address or phone number for which you have a Location Code in your Advisors Assistant, 4 separate Email Addresses, and 1 Web Address per contact name.
Examples
Name Data
Name FlexField Data
Home Phone
Business Phone
Target Field
Select the field in Advisors Assistant that matches the data being imported from your source file. The list of fields shown will be based on the Target Location you selected earlier. Be sure to match the fields correctly or the data will be put in the wrong place in Advisors Assistant. Click the Down Arrow Button to see the list of Target Fields.
When you are importing phone numbers, you have choices based on how the data is listed in your source file. If the import file only has one field for the entire phone number, be sure to select the Full Phone option in the Target Field list. If your import file separates the area code from the phone number, be sure to select the different fields from the Target Field list so that the phone numbers get imported correctly.
Examples
First Name
Full Name
Phone Area Code
Full Phone
Once you have mapped all of the Source Fields you wish to import, click Next to move to Step 4 or Step 5.
How to Map One Source Field to Multiple Target Fields
You may have a field from your import file that you wish to have entered into more than one field in Advisors Assistant. For example, if your source file has an occupation field you might also want that data to be used for the Title in the address. To map one source field to multiple target fields:
| 1. | Highlight the Source Field. |
| 2. | Click the Additional Target Button located at the bottom of the screen. This will create another line in the table with the same Source Field. |
| 3. | Select the Target Location and Target Field for this duplicate Source Field. |
Phone Numbers
Make all attempts to separate the phone numbers into area code and phone number. For non-US numbers, you must use the country code and map the country code to the phone country code.
How to Save the Mapping
If you think you may import a list formatted the same way as this source file, you can save the field mapping you've just set up. After you've selected all of your Target Fields, click the Save Button at the bottom of the screen and give the mapping a description. Your Mailing List Map has now been saved.
How to Load a Saved Mapping
If you're importing a list that is in the same format as a previous list import, you can load the field mapping from that list. Click the Load Button, and the Mailing List Maps Screen will open. Select the list and click OK. Additional help is available for the Mailing List Map Screen.
Clear Selected
If you have mapped a field in error, highlight the Source Field line and click the Clear Selected Button. The Target Location and Target Field will be cleared for that Source Field.
Clear All
The Clear All Button will clear every field mapping on the screen. Only click this button if you mapped all of the fields in error and you wish to start over.
See Also