Add/Modify Household or Group

Contents
To get to this screen, click on either the Add or Modify Action Buttons in the middle of the View Client With Households or Group Screen.
![]() Group/Households Tutorial (8:18)
Group/Households Tutorial (8:18)
Add/Modify Household or Group Overview
If a contact in your Advisors Assistant is an Individual, this screen will be labeled Household. If a contact in your Advisors Assistant is flagged as a Group (organizations) this screen will be labeled as a Group.
Once you've grouped people into households and groups you can run reports for that household or group.
From this screen you can:
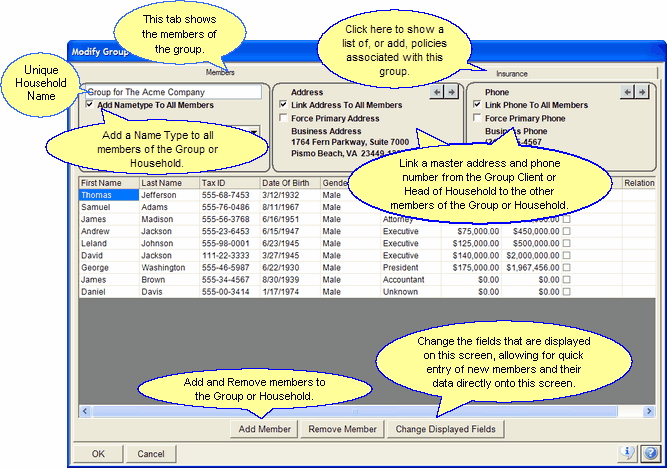
•Easily add or modify the members of a household or group.
•Link a single master address or phone number from the Group Client or Head of Household to the other members of the group or household. If you link an address and/or phone number, if you change that address or phone number in the future it will be changed for all of the members of the group or household.
•Send Dependent Data to Application Automation programs like Laser App. Additional information is available in the Application Automation Help.
•Add Policy Certificates to Group Insurance Plan Participants based on Master Policies. Additional information about using this screen for Group Insurance is available in the Group Insurance Overview Help.
Before you can add members to a Group or Household, you must first mark the contact as a "Head of Household" or "Group" on the Add/Modify Name Screen. Once that is done, from the View Client With Household/Group Screen, click on the Add Action Button.

Add New Member Screen
The first step in adding a new member is either selecting a name from Advisors Assistant to add to the group or household or add a new name to Advisors Assistant that you want then add to the household or group.
1.The Modify Household/Group Screen will open, and the Add New Member Window will be open. Either select a name from Advisors Assistant to add to the Household/Group, or add an entirely new name to the Household/Group.
2.If you are adding an entirely new name to the household/group, you will be taken to a new blank line in the list of members. Click in the first field on the left of the screen and enter the information as it applies to the member you are adding, using the Tab Key to move from field to field. Once you are done entering the data either click the Add New Member Button to add another name, or click OK to save your changes. The name will be added to Advisors Assistant as a separate name record.
Before adding entirely new names to a household/group, you should make sure the fields that you wish to enter are visible on the Modify Household/Group Screen. You can change the fields showing on the screen using the Change Displayed Fields Button. See below for additional information.

Adding or Modifying Members To A Group Or Household
How to Modify Members
1.From the View Client With Household/Group Screen, click on the Modify Action Button.
2.You can then make any changes to the fields shown for that member on the Modify Household/Group Screen. This will change the information in their name record in Advisors Assistant. You can also make changes directly to the name record they have in Advisors Assistant.
Removing a member from a Household or Group does not delete the name record from the Advisors Assistant Database, it only removes the name from the Household or Group list. If you wish to delete the name from the database you will need to go to the name record and delete the name.
•From the View Client With Household/Group Screen, highlight the name you wish to remove from the household/group and click on the Delete Action Button. You will be taken to the Modify Household/Group Screen and the name will be crossed out. Click OK to save your changes.
•From the Modify Household/Group Screen, click in any field of the member you wish to remove from the household/group and click on the Remove Member Button. The name will be crossed out. Click OK to save your changes.
How to Change the Displayed Fields
1.From the Modify Household/Group Screen, click the Change Displayed Fields Button.
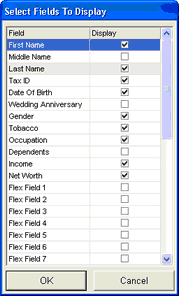
2.The Fields To Display Screen will open. Check mark the fields you wish to show on the screen. If a field is checked that you do not wish to show, uncheck that fieldname.
3.Click OK to save your changes, and those fields will now be shown on the Modify Household/Group Screen. You may have a scroll bar on the screen if you have selected more fields than will fit, but you can easily scroll over to the fields not showing on the screen.
Addresses And Phones
You can link the head of household's address or phone number to the members and then changing the head of household's address will change the linked members' addresses. However, you can still have a custom Greeting, Job Title, and Addressee for the member's address.
Only one address or phone can be linked. If you use the arrow buttons to toggle to a different phone and then click OK at the bottom of the screen, that address or phone will become the new linked record.
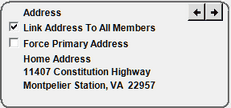
The box above shows the primary address for the head of household. In this case, it's the Home Address. You can link this address to all the member's records by checking the Link Address To All Member's box.
You can make the linked address the primary address by checking the Force Primary Address box.
Note: If you have already hand entered an address on the member's record, checking the link box does not link THAT address. That address was manually entered and will need to be maintained manually.
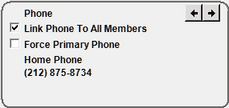
The box above shows the primary phone for the head of household. In this case, it's the Home phone. You can link this phone to all the member's records by checking the Link Phone To All Member's box. You can force it to become the Primary Phone by checking the Force Primary box.
Note: Like the address, if you already have a home phone, this will create a second phone record. Changing the Head of Household's phone number will only change the linked phone number and not the manually entered phone number.
In the Upper Left Corner of the Modify Households or Modify Groups Screen, you can type in a unique name for any Household to differentiate it from similar groups or households. This name will appear on reports and on the Household Lookup.
For example: On the screen above, the name of the group is "Group for The Acme Company," so you can change it to "The Acme Company Group" by just typing it in.
You can assign a name type to all the members of the household by choosing the name type in the drop down box and checking the box to assign to all members.
If the box is unchecked, the name type is not assigned to any member. Unchecking the box does not remove name types already assigned.
See Also
View Client With Group/Household
Printing Group/Household Reports
|
When you're setting up Households and Groups, be sure to name the Households and Groups consistently throughout your database so that you can find the names when you look them up.
For example, decide if you're going to name the households "The Madison Family" or "James Madison Family" or keep the default of "Family of Madison, James." |