Add/Modify Name

Contents
To add a new name, click the Plus Button (![]() ) located to the right of the current name you are viewing. To modify an existing name, click anywhere in the large box in the top left section of any View Client screen.
) located to the right of the current name you are viewing. To modify an existing name, click anywhere in the large box in the top left section of any View Client screen.
![]() Add/Modify Name Tutorial (7:15)
Add/Modify Name Tutorial (7:15)
Add/Modify Name Overview
•The Add/Modify Name Screen allows you to add or modify any contact name in your Advisors Assistant database.
•These names are the main point of reference for additional information ranging from notes, calendar events, interests (markets), products, and even relationships with other names.
•Most of the fields on this screen are available to be searched upon for reports.
•Many of the fields are designed to help with automating applications.
•There are tabs across the top of the window for you to enter additional information, such as Flex Fields and Application Info.
•When you add a new name to Advisors Assistant it defaults to adding an individual's name. To change between an Individual and an Organization, click the Change To Organization/Change To Individual Button at the bottom of the window.
The rule is: If a contact is not an individual, one single person, then the contact is an organization. IBM Corporation is an organization. Smith, John & Mary is an organization because it's more than one person. You can have the name filled in as an organization like the Smiths and still address everything based on the addressee in the address section. The name can be "Smith, John and Mary" and the addressee can be "John and Mary Smith" Normally Mary would have her own contact record and be listed as a spouse in John's and John would be the spouse in Mary's. But if you needed a Joint Tenant contact record, use an organization.
How To Add A New Contact Name
There are two ways to add names to Advisors Assistant. You can very quickly and easily add a name at any time, but we recommend looking the name up first to make sure you're not adding a duplicate name to your database.
Looking Up and Adding a Name:
1.From any View Screen in Advisors Assistant, either click on the Lookup Name Icon in the Sidebar or press Alt-Q on the keyboard to open the Name Lookup Screen.
2.Enter the Last Name and First Name of the individual, or the Organization Name you are looking up.
3.If the name is not in the database, click on the Add Button located at the bottom of the Name Lookup Screen.
4.Enter the contact's information. For details about each field, please see below.
5.Click OK to save the name. You will immediately be able to enter the contact's address and phone number, or click Cancel on the Address Screen to just add the contact name. Once the name, address and phone number are added you can add additional addresses and phone numbers.
Adding a Name without looking it up first:
1.From any View Client Screen in Advisors Assistant, click on the Plus Button (![]() ) located to the right of the name you are currently viewing.
) located to the right of the name you are currently viewing.
2.Enter the contact's information. For details about each field, please see below.
3.Click OK to save the name. You will immediately be able to enter the contact's address and phone number, or click Cancel on the Address Screen to just add the contact name. Once the name, address and phone number are added you can add additional addresses and phone numbers.
The Name Type fields describe who the contact is. They allow you to store several different “lists” of names in one big database so you’re not switching between programs all of the time to view a different list of names. It also gives you a lot of flexibility with your reports.
Some Name Type examples are:
Client |
Group Insurance Client |
Producer |
Prospect |
401k Client |
Rotary Member |
Vendor |
Mailing List Name |
Church Group Member |
Friend |
Trust |
The View Client Screen will list the Primary Name Type and the next 2 Types listed on the name screen, which are listed in the order they are added to the name. The Type of Name is entered using Advisors Assistant’s Abbreviation Lists, so you can customize the Name Types in your database.
The Primary Name Type is the contact's main name category, like Client or Prospect. To select a Primary Name Type, click on the drop down box and choose one from the list.
The Primary Name Type is the type that gets exported to mail merge files and reports. The other name types are only used for searching.
Other
The Others field is a place where you can store more than one Name Subtype for your contact. This is simply another level of categorization for sorting your contacts. Click on the "+" button to bring up a list of available Name Types to add a new Type or highlight an existing Type code and click on the "x" button to remove it. In the example below, the name with these types would come up on a report of just Clients, a report of "A" Clients, or a report of Friends.
Examples
Primary: Client
Others: Level A Client
Business Client
Friend

Edit Name Fields - Detail Tab
Details about each field name are listed below. Unless otherwise specified, the fields listed below pertain to either just Individuals or both Individuals and Organizations.
Examples of Abbreviations you can use for each field are sent with Advisors Assistant, but almost every field in Advisors Assistant has a list that is customizable by you so that you can add your own abbreviations. More help about adding and modifying abbreviations is available in the Add/Modify Abbreviation Help.
This check box allows you to indicate whether the contact in question is the head of their particular household or the master policy owner of a group contract. Place a check in the box for Yes or leave the box empty to indicate No. You can also use this box to take advantage of Advisors Assistant's Household feature. If checked, you will be able to add members to this Individual's Household. For more information about Households, see Modifying Households/Groups.
When a name is an Organization, all 'household references' are changed to 'group' references.
Unchecking Head of Household
Advisors Assistant will prevent you for unchecking this field if there are any household members. In order to uncheck the field, first, remove the household members (Using the Household Tab) from the household and then you will be able to uncheck the field.
First Name
This is your contact's first name. This does not appear if the contact is an organization.
Middle Name
This is your contact's middle name. This does not appear if the contact is an organization.
Last Name
This is your contact's last name. In the case of an organization, the entire business name is stored in this field.
Household Name
The Household Name will be used when printing Household Reports, and you can decide how you'd like those reports to be printed.
Examples
Family of Madison, James
James and Dolley Madison
The Madison Family
Nickname
This is your contact's nickname, if applicable.
Examples
Jack might be a nickname for John
William may go by Bill
Elizabeth may like to be called Liz
Gender
This is the gender of your contact.
Tobacco
This field is for storing whether or not your contact uses tobacco products.
Soc Sec No
This is for your contact's Social Security or Tax ID number, if applicable. Hyphens are optional, but should be entered if you wish the number to have hyphens when be printed.
Date of Birth
Clicking on this drop down box will bring up a calendar for choosing the birth date of your contact. Or you can just type in the numbers for the birth date.
Marital Status
This drop down box gives you an array of options to choose a marital status. If you don't see one that fits the particular situation, just use Unknown.
Examples
Single
Married
Divorced
Anniversary
This field is mainly used for the contact's Wedding Anniversary, although it could also be used for the Account Anniversary. You would need to decide which way you will be using the field for your entire contact list so that your reports would print accurately. With this field you can get a list of clients with an Anniversary in a particular month, regardless of the day or year. Clicking on this drop down box will bring up a calendar for choosing the anniversary date, or you can just enter the numbers directly.
This is a free-form text field where you can enter information about the dependent status of your contact to be used in reports.
Examples
SPOUSE + 2
SPOUSE ONLY
Dependents
This is simply the number of dependents that the contact has.
The phase ties into workflows. As a contact's active workflow moves from one step to another, the workflow step can control the "phase" the contact is in. When a workflow step is completed, the Phase associated with the next step, if any, will be copied to this field. Users can also manually change the phase, but the next time a workflow step is completed, it will still be updated.
Status
You can use this field to determine the activity level of your contact.
Examples
Active
Inactive
Deceased
Earned Income
You may use this numeric field to store your contact's annual earned income. You do not need to enter the dollar sign.
Occupation
Click on this drop down to choose from a list of occupations, or add your own abbreviations.
Examples
Small Business Owner
Attorney
Medical Doctor
Total Income
You may use this numeric field to store your contact's total annual income. This might be inclusive of investments, child support, etc. You don't need to enter the dollar sign.
Spouse
The Spouse field allows you to select the spouse's name from the list of names entered into Advisors Assistant (or quickly add the Spouse's Name.) Clicking on the ellipses (![]() ) will open the Name Lookup Screen, where you can then select the name in Advisors Assistant that represents the current contact's spouse. If the spouse has not been entered in your Advisors Assistant database, you can click on the Quick Add Button, located at the bottom of the Name Lookup Screen, to quickly add them to the database. If you do not wish to have the spouse's name added to your database, you could leave this field blank and use a Flex Field to just store the spouse's name without entering it into the database. If you are using an application automation program like Laser App or Quik! Forms we recommend entering the spouse into Advisors Assistant so that their information can also be sent over to the form program for quick insertion into your applications.
) will open the Name Lookup Screen, where you can then select the name in Advisors Assistant that represents the current contact's spouse. If the spouse has not been entered in your Advisors Assistant database, you can click on the Quick Add Button, located at the bottom of the Name Lookup Screen, to quickly add them to the database. If you do not wish to have the spouse's name added to your database, you could leave this field blank and use a Flex Field to just store the spouse's name without entering it into the database. If you are using an application automation program like Laser App or Quik! Forms we recommend entering the spouse into Advisors Assistant so that their information can also be sent over to the form program for quick insertion into your applications.
Net Worth
You can use this numeric field to store the net worth of your contact. You do not need to type the dollar sign.
Enter the Contact's tax bracket as a percentage.
Send Mail
If a client requests to be removed from your "marketing mailings" you can use this drop down box to mark them as a "do not mail." Then this field can be used as a filter for your marketing mailings, but critical mailings can still be sent to the entire contact list when needed.
Use this field to code whether or not it is appropriate to send email mailings to this contact, similar to the Send Mail option above.
Call
A contact can be put on a "Do Not Call" list by marking this field No. Call Reports can also be filtered based on this field.
The Primary Producer is the account executive most responsible for the client and communications with the client.
Click on the ellipses (![]() ) to open the Producer Lookup Screen. This will allow you to select the Primary Producer associated with this contact's name. If the Producer's name is not on the list, it can be easily added. For more information about the Producer List see the Producer Lookup Help. The primary producer and additional producers are significant because these fields controls access rights for the multi-producer system.
) to open the Producer Lookup Screen. This will allow you to select the Primary Producer associated with this contact's name. If the Producer's name is not on the list, it can be easily added. For more information about the Producer List see the Producer Lookup Help. The primary producer and additional producers are significant because these fields controls access rights for the multi-producer system.
In a Multi-Producer 3/22/2016 2:39:28 PM, you can share a client among more than one producer by adding access rights. Click HERE for more information. You can also add the producer's
This field is typically of more use to Broker Dealers, Home Offices, and larger operations than it is to offices with just a few producers.
A single producer may have more than one ID reference in the enterprise for various reasons. Advisors Assistant has the ability to associate a single producer record with multiple ID’s and one of those ID’s with a client record.
You must enter the producer name before you can associate a Producer ID.
The Producer ID is maintained by various downloads. It can also be maintained in the Maintain Producers Section from the Admin Menu.
It is OK to leave this field blank and only use the Primary Producer field to identify the producer associated with a name.
There are the names of producers also involved with the client and have access to the client's information. You can add to this list by clicking on the + just above the field.
You can populate this by selecting either individual producers or by selecting a team when you click on the +.
Advisors Assistant will take you to the contact's social media page based on the entry here. Do not use the entire address. Only use the ID. Examples of various ID's are shown below

Social Media Examples
Addresses for social media are entered on the Add / Modify Name Screen.
Color vs Grayscale Icons
You can tell if there is an address that can be clicked on based on the social media icon.
![]()
![]()
If the icon has color, there is an address. If there is no color, the address field is empty. (Google+ color is at the very top of the icon.) The icons above on the left all have an address associated with them. The set of icons on the right do not have an address associated with them. Each icon stands on it's own.
An example of only using the Facebook ID is:
Facebook Example
AdvisorsAssistant
Linkedin uses slightly different ID's for individuals vs companies
Linkedin Individual Example
https://www.linkedin.com/in/patdempseycm
Linkedin Company Example
www.linkedin.com/company/advisors-assistant
You can also just go to the person's linked in page and copy the address beginning with the "www"
Be sure to test the result after saving it.
An example of a Twitter ID is shown below:
Twitter Example:
AdvisorsAssist
Google+ ID's begin with the "+" symbol.
Google + Example
The following example is provided with the user's permission.
Flickconfreres
![]() Information Icon
Information Icon
Shows when the record was created and last edited, and the initials of who created and edited the record.
![]() Help Icon
Help Icon
Opens Help for this window.
Identification Fields
To comply with the Patriot Act, we have included fields to accommodate the required information. This information is also passed over to Laser App and Quik! Forms for your applications.
Drivers License
This field stores the Drivers License for the Individual.
State
The State in which the Individual has their Drivers License.
Issued
Enter the Issue Date for the Drivers License.
Expires
Enter the Expiration Date of the Drivers License.
Citizenship Nation
Use this field to store the nation of citizenship for the Individual.
This field is a drop down list but you can also just fill in the field if the value you want is not on the list.
This is a social Insurance number used for medical insurance. In non-US countries, please use it as such.
Passport Number
Enter the Individual's Passport Number.
Issued
Enter the Issue Date for the individual's Passport.
Expires
Enter the Expiration Date of the Passport.
Residency Status
Use this drop down list to choose the Residency Status for the Individual. If an appropriate selection is not found, you may add or edit your own by choosing Edit List...
Examples
Citizen
Resident Alien
Non-Resident Alien
Non-Citizen ID
Use this field to store a Non-Citizen ID, if applicable.
Issued
Enter the Issued Date of the Non-Citizen ID.
Expires
Enter the Expiration Date of the Individual's Non-Citizen ID, if applicable.
Organization Field Details
Group Client
Use this box to take advantage of Advisors Assistant's new Householding/Grouping feature. If checked, you will be able to add individual members to this Organization's Group. For more information on this, see Modifying Households/Groups.
Organization
Use this field to store the name of the Organization.
Examples
The ACME Company
Bob's Do-It-Yourself Roofing
The Smith Family Trust
Established
This is the Date that the Organization came into being.
Fiscal Yr End
If applicable, this is the Date at which the Organization's Fiscal Year comes to a close.
Tax ID
This text box is for entering the Tax ID for the Organization, if applicable.
Business Entity
A Business Entity is a Corporation, Proprietorship, Partnership, Sub-S Corporation, or other form of business. When you enter the information for a Business Entity, you use the Organization entry screen. When you are entering the field Business Entity, enter the type of Business, such as Corporation or Partnership.
Employees
Use this field to enter the number of Employees the Organization has.
Sales
This field allows you to keep track of the Annual Sales of the Organization.
Profits
This field helps you track the Annual Profits of an Organization.
Assets
The Assets field is for listing the amount of Assets the Organization owns. This information is entered and updated manually.
Industry
The Industry drop down provides you with a pre-defined list of Industries to choose from for your Organization. If you don't see an Industry that is appropriate, you may add or edit your own by scrolling to the bottom and selecting Edit List...
Examples
Financial Services
Advertising
Small Business
Contact
Use the Contact field to designate a Name in your Advisors Assistant database to be the main Contact for this Organization. Clicking on the ellipses will display the Name Lookup Screen. If the Name doesn't exist in Advisors Assistant you can quickly add your own by using the Quick Add feature on the Name Lookup Screen.
FlexFields
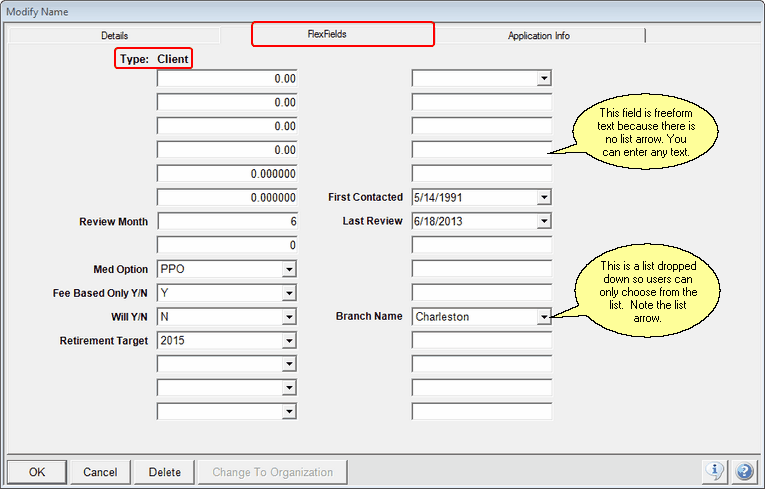
You have access to thirty FlexFields in Advisors Assistant! FlexFields are fields that you can customize, and name the label anything you'd like. You can also search on the information stored in the Flex Fields and customize your own reports. For more information about changing the titles of the FlexFields, please refer to the Modifying Flex Field Titles Help.
![]() Application Info
Application Info
Advisors Assistant integrates with Application Automation Programs like Laser App and Quik! Forms to help you fill out applications quickly and easily. In addition to basic name and address information, the information on the Application Automation Screen is sent to the application program. Once you fill out this screen, all you have to do is click on the Forms Icon in the Sidebar to open the application program you have installed on your computer (the application programs are sold separately.)
Additional information about automating applications is available in the Application Automation Help.
How To Modify A Contact Name
To make changes to a name that has already been added to Advisors Assistant, just click anywhere in the left corner of the View Client Screen that has the basic name information (such as the Name Type and Birthdate.) The Modify Name Screen will open so that you can make your changes. Click the OK Button to save your changes, or the Cancel Button to leave the screen without saving your changes.
How To Delete A Contact Name
To delete a name from your database, first Modify the name. Then click the Delete Button at the bottom of the Modify Name Screen. You will be asked to confirm the deletion.
When Advisors Assistant connects to other databases, it is necessary to store information about those connections, called key fields, in Advisors Assistant. This screen shows a list of these fields.

Other Databases Tab appears only if there is information stored there.
This tab is only visible when information is stored on the screen.
Normally, you would not delete the ID's associated with other databases. It will break the connection between Advisors Assistant and that program for this contact. Do not delete an ID unless you are sure you don't need it.
Disconnecting A Contact From Outlook
The link that connects a contact in Advisors Assistant to the contact in Outlook is stored here.

This shows that 3 users' Outlooks are linked to this contact's name
On the screen above, you can highlight a user's link and use the Delete Database ID button to delete the connection between Outlook and Advisors Assistant. Then, deleting information in Outlook will have no effect on the name in Advisors Assistant because Outlook will not find a link in Advisors Assistant.
HOWEVER, if Autosync is ON and you create an event in Advisors Assistant, it will sync back to Outlook, possibly duplicating the contact in Outlook.
Basically, if you want to Autosync, we have to do the Autosync. But if you are finished with a contact and want to break the link between Outlook and Advisors Assistant, you can do that.
You can enter alert notes under Modify Names on the Alert Note Tab. When there is any text in the alert note, the Alert Note Icon, shown above will appear on the View Screen.

You enter Alert Notes from the Alert Note Tab
The Alert Note saves when you click OK at the bottom. This saves the information under all of the tabs. The Alert Note Icon will appear on all of the View Screens so that it is hard to miss.

Double Click on the Alert Icon to read the alert.
If there is no alert, the Alert Icon will not appear.
Double click on the Alert Icon to read the alert.
See Also
Sharing Client Access Among 2 Producers
Archiving Any Email To Any Contact
|
Before adding a new name to Advisors Assistant we recommend looking the name up first, to avoid entering a duplicate name. |