Scanner Setup
From either the Advisors Assistant Scan Screen or the Advisors Assistant Viewer Screen, click on the Tools Icon. Then click on the Scanner Tab.
Overview
Windows keeps track of the scanners that are connected to your computer. Unless a scanner is connected to your station, or the station can control the scanner of your network, it cannot be used by Advisors Assistant.
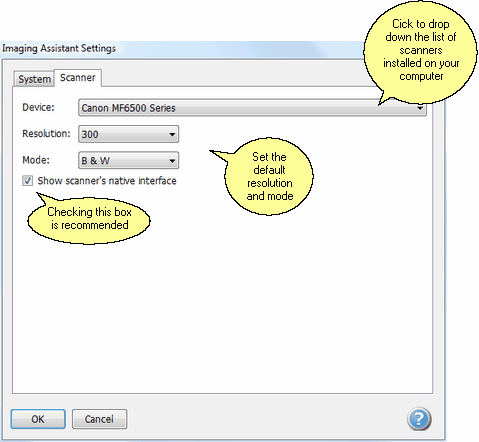
Advisors Assistant can show you a list of scanners in the Device drop down list shown below.
How To Select Or Change Scanners
You can select or change the scanner you want to use by clicking on the Tools Icon ![]() and selecting the Scanner Tab.
and selecting the Scanner Tab.

Scanner Setup
Device
Click on the field to drop down a list of the scanners connected to your computer. You can have more than one scanner available.
When a Twain driver is shown for your scanner, select the Twain driver.
Resolution
The best resolution for business scanning is a low of 200 to a high of 300 Dots Per Inch (dpi). File size increases as the dpi increases. View your initially scanned files to decide which resolution you like. For some examples of file sizes at different resolutions, click HERE.
Mode
Black and White mode produces the smallest files. If you are scanning photos, you may wish to use grayscale. See scanning tips for some actual file sizes at different modes and resolutions.
Show Scanner Native Interface Check Box
Checking this box will use the scanning interface provided by the manufacturer's scan driver. This will expose all of the scanner's features, such as the Automatic Document Feeder, ADF, Duplex Scanning (scanning both sides in one pass), etc.
Leaving the box unchecked will skip the interface and scan at the resolution and mode shown.
See Also
|
Using the Scanner's Native Interface gives you full control of the Scanner. |
