View Client With Notes
![]() View Client With Notes/Add Notes Tutorial (7:42)
View Client With Notes/Add Notes Tutorial (7:42)
![]() Getting Started - View Screen Tour (7:53)
Getting Started - View Screen Tour (7:53)
View Client With Notes Overview
With Advisors Assistant, you have the ability to track an unlimited number of notes for every contact in your database. You can also organize your notes into different Note Topics, which is especially helpful for compliance if you're selling securities and insurance products and need to keep your notes separate. You determine the name of each Note Topic you add to Advisors Assistant, so you can customize your notes and they make sense to you. Then within each Note Topic you can have an unlimited number of Note Entries.

View Client With Notes - Client Perspective
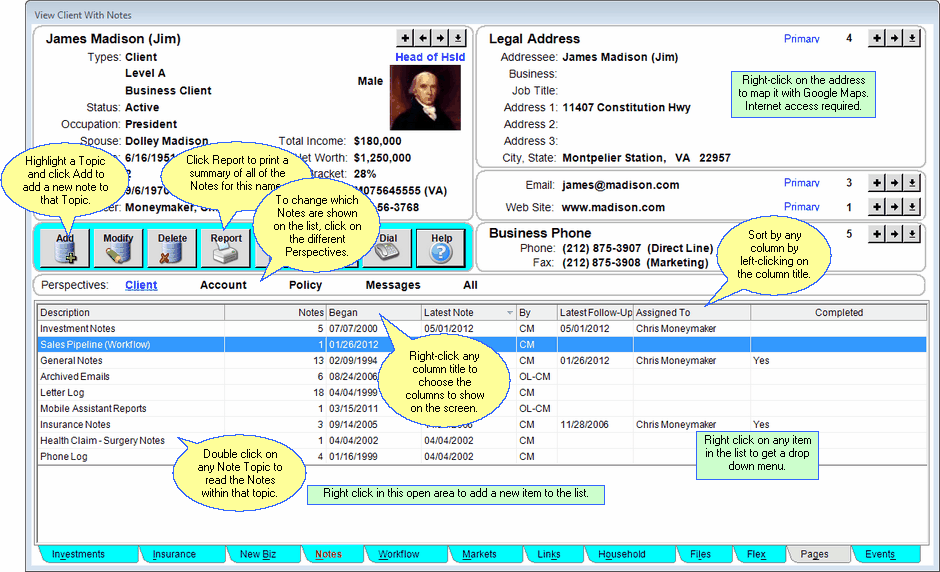
The View Client With Notes Screen shows you a summary of the Note Topics you've added to the contact you're currently viewing, as well as:
Notes
The number of note entries within that note topic.
Began
The date the first note within that topic was entered.
Latest Note
The date of the latest note entered within that topic.
By
The initials of who wrote the latest note.
Latest Follow-up
The latest Follow-up date that's been entered.
Assigned To
The name to whom the latest follow-up is assigned.
Completed
If the latest follow-up for that topic has been completed, YES will be indicated in the column.
The date the Note Topic was started is shown, the date the last note was added to the Note Topic is shown, and the number of notes within that Note Topic is listed.
When you're entering notes into Advisors Assistant you can also attach Follow-Ups to each note. When you add a Follow-Up date to a note a Task is automatically added to the Advisors Assistant Calendar, insuring that you won't forget about important follow-ups. The View Screen shows the latest Follow-Up Date that was entered.
As with every View Screen in Advisors Assistant, you can left-click on the column titles to sort the Topics by that column, or right-click on any column title to choose which columns to show on the screen. If you wish to see the most recently updated Topic at the top of the list, click twice on the Latest Note column title to sort the notes by the Latest Note date. Advisors Assistant will keep your View Screen sorted in this order until you change it. Each User in Advisors Assistant can sort their Notes by a different column.
You can also right-click on the address shown on the View Screen to map that address with Google Maps. Internet access is required for this feature.

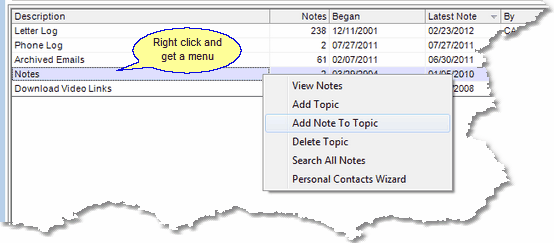
Right Click to get a menu.
Quick Report
To print a summary of all of the notes for the contact you're currently viewing, click on the Quick Report Action Button in the middle of the screen.
Perspectives
Perspectives allow you to view the information on the current View Screen in different ways. The View Client With Notes Screen can have up to four Perspectives, depending on the modules you've purchased with Advisors Assistant.
Client
Lists the Client Notes that have been added to that contact record.
Account
If you purchased the Investment Module, each investment account will have a note topic. The Account Perspective would list each account note topic for that client, and indicate the number of note entries within each topic.
Policy
If you purchased the Insurance Module, each policy will have a note topic. The Policy Perspective would list each policy note topic for that client, and indicate the number of note entries within each topic.
Messages
This perspective applies to internal messages sent between users using the Messages Button on the Sidebar Menu. When you fill in the Related To field, the message you send will appear on the Messages Perspective.
All
Lists all notes for that contact record.
![]() Expanding Your Lists
Expanding Your Lists
If the list in the bottom half of the View Screen is too long to fit on the screen, you can expand the list by clicking on the List Expander Button (![]() ) located in the bottom right corner of every View Screen.
) located in the bottom right corner of every View Screen.
Adding Notes
| • | To Add a new Note Topic when the contact name does not have any existing Note Topics, click on the Add Action Button in the middle of the screen. You will then be able to name the new Note Topic and then add a new Note Entry to that Topic. |
| • | To add a new Note Topic when the contact already has existing Note Topics, double click on any existing Note Topic or click the Modify Action Button to open the View Notes Screen. Then click on the Add Topic Button in the top left of the screen. |
| • | To Add a new Note Entry to an existing Note Topic, highlight the Note Topic and click the Add Action Button in the middle of the screen. |
| • | More details about Adding and Modifying Notes is available in the Add/Modify Notes Help. |
Adding Notes From AAMobile
You can also add notes from your iPhone, Android, iPad, or Android Tablet. See Note Reading And Taking with AAMobile
Right Click Menu
By right clicking on any note topic at the bottom of the screen, you can also add topics and add or modify notes.
Adding Names to Advisors Assistant
You can add a name quickly and easily to Advisors Assistant at any time. To add a name to Advisors Assistant, click the Plus Button (![]() ) to the right of the current name you're viewing on the View Client Screen. To avoid adding duplicate names we recommend you look the name up first by opening the Name Lookup Screen. For more help about adding names, please see the Add/Modify Names Help.
) to the right of the current name you're viewing on the View Client Screen. To avoid adding duplicate names we recommend you look the name up first by opening the Name Lookup Screen. For more help about adding names, please see the Add/Modify Names Help.
Quick Report From View Notes
You can get a quick report by clicking on the Report Button in the middle of the screen. The sort order of this report can be controlled in the User Preferences, Reporting Tab.
See Also
Dictating Notes Using Mobile Assistant
Dictating Notes Using CopyTalk
|
With Advisors Assistant you can have an unlimited number of Note Topics. But for fast and easy access to notes you should try to keep the number of Notes Topics down to a minimum. You can name your Note Topics with general descriptions like General Notes, Securities Notes, Insurance Notes, and then add new note entries into those general topics. When a special situation arises, like a health claim, you can also have a Note Topic specific to the situation and store all notes related to that situation in the one Note Topic. This will help you organize your notes and access the exact notes you need quickly and easily. |
