Add/Modify Event

Contents
You can get to this screen either by double-clicking on a time slot, by clicking on the Add Button of the Tasks and Calls pane, or by double-clicking on an existing Appointment, Task, or Call in the Advisors Assistant Calendar.
![]() Add/Modify Calendar Events Tutorial (8:53)
Add/Modify Calendar Events Tutorial (8:53)
Add/Modify Event Overview
There are three different Types of Calendar Events in Advisors Assistant: Appointments, Tasks, and Calls. But the fields to fill out for these three types of events are almost identical - the only difference is that Appointments have a Begin and End date, and Tasks/Calls have a Begin and Due date.
Adding Calendar Events
You can quickly and easily add Appointments and Tasks at any time.
How to add an Appointment
1.From the Day or Week View, select the day to which you'd like to add the appointment (to insure the time period is available.)
2.From the Day View, double click or right-click on the empty time block to which you're adding the appointment. From the Week View, right-click on the empty time block to which you're adding the appointment and click Add Appointment.
3.Enter the appointment details. Each field is described below.
4.Click OK to save the appointment.
How to add a Task or Call
1.From the Day View, click the Add Button in the Task Section of the Calendar View.
2.Enter the event details. Each field is described below.
3.Click OK to save the Task or Call.
Transferring Events to Another Calendar
By using the "Calendars" list, you can easily add and remove users from the list to decide on whose calendar the event will show. If you start out with John on the list and add Sara and then remove John, you just "transferred" the event to Sara's calendar.
You can transfer multiple calendar events to another calendar also. Click HERE for more information.
If you exit with the list blank, it will put the event on the calendar of the Current User's Calendar in the upper right of the Calendar Screen.
Type
Type indicates what kind of Event this is: an Appointments, Tasks, or Call.
Sub Type
Sub Types allow you to specify a secondary class to categorize this Event. You can either choose an existing item from the drop down list, or edit the list if you have administrator access. Once you select a Sub Type the description is filled in automatically, but can be edited.
Examples
Follow-Up
Annual Review
Vacation
Priority
There are three different Priorities: High, Medium, or Low. You can sort Tasks/Calls in Priority order on the Day View.
Begin
The Begin Field sets the Date and Time that the event starts.
End
Specific only to Appointments, the End Field sets the Date and Time at which the Appointment will be over. If the End date is different from the Begin date, you must click the Multiple Days checkbox to indicate that it is going to span across more than one Day.
Due
Specific only to Tasks and Calls, the Due Field indicates the Date and Time at which the Task or Call is due. You will need to mark a Task or Call as completed to have it removed from your pending events lists.
Completed Check Box
This checkbox indicates whether or not the Event has been Completed. You can set your Tasks and Calls to roll over each day if they have not been marked Completed.
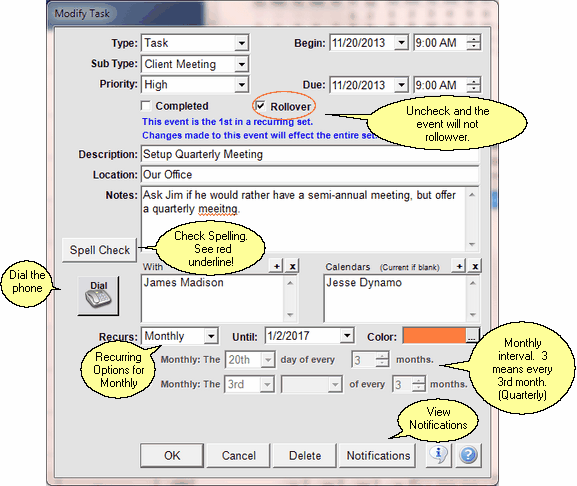
Rollover Check Box
This box defaults to checked because you would want tasks you do not complete to rollover to the following day. However, you can uncheck the box and uncompleted tasks will not rollover. This super-cedes the setting you select in the calendar setup.
Multiple Days
Specific only to Appointments, this allows you to set an Appointment that will span across more than one day.
All Day
Specific only to Appointments, this will flag the Appointment as taking up the entire day. You will notice that when this box is checked, the Begin and End Times will turn gray so that you can not edit them.
Description
The Description Field allows you to give a short description for what the Event is about. The text that you enter can later be searched upon using the Calendar Search Screen.
Examples
Meeting with the Johnson Family
Doctor's Appointment
Call the Ferguson's Re: IRA accounts
The Location field matches the Outlook location field and will be exported / imported when syncing with Outlook.
Notes
Use the Notes section to enter detailed information regarding the event. The text that you enter can later be searched upon using the Calendar Search Screen.
For recurring events, only one note is carried in the system for all of the events.
The With Field specifies the contact name of who this Event is with. For example, if you are meeting with John Smith, click the Add Button (![]() ) to bring up the Name Lookup Screen, find John Smith from the list of names in your database, and select his name. By selecting the contact name from your database you will link the calendar Event to the name, and be able to view these events from the View Client With Events Screen. You can also have an Event with more than one contact name by repeating this process for each person that will be involved with the event. To remove a Name from the Event (With box,) highlight the name and then click the Delete Button (
) to bring up the Name Lookup Screen, find John Smith from the list of names in your database, and select his name. By selecting the contact name from your database you will link the calendar Event to the name, and be able to view these events from the View Client With Events Screen. You can also have an Event with more than one contact name by repeating this process for each person that will be involved with the event. To remove a Name from the Event (With box,) highlight the name and then click the Delete Button (![]() ).
).
You do not have to select a name for the With Field, you can leave it blank if your Event is not involving any contacts within your database. But if the Task or Appointment is with a contact that is listed in Advisors Assistant, you should definitely select their name.
You can turn off the requirement of having a With Name in the Calendar Setup by unchecking the box "Appointments Must Have With Names."
Calendars
Similar to the With Field, the Calendars Field specifies the Advisors Assistant Users (other people in your office) that will be involved with the Event. This means that the Event will show up on their Calendars as well as yours (or just their calendar if you remove your name.) By default, no name is entered in this area. If you leave the field blank the event will automatically be added to the calendar that you're viewing.
You can add different User to the Event by clicking the Add Button (![]() ) to bring up the Select Calendar Screen and selecting the User's name. You can have as many people involved with the Event as needed by adding additional names, one at a time. You can remove a name from the Calendars Field by highlighting the name and clicking the Delete Button (
) to bring up the Select Calendar Screen and selecting the User's name. You can have as many people involved with the Event as needed by adding additional names, one at a time. You can remove a name from the Calendars Field by highlighting the name and clicking the Delete Button (![]() ), even your own name if you are not involved with the Event. However, the Event must be associated with at least one Calendar Name.
), even your own name if you are not involved with the Event. However, the Event must be associated with at least one Calendar Name.
Once the field is not blank, the calendars containing the event will be only those listed. The calendar being viewed will not be automatically added to the list.
The Recurs drop down list offers you many choices for determining how often you would like this Event to be repeated, if applicable. You will notice that selecting different Recur options will then give you additional fields with different choices. For example, if you choose Monthly, you will have a different set of details to help select which days of the week for the recurrence.
If you are adding a Recurring Event, you will need to also specify a Date for which you want the Recurrence to end. Use the Until Field to enter this date.
To set up a quarterly event, select monthly and then put a "3" in the every x Month field.
Recurring events are designed to correspond to Outlook recurring events so that they can be synced with Outlook. Recurring events follow certain rules.
•You cannot add recurring events from Notes Follow-ups. Note calendar follow-ups do not recur.
•Recurring events can only be CREATED from the Advisors Assistant calendar and then synced to Outlook.
•Modifying or deleting recurring events should ALWAYS be done in Advisors Assistant and then synced to Outlook.
•You cannot delete or reschedule one of the events in a group of recurring events.
•You cannot change an existing event into a recurring event. You should delete the individual event and add the recurring event.
•Recurring events cannot be added or edited from AAMobile.
•Recurring events are not supported with Google Sync.
Color
Applicable only to Appointments, setting a Color will help you visually determine what kind of Events are occupying your schedule. This is especially helpful in the Week or Month views of the calendar.
How to Delete a Calendar Event
1.Double click on the Event to open the Modify Event Screen.
2.Click the Delete Button to delete the event.
3.Confirm that you wish to delete the event.
You can delete multiple events at the same time.
Calendar Notifications
You can see a history of when users were notified of this event by clicking on the Notifications Button. This button is only available after the calendar event has been saved. If you're adding events, no one has been notified yet.
Spell Checker
As you're typing your notes into the Event, Advisors Assistant has a dictionary that it will use to check the spelling of the words. If a word is misspelled or unknown, it will underline the word in red. Right-click on the underlined word for spelling options, and the ability to add new words to your dictionary. Each workstation has a separate custom dictionary to which words can be added.
You can also click on the Spell Check Button to check all of the words in your Event Note.
Calendar Notes
Calendar notes are slightly different from other notes.
•For recurring events, the note is only stored in one place, so if you change the note, it changes it for all events in that set.
•Calendar notes cannot be private notes. If you have a private note and need a calendar follow-up, then you will need to make a second note without the private information and refer to the private note. Too many users may have access to calendar events to have private notes.
See Also
Outlook Synchronization and Using PDA's with Advisors Assistant
Completing Multiple Events At The Same Time
Transferring Multiple Events At The Same Time
Deleting Multiple Events At The Same Time
|
Remember, if you initiate, change, or delete recurring events, ALWAYS do it in Advisors Assistant. Do not add, change or delete recurring events in Outlook. The Outlook Sync will take care of that. |