Calendar Setup
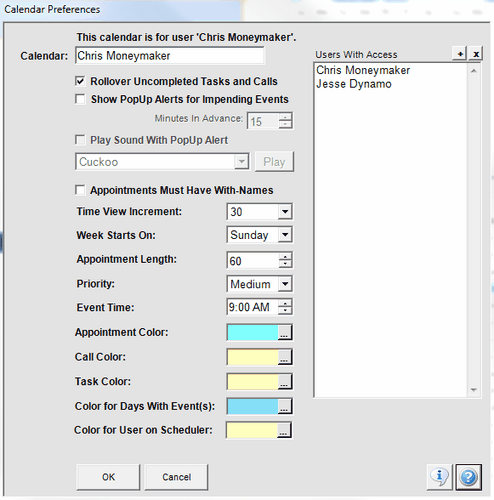
You can get to this screen by either clicking on the Setup Button in the Advisors Assistant Calendar or clicking the Add or Modify Buttons from the Maintain Calendars screen from the Admin Menu.
Calendar Setup Overview
The Calendar Preferences Screen allows you to customize the settings for your calendar in Advisors Assistant. If you are a database administrator, you can also set these preferences when you add a new calendar to Advisors Assistant.

Individual Calendar Setup
Details about each option are below:
Calendar
The Calendar Field at the top displays to whom the calendar belongs. If you are an Administrator and adding a new calendar, you can specify the Calendar User's name here.
Examples
Chris Moneymaker
Office Vacation Calendar
Conference Room 1
Rollover Uncompleted Tasks and Calls
This checkbox allows you to determine if you want Advisors Assistant to automatically rollover uncompleted Tasks and Calls to the next day.
Show Pop Up Alerts for Impending Events
If you would like to receive a visual notification of events before they occur, put a check in this box. If you do so, you can also choose the time, in minutes, of how long before the event you would like to be notified.
These alerts can be logged in the Calendar Notification Log.
There is an Auto Hide setting in the System Utilities. The Pop Up notice can be set to persist on the screen until the user closes the little window or it can fade away in a few seconds.
Each user needs to enable the Pop Ups on their User Preferences.
Play Sound With Popup Alert
If you chose to show the Popup Alerts, you can also choose to receive an audible notification, to be played through your computer's speakers, when an event occurs. Click on the drop down box to select from the different sounds. Once you have selected a sound you can click the Play Button to preview what it sounds like.
The WAV file that you choose can be one of the files we provide, or you can scroll to the bottom of the list and Select Your Own WAV file.
Appointments Must Have With-Names
If checked, an appointment can not be added to your calendar without a name in the With Field.
Time View Increment
The Time View Increment setting allows you to specify if you would like each hour to be broken up into 15 or 30 minute intervals on the Day and Week views of the View Calendar Screen. For example, setting a Time View Increment of 15 will display 15 minute intervals for each hour. This will make your calendar appear longer than a 30 minute interval setting, but you will also have more detail.
Week Starts On
Let's you choose the day of the week that you want to have the Week, Month, and Year views begin on.
Color For Days With Events
You can select the color you'd like to show in the two-month display indicating which days have events on them.
Appointment Length
The Appointment Length setting allows you to choose a default for how long an appointment will be when you are adding Calendar Events. This is only a default setting so you can change an appointment's length when you are adding or editing it.
Priority
You can specify what you would like the default Priority to be for each Event that you create. This is only a default setting so you can change an Event's priority when you are adding or editing it.
Event Time
The Event Time is the default Begin Time for all Events. This is only a default setting so you can change an Event's Begin Time when you are adding or editing it. You may want to group all Tasks together early in the morning so your Task List is shown when you open Advisors Assistant, then when you're adding individual Tasks that you need to be notified about at a specific time you can change your Begin Time for that Task.
Appointment Color
The Color Option allows you to select a default color for your Appointments. You can define within your office what the different color selections would signify. This is only a default setting so you can change an appointment's color when you are adding or editing it.
Task Color
If you converted data from earlier versions of Advisors Assistant, your black and white reports may not print clearly if you previously had a dark color chosen for Tasks. This option allows you to change that previous Task Color, and if you change the color you will be asked if you wish to change the color on all earlier Tasks. Tasks are not currently color-coded, so this option is only for changing previous colors from a conversion.
Call Color
If you converted data from earlier versions of Advisors Assistant, your black and white reports may not print clearly if you previously had a dark color chosen for Calls. This option allows you to change that previous Call Color, and if you change the color you will be asked if you wish to change the color on all earlier Calls. Calls are not currently color-coded, so this option is only for changing previous colors from a conversion.
Color for Days With Events
This option allows you to select the color that will show on your Calendar View Screen, to indicate which days have events scheduled on the two-month calendar.
Users With Access
The Users With Access section allows you to grant other Advisors Assistant Users access to view and edit your calendar. If you would like to be able to view someone else's calendar, they will need to put your name in this area of their calendar preferences.
To give an Advisors Assistant User access to your calendar, click on the Plus Button (![]() ) to display the User Lookup Screen. Select the user that you would like to grant access to and click OK.
) to display the User Lookup Screen. Select the user that you would like to grant access to and click OK.
To remove access to your calendar from a particular user, highlight their name in the Users With Access section click the Delete Button (![]() ).
).
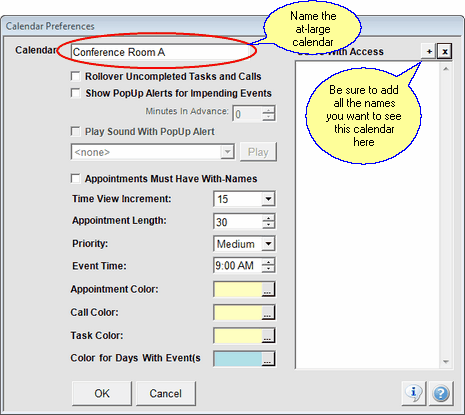
You may want to have a calendar that everyone can see for someone or something that is not a user. Such a calendar could be used for:
•Vacation Schedules
•Conference Room Schedules

At-large Calendar Setup
Only administrators can set up At Large Calendars. Go to Admin | Maintain Calendars.
This screen has the additional field so you can name the calendar.
See Also
Pop Up Setting To Persist On Screen
Outlook Synchronization and Using PDA's with Advisors Assistant
