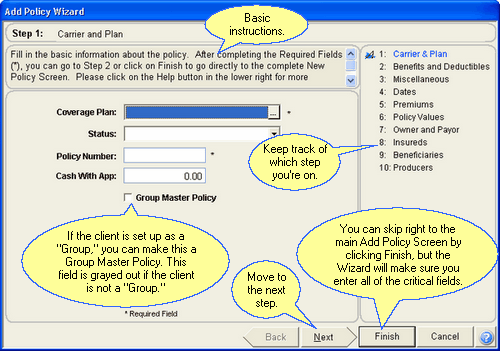
Add Policy Wizard - Carrier and Plan
From the View Client With Insurance Screen, click on the Add Action Button.
Add Policy Wizard Overview
The Add Policy Wizard simplifies adding a policy to Advisors Assistant. It leads you through both adding the Policy and the Base Coverage. The Wizard does not fill in every field on the policy record, but it fills in the most important fields. When you click on Finish, it will take you to the Add Policy Screen so you can fill in other information if you like.

All new policies start with the Policy Wizard. You must do at least Step 1.
After the first Wizard Screen, you can click Next and you will go to the appropriate benefits screen for the Class of Coverage you are adding.
Coverage Plan (Required)
Click in the field to choose the Plan of Coverage from the Drop Down List.
Click on the field to choose the Status of the Policy from the Drop Down List.
Policy Number (Required)
If a Policy Number has been assigned, enter it. If one has not been assigned, you can enter PENDING or some other indicator. The same Policy Owner cannot have two policies with the same Policy Number. It must be unique within the Owner's policies.
If this application has money with it, you can fill in the amount of funds tendered with the application.
Next Button
The Next Button will take you to Step 2 of the process.
Finish Button
The Finish Button will take you to the Add Policy Screen. Any information you completed in the Wizard will be filled in on the screen. The policy has not been saved until you click OK on the Add Policy Screen.
Cancel Button
The Cancel Button will Exit the Wizard without adding any information to Advisors Assistant.
See Also
Policy Coverage Model Explained
|
Use the Wizard until you are completely familiar with filling in the New Policy Screen. The Wizard will make sure you don't miss any of the important fields. |
