G Suite Setup
Time Zones
Google does not read your computer's time zone. You can set the time zone on your Google Account in the Calendar setup area. Your domain administrator can set a default time zone.
https://support.google.com/a/answer/1051749?hl=en
The link above provides information from Google on how to set the time zone.
If your time zone setting in Google is different from the time zone setting in Windows, times will not sync with Advisors Assistant correctly.
Setup
Please follow the steps below to set up Google for Archiving with Advisors Assistant.
Keep in mind that you are using the Google website and that Advisors Assistant cannot support their web site and that some of the screens may have changed since they were captured.
The following steps should be done on an Advisors Assistant Administrator's computer because a file is created that gets imported from the Advisors Assistant System Preferences. These require an Administrator to access.
Step 1: Login To Google
Go to https://console.developers.google.com/project and log in with your G Suite ADMINISTRATOR credentials.
If you get the following message...
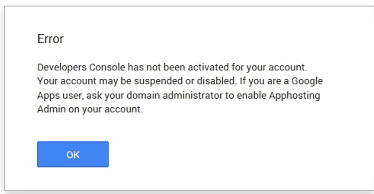
You may need to call Google Apps Help Line
click on this link for help from the web: http://stackoverflow.com/questions/27114798/how-to-create-a-project-in-google-developers-console
Step 2: Create A Project
If you already have email addresses, you will have a projected listed. If you do not have a project, click on ![]() . If you have a project, go to Step 3.
. If you have a project, go to Step 3.
Step 3: Enable Four API's
There are 4 API's that you need to authorize. Three of them are shown, but one you will need to search for the fourth. If you do not enable all four API's you will have problems when you try to set up your individual users. Be sure you enable all FOUR.
Step 3.1: Click on the Project Name
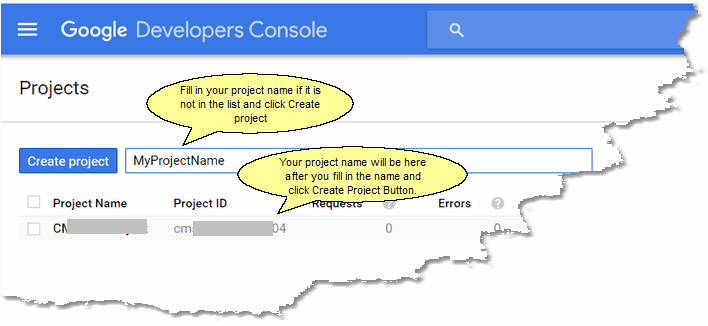
Screen 1: Click on your project name to enable API's
If you already see a project listed, click on the project name on the screen above. You must be an administrator on the project in order to have access.
Step 3.2: Click on the Enable and Manage API Button
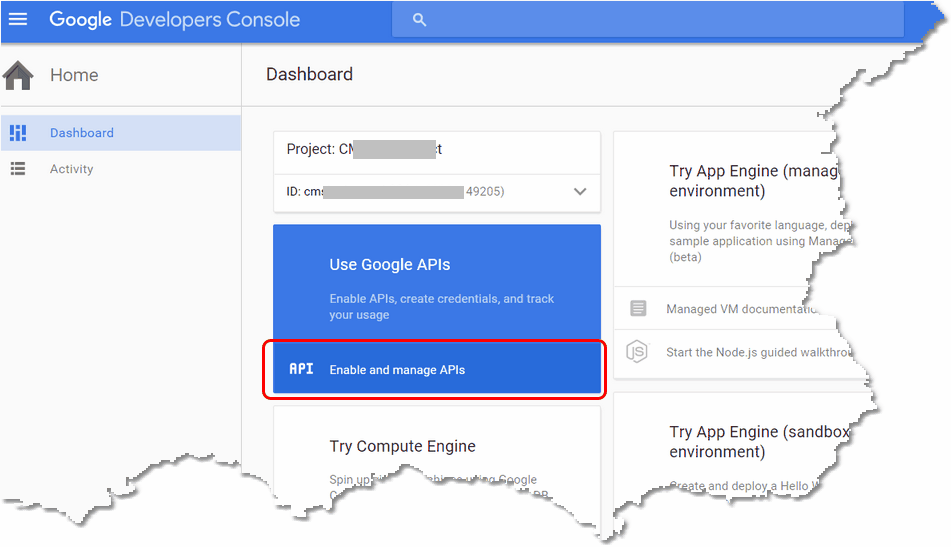
Screen 2: Click on the Enable API Button
The Enable API Button will bring up a list of the MANY Google API's.
Step 3.3: Locate API's on the List
After clicking the Enable API Button, 3 of the 4 API's will show on the list as indicated below.
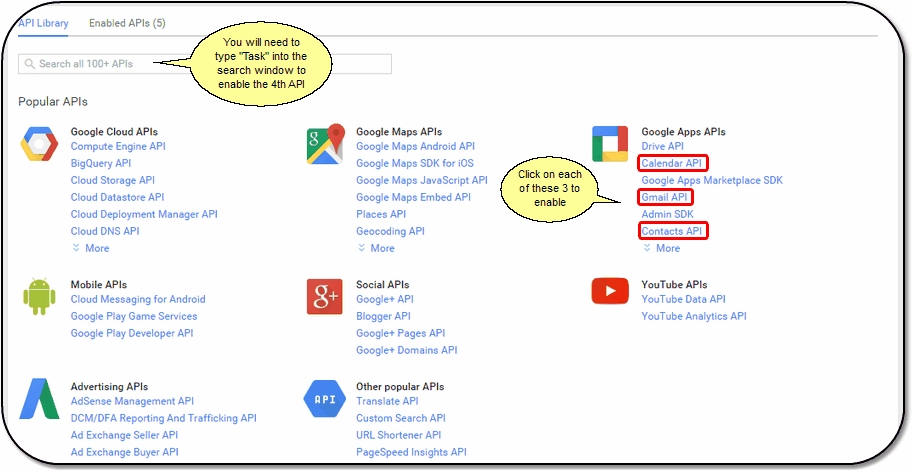
Screen 3: Google API Library.
The first 3 API's are on the list. Just click on each of them. Click on each of them, one at a time.
Step 3.4: Enable Each API
The API you are enabling will show. Then click on the Enable API Button.
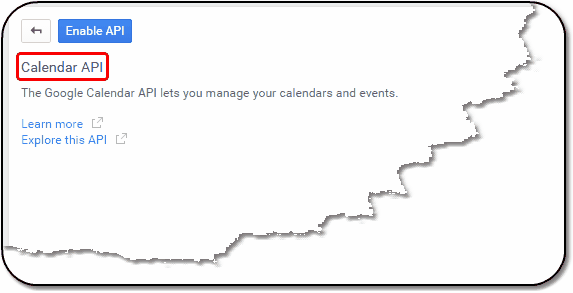
Screen 4: Click on the Enable API Button to enable each.
Step 3.5: Return To API List
When the API is enabled, the screen will change.
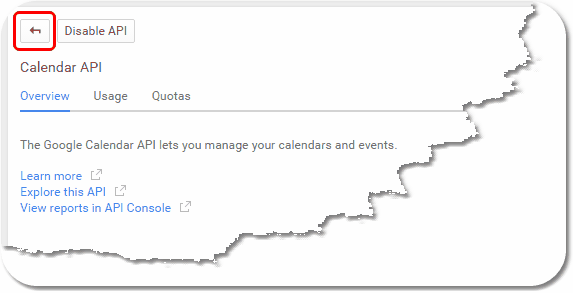
Screen 5: Click The Return Button to get back to the list.
After returning to the API list. repeat Steps 3.3, 3.4, and 3.5 until you have enabled Gmail, Contacts, and Calendar.
Step 3.6: Enable Task API
As of this writing, the Tasks API is not on the list. Therefore, you will need to use the Search function.
On Screen 3, above, enter "Tasks" into the field "Search All 100+ APIs" and press Enter.
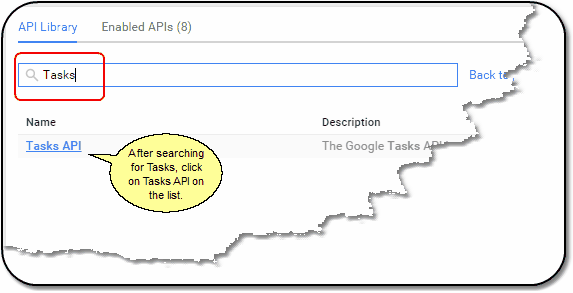
Screen 6: Tasks API on list after searching Tasks.
When Tasks API shows on the list, click on the Name and repeat the same procedure as in Step 3.4 and 3.5.
Step 3.7: Review Enabled APIs
After Enabling Tasks, click on the Return Button to return to Screen 3. Then click on the Enabled APIs link at the top of the screen.
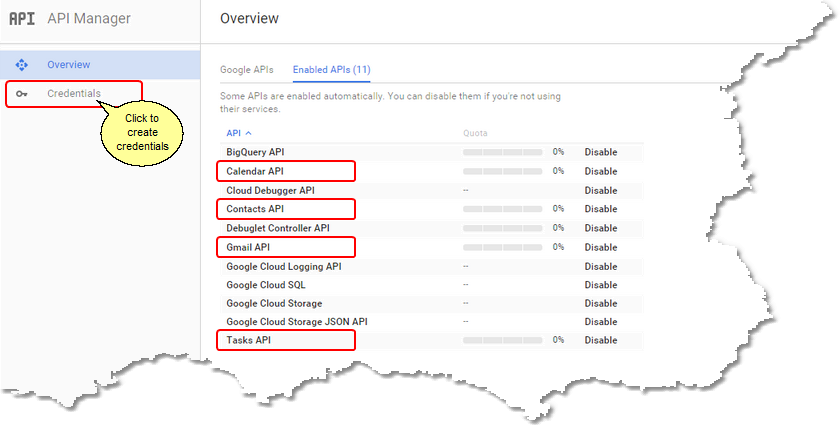
Screen 7: Look for your 4 APIs on the list.
Once you have enabled the APIs, you can now create Credentials that authenticates that Advisors Assistant has your permission to use the APIs with your Google Account. If you don't enable FOUR API's, don't go to step 4.
Step 4: Create Credentials Using OAuth 2.0
Credentials consist of a Client ID and a Secret Code. Click on the Credentials Link on the Sidebar just under Overview.. Advisors Assistant uses OAuth 2.0 Client IDs for its credentials.
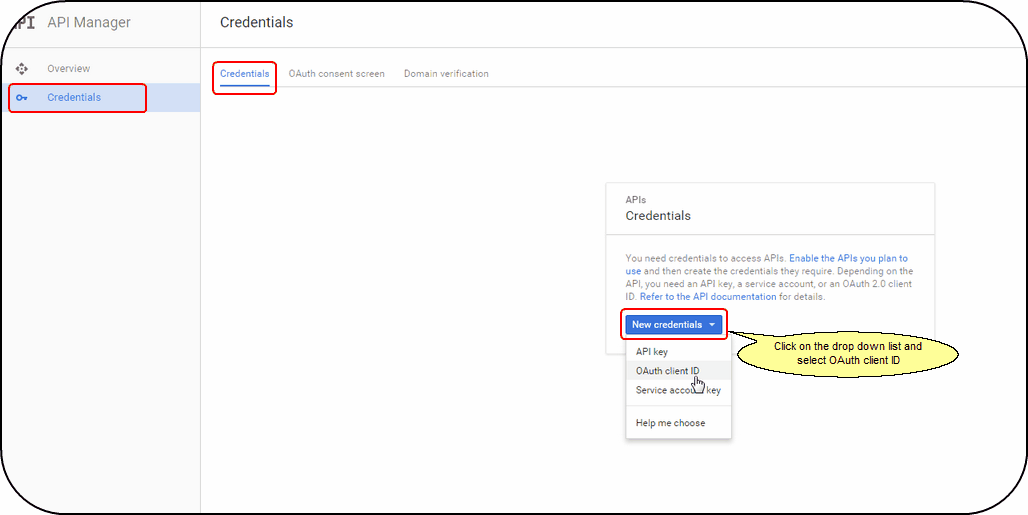
Screen 8: Click on Credentials on the Sidebar to get to this screen.
Then, click on Create New Client ID.
Step 5: Create Client ID
Next, you need to tell Google what kind of application you will be using.
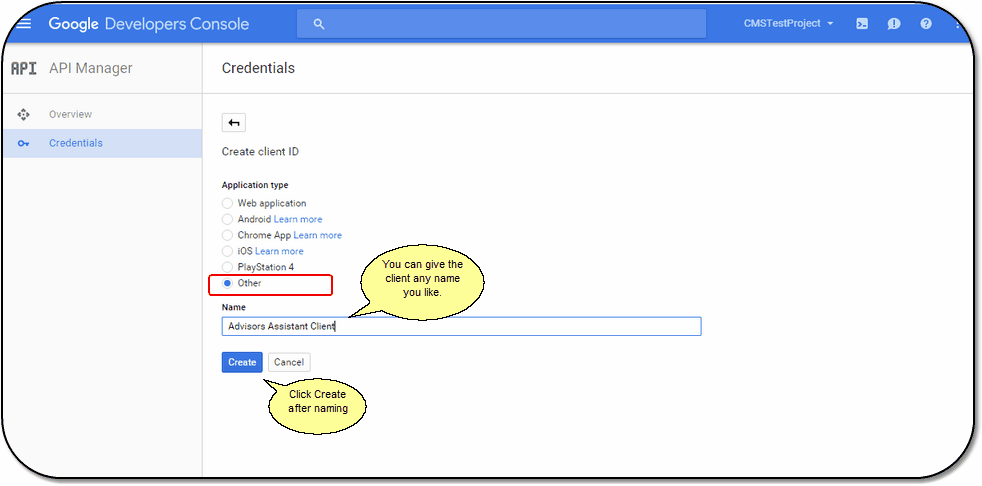
Screen 9: Choose Other and name your client
On Screen 9, Above, choose "Other."
After you click Create, Google shows you your client Information.
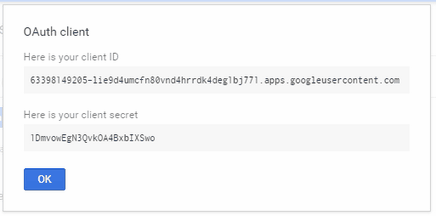
Screen 10: Just click OK on this screen
As you can see, even with part of the credentials grayed out, the Client ID and the Client Secret would be very difficult to enter into Advisors Assistant manually.
You can download these credentials in the form of a file with the extension of .JSON so that you import the file into Advisors Assistant and Advisors Assistant can get the credentials in Step 7 below.
Click Ok on Screen 10.
Step 6: Complete Consent Screen
Click on OAuth consent screen tab near the top of the screen.
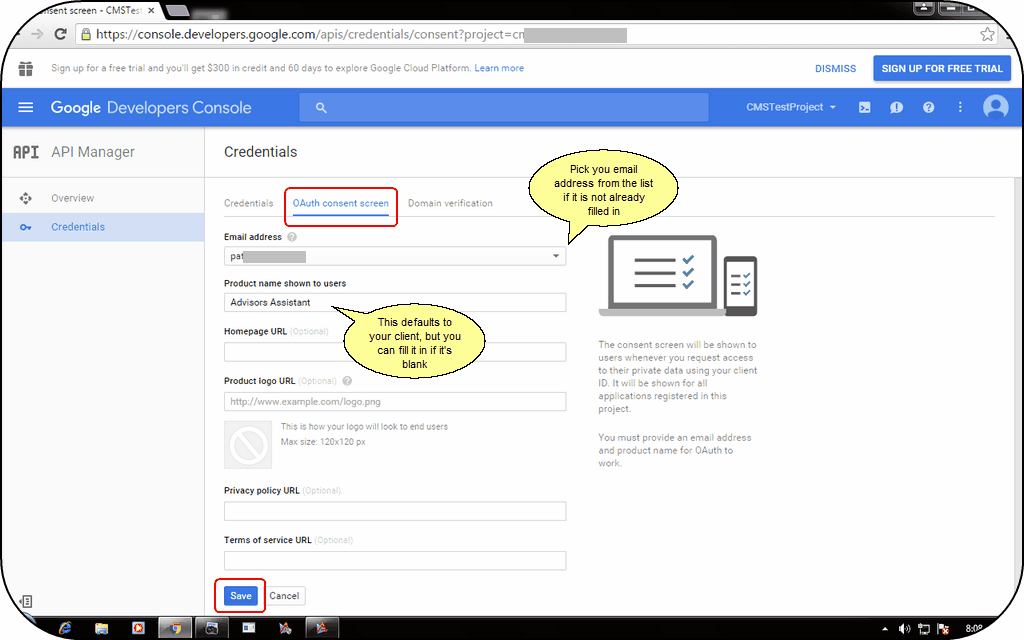
Screen 11: Only fill in the first 2 fields and click Save
You only need to fill in the first two fields on the consent screen. These may already be filled in for you.
The email address you fill in should be the address of one of the Google Administrators.
Click Save on Screen 11.
Step 7: Download JSON File
When you click Create Client ID in Step 5, Google created your credentials. They are associated with the name of your client (Advisors Assistant Client) shown on the screen below. Because they are long and complicated, you want to download them as a file and REMEMBER where they are located.
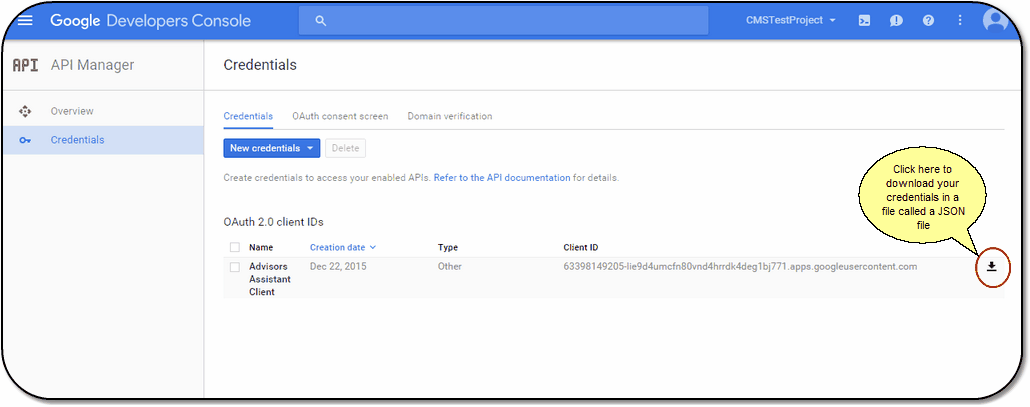
Screen 12: Download JSON File
•You should download the file to an Advisors Assistant Administrator's computer.
•You only need to download it once because it is only entered once for all users of the database.
•The JSON file will typically download into your DOWNLOAD FOLDER.
Click on the Download Icon on Screen 12.
Step 8: Set System Preferences & Import JSON File Into Advisors Assistant
Once you have downloaded the JSON file, you are finished on the Google Web Site. Now, all you have to do is to tell Advisors Assistant what you want it to do with Google and import the JSON file into Advisors Assistant.
The JSON file saves your having to enter the Client ID and Client Secret.
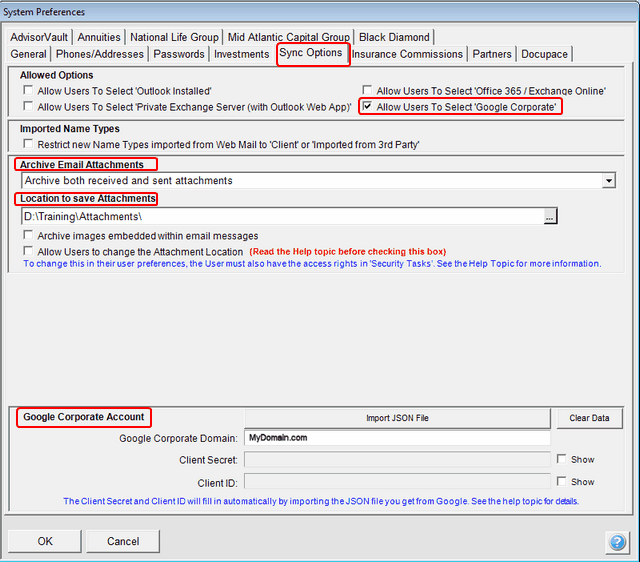
Screen 13: System Preferences for setting up Google Integration
Allow Users To Select Google Corporate Checkbox
By checking this box, you will allow individual users to set their User Preferences for Google.
Imported Name Types
This is usually used by larger systems that plan to import data from several Google Contact databases. It keeps it simple and restricts the imported name types to either Client or Imported from Third Party. For more information on this feature, Click HERE.
Archive Email Attachments
Do Not Archive Email Attachments or Blank
This tells Google not to archive attachments. If you want to save an attachment to the View Client With Files area, you will need to save the attachment manually and then associate it with the contact's name.
Archive Both Received And Sent Attachments
Attachments Sent or Received will be archived.
Archive Only Received Attachments
Only email attachments that are received will be archived. Email attachments that you send are not archived, but the email body may be archived based on your user preference.
Archive Only Sent Attachments
If you are archiving emails, only attachments you send will be archived. Attachments received by you will not be archived.
Location To Save Attachments
The location you choose must be on your local network or a drive mapped on your network. Advisors Assistant will add the folder "Attachments" to whatever folder you choose so you don't end up archiving them into a root folder.
Archive Embedded Images
We recommend leaving this field blank unless you want to archive all those little logos and signatures at the bottom of emails.
Allow Users To Change Attachment Locations
Choosing this option will allow the user to pick their own folder on their local network or drive. This is useful when a user is in a remote office and does not have VPN access to the main network.
Import JSON File Button
Click this button to import the JSON file you saved in the steps above. Navigate to the location where you saved the file. It will have an extension of JSON.
Google Corporate Domain
This is the part of your Google Corporate email address that comes after the "@". If your Google Corporate address is John@MyDoimain.com then you would enter MyDomain.com.
Client Secret and Client ID
These fields will fill in when you import the JSON file. They are Read Only so that they can't inadvertantly be changed. They display so that you can compare them with your printed ClientID and Client Secret.
Click OK to Save The Data
Step 10: Setup User Preferences (Done By User)
Each user can set up their own User Preferences. The preferences being set up depends on the user who is logged in.
Step 10.1: Set Up User Preferences
Click on File | User Preferences and then click on the either Sync Options or Google Sync Tab.
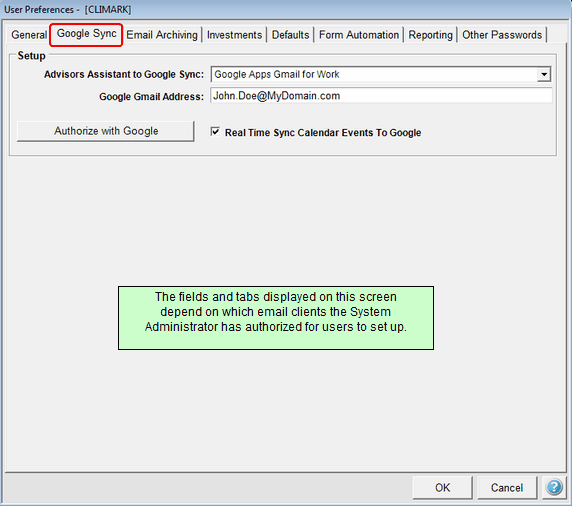
Screen 14: Google User Preferences
If Google is the only options provided by the System Administrator, the tab will show as Google Sync. If some users need Outlook and some need Google, then the tab will be Sync Options.
Advisors Assistant to Google Sync
Click on the drop down list and choose the Google option.
Google Gmail Address
Enter your full Gmail Address
Real Time Sync Calendar Events To Google
Real time sync will allow you to enter an event in the Advisors Assistant Calendar and it will go out to the Google Calendar when it is saved in Advisors Assistant. This is a one way feature, Advisors Assistant to Google Calendar.
Authorize With Google Button
Clicking this button sends your email address to Google and authorizes that email address to be part of the email addresses and calendars that can be sync'd with Advisors Assistant. Be sure to click this button and look for a return message that you have been authorized.
Click OK
Step 10.2: Authorize Your Account
After you click the Authorize with Google Button, you will automatically be taken to the Google Login Screen. This is where you tell Google who you are.
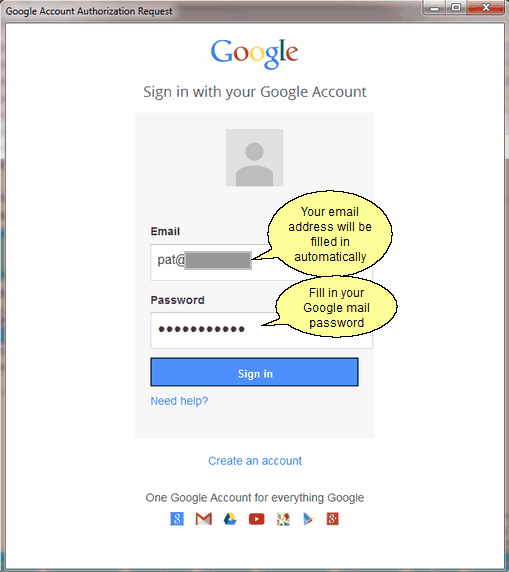
Screen 15: Enter Your Password For Your Google Account
Signing into Google now will authorize Advisors Assistant to use the APIs. Enter your Email address and your Google password.
Step 10.3: Accept Google Authorization Request
You are almost there! Now, give Google permission to talk to Advisors Assistant.
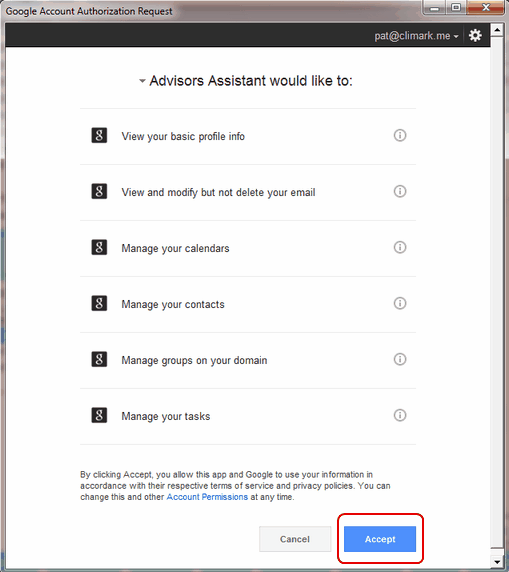
Screen 16: Click on Accept!
Just click on the Accept Button.
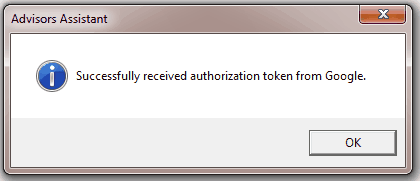
Success!
You Did It! Now you are ready to sync your Advisors Assistant calendar with the Google Calendar and also archive emails and attachments directly from Google.
![]()
The button on the screen will change to indicate that you have been authorized.
Step 10.4: Set Up Gmail Archiving (Optional)
If you want to archive Google Mail, as a user you will need to at least check the first two boxes on Screen 17 below.
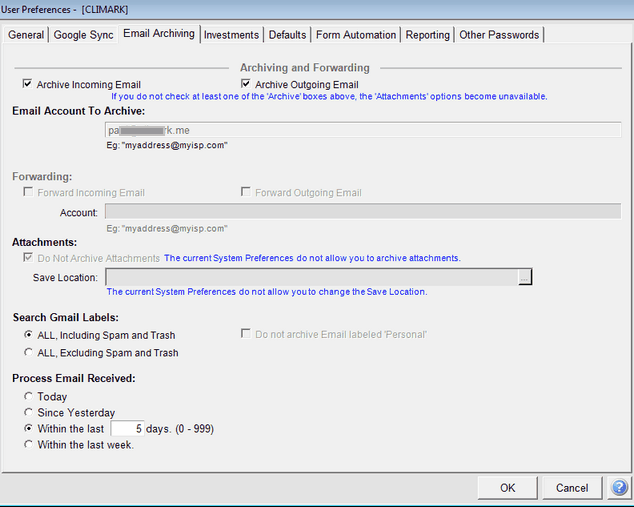
Screen 17: Turn on Email Archiving in Advisors Assistant
Your email address from Screen 14 will be pre-filled.
Attachments
If archiving attachments have been authorized in the System Preferences, you will see the location that attachments are stored to on the local network.
Save Location
If the System Admin has authorized users to store attachments for their address on their own network, AND the user has the security rights to choose their own attachment location, the Save Location field will be available.
Search Gmail Labels
This tells Advisors Assistant where to look for emails to archive. it lets you exclude SPAM and Trash.
Process Email Received
This section provides the defaults for the Manual Sync function initiated from the Sidebar when you click on the Google Icon. The farther back you tell Google to look, the slower the process. Unless you have not done a sync for a long time, we recommend about 5 days.
See Also
