User Preferences
From the File Menu, click on Preferences.
User Preferences Overview
There are User Preferences you can set that tells Advisors Assistant how you want certain features to perform. You should be sure to set your User Preferences when you start using Advisors Assistant.
The user preference screens change slightly in the Outlook Preferences or the OWA / Exchange Server preferences.
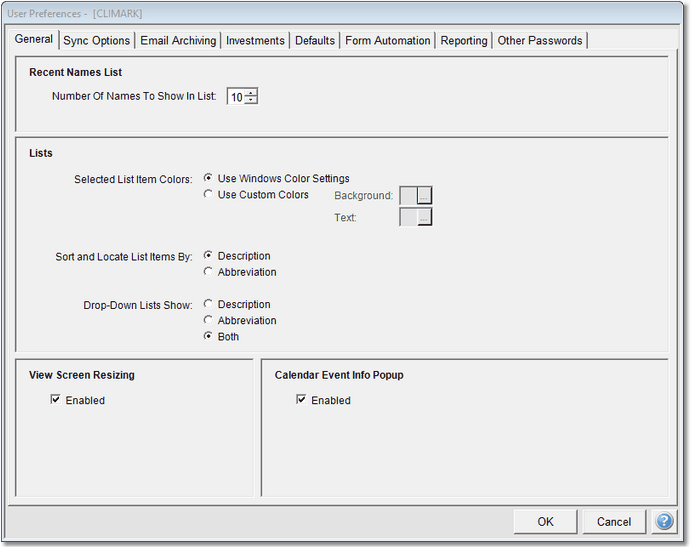
User Preferences General Tab
The User Preferences control the following features.
General Preferences
The General Preferences apply to each individual user and Advisors Assistant in general.
Number of Names On Recent Names List
You can choose how many names Advisors Assistant keeps on it's recent names list. These are names you have viewed on any view screen. The usual setting is 10, but you can set it higher.
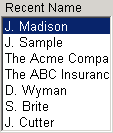
Recent Names List
Selected List Item Colors
This preference lets you choose the colors used on the drop down lists, including the background for the item selected.
Select your background and text colors for the lists in Advisors Assistant. It will default to the settings in Windows, but you can change your colors for just Advisors Assistant lists. Be sure that if you select a light color you change the text color to black.
Sort And Locate List Items By
Select how you'd like to sort your abbreviation code lists in Advisors Assistant. When selecting an option from a list, you can type in a few characters to select your code. So you can decide if you'd like to lookup your lists by abbreviation or description.
Drop Down Lists Show
You can control how much information is shown on the drop down list. If you don't care about the abbreviations used, selection Description. Selecting Both is also a good selection. Selecting just Abbreviation is not recommended.
Be sure that you select Description as the sort order if you select the Description option in the drop down list.
View Screen Resizing
You can turn this off by unchecking the box. The screens will then default to a 1024x764 screen. For this to take place, you must restart Advisors Assistant.
Calendar Event Information Popup
When you hover over a calendar event on the Calendar for a second, a small window will open giving you more information about the event. For some users, this is not desired, so you can turn it off here.
The notice of these events can be logged in the Calendar Notification Log.
Outlook Sync & Email Archiving
The Outlook tab is used for setting the Outlook Sync Preferences. Click on the Outlook Tab and use the help topic on that screen.
Exchange Server, OWA, setup is covered in a separate topic. Click HERE for that information.
Use the links below for more information:
Outlook With Private Exchange Servers
Gmail, Hotmail, And Other IMAP Sources
The Tab changes based on the email system with which you choose to sync.
Getting set up to Sync with Google at Work (AKA Google Corporate) is not easy and straight forward. We put all of the instructions for getting set up with Syncing with Google and Archiving Google Mail in one topic so the Advisors Assistant can go step by step. Each of the "HERE" links below take you to a different section of that large topic.
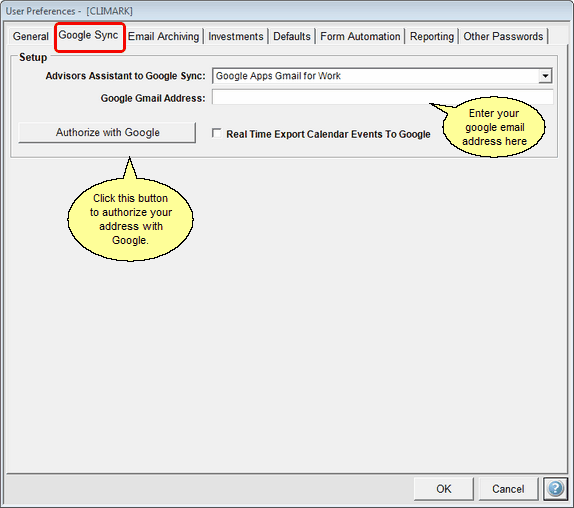
You MUST authorize the Google API's and do the System Preferences Before Using This Screen
Google Sync starts with setting up Google in their development console to allow you to use the Google API. Click HERE if you have not done that yet.
Next, you will need to set up the Google System Preferences. Click HERE for more information about that.
Finally, you can set up the Google User Preferences. Click HERE for more information about User Preferences for Ghhg
Files are downloaded to your local workstation. Then they are sent to the SQL Server for processing. Once processed, they are no longer needed, but they are kept on the SQL Server for 30 days in case they need to be reprocessed..
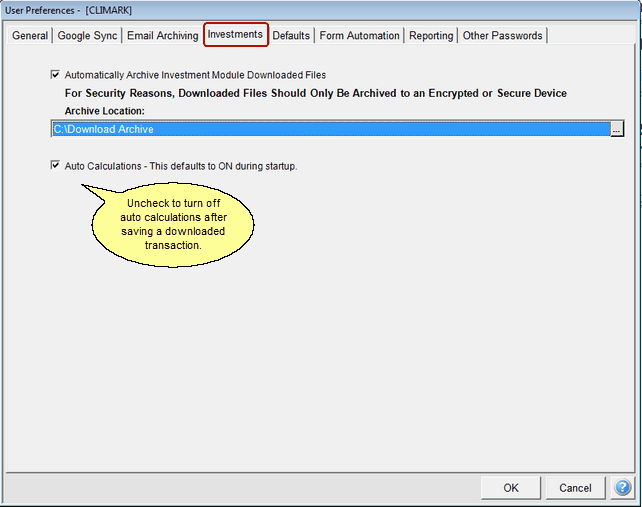
Overview
Each download vendor has their own naming convention. Some vendors repeat the same name every day, while others may repeat the names for different advisors, and others may never repeat a file name.
When names are repeated, files can overwrite each other and, if multiple days are being processed, files, such as prices can be missed. To avoid this, Advisors Assistant renames any files that may duplicate.
Advisors Assistant does not delete any files you download. We consider these to be your files.
The Archive Function
The archive function will compress the files before they are renamed and store them as zip files on your file system in the destination folder you designate.
Automatically Archive Download Files Check Box
Check this box to activate the Archive Location field.
Leaving The Field Blank
If you do not designate a folder, the files will not be archived, but the renamed files will remain on your system.
Selecting A Folder / Archive Location
If you do designate a folder, the files will be zipped and moved to that folder, but the renamed files will still be left on the folder you download them to. You should, from time to time, either delete them or move them to a CD for off line storage.
Each user performing downloads can designate their own archive folder.
The zipping function does not encrypt the files. You can add encryption after they are zipped if you have the Winzip program, which can be purchased on the internet. Download a free trial at http://www.winzip.com/win/en/index.htm.
Normally, when you save an investment transaction on the Add / Modify Investment Activity Screen, Advisors Assistant will recalculate values by reading all of the transactions for the asset, and sometimes the account. This can take a few seconds, depending on the number of transactions and the speed of the computer.
If you are going to be entering or modifying several transactions, you can turn this function off by unchecking the box.
On the next startup of Advisors Assistant, the checkbox will be defaulted to on.
The Default Preferences let you save time by choosing certain data that you can "default," not have to fill in, when you are adding NEW contacts or products.
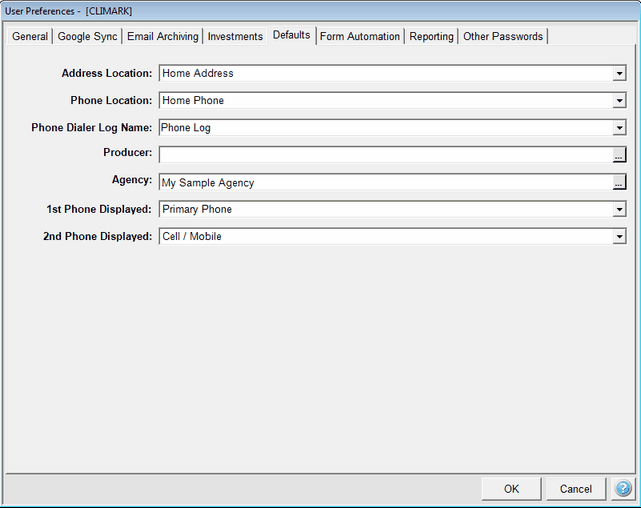
User Preferences Default Tab
You can also leave the field blank and the system will not default.
Address Location
When adding a NEW address, you can have Advisors Assistant fill in the address location for you. You can also change it. If you plan to be storing mostly business contacts, use the Business Address as the default.
Phone Location
When adding a NEW phone number, you can have Advisors Assistant fill in the phone location for you. You can also change it. If you plan to be storing mostly business contacts, use the Business Phone as the default.
Producer
If most of your Investments or Insurance are serviced by the same producer, you can default the producer when entering new investment accounts or insurance policies. Click on the field for the list of Producers.
To add or modify producers on the list use the Modify Producer feature.in Advisors Assistant.
Agency
Agency names are used by the Optional Commission Module. If you use the Optional Insurance Module, you can choose your agency name from the agency list by clicking on the field. The Modify Producer feature is also used for adding the agency name to Advisors Assistant. The Agency Name used by the system is based on the Registered User's name, but the agency name displayed can be changed on the Modify Producer Screen.
1st Phone Displayed
You can control the two phone numbers displayed on the View Screen. It is recommended that you choose Primary Phone for the first phone displayed.

2nd Phone Displayed
If you do not wish to display the Fax Phone, you can change the second phone displayed as shown above.
This tab lets you choose which Form Automation Tool you want to use. You can only use one tool at a time. In the case of Laser App Anywhere, a User Name and Password are required.
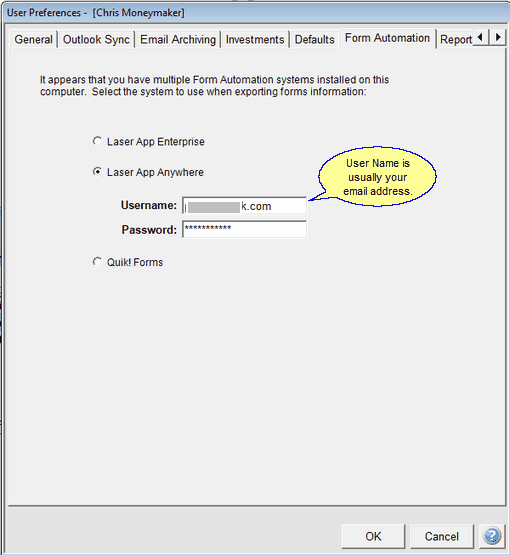
Form Automation Preferences
The Laser App Anywhere log in information is obtained from Laser App's web site. Contact Laser App at 800-985-2174.
Quik! Forms contact phone number is (877) 456-7845.
The Forms Application you choose is started by clicking on the Forms Button on the Sidebar Menu.
![]() Laser App Anywhere Video On YouTube
Laser App Anywhere Video On YouTube
![]() Laser App Enterprise Video On YouTube
Laser App Enterprise Video On YouTube
Reporting preferences gives you more control over reports. These preferences have been suggested by users.
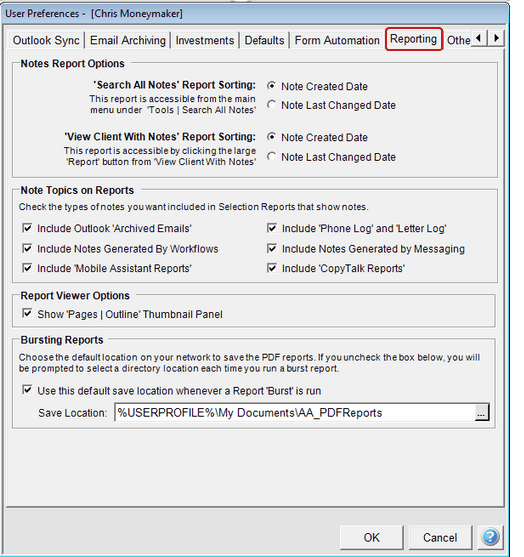
Reporting Preferences
Search All Notes Sort Order
Choose the sort order you want to use for the report you get after using Tools | Search All Notes.
View Client With Notes Report Sort Order
The report you receive after clicking on the Report Button from the View Client With Notes Screen can be controlled with this preference.
By unchecking any of the boxes, you can exclude certain note topics on reports.
On the left side of the Report Viewer there is a strip with tabs for page thumbnails or an outline view. The outline view usually contains numeric keys and is not useful, but some find the thumbnails useful.
You can make this strip disappear by unchecking this box.
Use This Default Save File Location Check Box
If you check this box, you can choose a default folder to save the bursted reports. The default location will be filled in for you, but you can still change it at report time. It is recommended that you check the box.
Leaving the box unchecked will have Advisors Assistant ask you for the save location on every report run that you choose to burst.
Save Location
Use the ellipse to choose the default location. If you leave this field blank, Advisors Assistant will ask you to choose a location each time you burst reports. Filling it in will default the location, but you can still change it.
You can have reports delivered to your clients automatically through our strategic partner, Advisor Products using their product called AdvisorVault.
Note: Be sure to review all reports through the report viewer and delete any bursted files where there is an issue with the information shown on the report.
There are applications that we integrate with that require a specific password for each user. This tab provides a place to enter that user password.
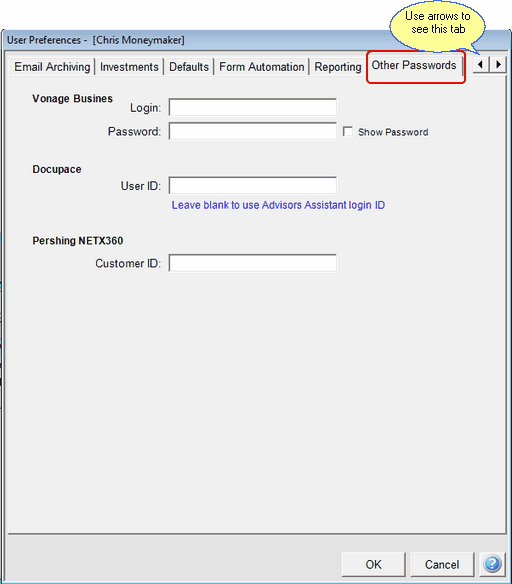
This is used for application specific passwords
Cities Digital provides document storage and management services.through integration with LaserFiche.
Cities Digital can be reached at 651-714-2800
Docupace requires a User ID and also information filled out in the System Preferences. If you leave this field blank, Advisors Assistant will use the User ID you use to log into Advisors Assistant. If you want to use the Advisors Assistant be sure you set that up in the Docupace system. It is not automatic.
The User ID for Advisors Assistant is stored all upper case. If the User ID sent by Docupace has any lower case letters, you need to fill that User ID into the User Preference field.
For information about how to use Docupace with Advisors Assistant, click HERE
Enter the Customer ID that Pershing assigned to the Advisor for access to their web site. For more information about NetX 360, click HERE.
See Also
Outlook Web App / Exchange Server
Logging Calendar Pop Up Notifications
Google Calendar / Contact Sync
Producer And Agency Displayed Names
|
Each User of Advisors Assistant has their own separate Preference settings, which are saved with the User ID. |
