System Preferences

Contents
From the Admin Menu, select System Preferences
System Preferences Overview
System Preferences can only be set by an administrator. They affect all users on the system. If the Investment Module or Insurance Commissions Module is active, these tabs will also show on this screen. Otherwise they will not show.
The purpose of these screens is to give system administrators a degree of customization to add or remove features and to control the behavior of some of the other features.
There are 3 parts to the screen, but if you have not activated Investments, the Investments Tab will not show.

System Preferences General Tab
General Tab
Notifications are those little popups on the lower right part of the screen which can either persist for a few seconds and fade (hide) or they can stay up until closed. Notifications can pop up when an internal message arrives or when a calendar event reminder come up. The screen that comes up when you first log into Advisors Assistant is also considered a notification. It tells you about calendar events which are overdue.
Show Notifications
If you uncheck this box, you will not be notified of pending events or messages. The default is checked.
Checking this box will have the small notification box that comes up in the lower right corner persist until you either click on the link or the red X.
The user can control whether they get the Pop Up notices in the User Preferences.
Log Calendar Event Notifications
When you are notified of a calendar event and you click on the notice to make it go away, if this box is checked, it will be logged. To see the log, go to the event and click on the Notifications Button.
Log Message Notifications
When you are notified of a message and you click on the notice, the notification will be logged if this box is checked.
Messenger Section
If you do not wish to provide messaging capabilities to users, you can disable the messenger by unchecking this option.
Do Not Autohide Message Notification
Notifications will come up in the lower right of the screen and then fade after a few seconds. If you want them to stay on the screen until you click on the red X in the notification, check this box. This lets you see a message even if you were away from your desk when it comes up.
Users can only delete messages if they have the security rights to delete messages.
This feature was added because some broker dealers do not want internal messaging to be used that outside of their SEC approved communications system. Disabling replies turns the Messenger into a notification tool which is not thought to violate an SEC regulations.
This feature forces the user to include the original message in their reply.
Document Storage
Show Scan Option
If you are not using one of the scan interfaces available with Advisors Assistant, you can uncheck this item and the Scanner Icon on the Sidebar Menu will not be visible.
Network Path For Station Updates
This feature is designed for larger networks that want to avoid using Internet bandwidth when a station updates directly from the Advisors Assistant site.
To use this feature, the network administrator:
Sets up a folder on the network that is available to all of the stations on the network.
1.Store the path to the folder in this System Preference Field
2.Selects Update w / Save Option when updating the first workstation.
3.Save the update file to the folder whose path is stored in this field.
When the user clicks on Update Now, Advisors Assistant will look in the Network Path For Station Updates first. If it finds the correct file, it will retrieve it from the network instead of the Internet.
Internet Links
Enable Internet Links In Archived Emails
Archived emails can contain internet links. If the email was sent from one of your contacts or clients, and that client got infected with a virus, the virus program could have sent the email with a link that, if followed, could infect your computer.
The default is to disable Archived Email Links (unchecked,) since these can create a risk, but to leave standard note links enabled, since there are entered manually.
Enable Internet Links In Notes
If you are comfortable with links that are manually added to notes other than archived emails, check this box and they will become active. The default is unchecked.
Can Create New Emails From Advisors Assistant
Unchecking this box will disable the feature that allows users to send emails by clicking on the email address on the view screen. Since this feature uses the default email client, it could be used to avoid a broker dealer's email archiving system. This does not affect sending emails from Notes if there is an email link in a note. Use one of the check boxes above for that feature. The default is checked.
Can Open Web Sites From Advisors Assistant
This includes the web site listed on the view screen. Uncheck this box if you want to disable the ability to go to the web site listed on the view screen. The default is checked.
This does not affect following web links in Notes if there is an email link in a note. Use one of the check boxes above for that feature.
If you uncheck this box, Social Media Links will not appear on view screens. You can still store the link, but you will not be able to go to the social media link(s) of the contact. In most cases, unless your compliance department disagrees, you will want to leave this checked.
Spell Checker
You can choose from a variety of English dialects for spell check.
Extra Pages
The Pages Tab on the View Screens is available to maintain compatibility with Advisors Assistant Version 2. Some users don't care to use the feature, so leaving this checkbox unchecked will make the tab disappear on the View Screens.
OK Button
The OK button will save all three tab's information.
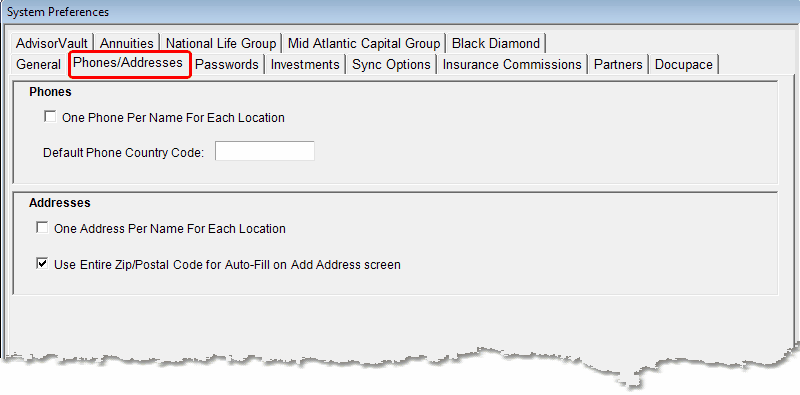
Phones Section
This field will supply the Country Code when it is left blank on the Modify Phone Screen.
If this field is blank and your phone number's country code is blank, the country code from your registry will be used. However, this allows you to override the registry's country code or, in the event you are not getting the correct country code sent to Skype, you can change it here. This is used for Skype dialing when the country code is blank in the phone number.
One Phone Per Name For Each Location
This field is most useful when contact information is being maintained by a business enterprise using the Advisors Assistant API or some outside program which is syncing information. Often it is necessary to make sure there is only one phone stored for each location, such as one business phone number, so that the phone can be updated without updating the wrong phone number.
Normally, this field would be unchecked.
Addresses Section
One Address Per Name For Each Location
This field is most useful when contact information is being maintained by a business enterprise using the Advisors Assistant API or some outside program which is syncing information. Often it is necessary to make sure there is only one address stored for each location so that the address can be updated without updating the wrong address, such as the legal address.
Normally, this field would be unchecked.
Use Entire Zip/Postal Code For Auto-Fill...
This is designed to accommodate countries which have spaces in their Postal Codes. Check the box for Canada or other countries where the postal codes will contain a space.
Provide Awareness of All Names On Lookup
Users can have more than one set of access rights. For example, when working for one advisor, an assistant may have access to that advisor's contacts, but would need to switch access rights to have another advisor's contacts. This will let the user know that, when looking up a name, there are contacts that match the look up criteria for which the user does not have access. It also makes it easy to switch to the access rights that will allow the user to work with that contact if they have access under other security rights.
This is also helpful to allow users to see that a name exists in Advisors Assistant for which they do not have access. For information on what this looks like when looking up names, click HERE.
Security is extremely important. It is highly recommended that all users use Strong Passwords.
If you are not using strong passwords, we will not force you to unless you are our hosted system, however, Advisors Assistant will nag you at least every 5 days.
Because we work in the financial services industry and because personal data is stored in Advisors Assistant, our users are subject to many privacy laws. If there are security breaches, a user may, depending on the local laws, need to contact each and every user to notify them of the breach.
We regularly receive questionnaires from Broker Dealers and other interested parties concerning whether we require strong passwords. The nag screen you see when you are not using strong passwords is a compromise for those users who just do not want to use the highest security.
As a software vendor, we cannot enforce security at the local computer level. We have neither the authority or the means. However, we can do all we can to help our users have the best security they can.
•We provide a strong password system which is modeled after the FDIC requirements and has been reviewed in audits at our banking users.
•We remind non-hosted users to use strong passwords if they are not using them.
•We require strong passwords for internet hosted databases.
•In addition to being behind a commercial grade firewall, the database server on our hosted system does not have any ports open to the Internet.
•Our hosted servers are not shared with any other companies. They are dedicated servers in data centers that are maintained by Rackspace and are SAS 70 Type II security certified.
•Personal Information, such as Tax ID's, Passport Numbers, Drivers License Numbers, and Non-Resident ID Numbers are stored encrypted inside of the database.
•All backups are automatically encrypted unless the user specifically turns off the backup encryption. Personal information encryption cannot be turned off. It remains encrypted inside the backup.
•All communications from the station to the hosted installations are SSL encrypted.
•Encryption levels are AES 256 bit except for the SSL encryption which is a minimum of 128 bit encryption.

Passwords Tab Of System Preferences
Strong Password Settings
Force User To Change Password Interval
90 days or less is the recommended setting for this field.
Restricting Users From Changing Passwords More Than Once Within
This prevents users from changing their password too often. You can disable this by setting it to 0.
Restricting Users From Reusing Old Passwords
This prevents users from just bouncing back and forth between passwords. Five to 10 is the recommended setting. You can set as low as 1.
Lockout Setting
This helps prevent brute force break ins. Ten or less is recommended.
Hosted Systems
Hosted systems cannot disable strong passwords.
Enable Strong Passwords
To secure your database, Advisors Assistant has the ability to enable Strong Passwords. When you first install Advisors Assistant Strong Passwords are not turned on, so if you wish to use Strong Passwords you will need to turn them on through this System Preferences Screen.
Once you have enabled Strong Passwords, you will see all of the guidelines for the passwords. Some of the settings can be changed by the database administrator. Additional help is available in the Strong Passwords Help.
It is recommended that you force password changes every 90 to 120 days and that users do not use the last 5 to 10 passwords.
Once strong passwords are set, they cannot be reset to normal passwords.
This is a value issues to approved vendors who use the Advisors Assistant Application Programmers' Interface, API. This is a security key that allows the vendor to access the database through the API without knowing the passwords used by the system.
You can elect to record all log ins to Advisors Assistant and attempts of log in in the process logs. Check this box.
This tab lets you control certain system behaviors in the Optional Investment Module.

Screen Preferences Investment Tab
When calculating investment values, Advisors Assistant creates a valuation record at an interval selected by the System Administrator. This is used for calculating rate of return if there is no price for a particular date, such as the end of a month.
You are given a preference because the calculation and writing of the record can take time, so if you are only sending quarterly reports, you may not want to calculate monthly values, etc.
We recommend that you try monthly, and if the calculation is too slow when changing clients with lots of investments, try quarterly.
Default Out of Balance Tolerance
When positions are sent with downloads, they can often have more decimal places than the original transactions sent. For example, transactions may only use 3 decimal places and the position may send 4. This can create lots of very small reconcile transactions.
The Out of Balance Tolerance allows you to set a number of shares at or below which no reconcile transaction will be created.
Export Morningstar Last Name First
Morningstar stores client names alphabetically. There is only one name field, so you cannot separate the last from the first name. This option allows you to export to Morningstar Principia or Advisor Workstation with the name formatted Last Name, First Name.
Aggregate Morningstar Accounts Into One Portfolio
Morningstar considers each account a portfolio. If you want one portfolio to contain all of the accounts, check this box.
Some Compliance Officers may require that assets held away have contact information provided for each custodian of these assets. Most investment reports will have this information available, but it will only show up if this box is checked.
This feature was added in late 2012. Prior to this feature, all calculations of market values, tax lots, etc. were based on settle date. This gives the user a choice for the entire system.
Note: You must recalculate the entire database with all the boxes checked. This is done on the Calculate Investment Values Screen.
The Help Topic Settle Date vs Trade Date discusses this option in more detail.
Some clients' holdings may not get processed for weeks unless you land on their View Screen and recalculate their account. This happens if the account had a value of zero and received a transaction that changes it from zero. If you tell the reports to exclude zero accounts, the account will appear to be zero at selection time because the system cannot recalculate what can be tens of thousands of assets for a simple selection report.
The asset may also actually have a value of zero because of a recent transaction and it can be left off of a report if you exclude zero assets.
Checking Process Market Values After Download Box: If you check this box, when you exit the download, assets that are part of this download source, TD Ameritrade, DST, etc., will be examined. Advisors Assistant will look back 6 days and reprocess any asset that had any transaction which would change the number of shares.
This can extend the time involved with downloading of assets from a few minutes to several minutes, depending on the size of your data.
Note: Because of the time involved with the calculation process, you may want to turn this feature off during the times you are not running client reports. You can also accomplish the same thing for a single client by reprocessing just that client's accounts. Use Investment Utilities | Account | Calculate Investment Values and limit the calculation only to the client you need calculated.
This only applies to assets that are going to zero shares or are coming from a zero balance.
Certain Outlook functions must be turned on for the entire system, vs user by user. The functions below cover the set up for these preferences.

Outlook System Preferences
Allowed Options
Advisors Assistant can archive email from either Outlook running on your desktop or Outlook Web App, which uses Exchange Server. Step by step instructions for setting up Advisors Assistant with Outlook Web App can be read by clicking HERE.
When importing names, the Outlook being imported from can have several, or even dozens of name types. This can be a burden to the Advisors Assistant database being imported into.
By checking this box, the Name Types in the import will be limited to only limited types. If the word "Client" is found in the description of the type, then it will be classified as a Client. Otherwise, it will be designated as Imported From Outlook.
What Happens When You Check This Box
When you check the box and then the users restarts Advisors Assistant, the Outlook Import will apply these rules to the Advisors Assistant Name Type when importing new names:
1.If there is an exact match between the Outlook Category and the Advisors Assistant Name Type Description, the Outlook Category will become the Advisors Assistant Name Type. If there is no exact match, rule #2 is applied.
2.If the word "client" (not case sensitive) appears anyplace in the Outlook Category, the Name Type in Advisors Assistant will be assigned "Client." If "client" is not present, then rule #3 is applied without exception.
3.The Name Type assigned on import into Advisors Assistant will become "Imported From Outlook"
The Outlook Preference will not become effective until the user restarts Advisors Assistant because Advisors Assistant only reads system preferences on startup. It is recommended, but not necessary, that the user also restart Outlook. This takes place on a station by station basis.
Archive Email Attachments (Outlook 2007 And Later - Not Available With Outlook Web App)
![]() Setting Up Email Archiving (6:14)
Setting Up Email Archiving (6:14)
The choice of whether to archive emails is a User Preference. However, if the choice is made, the decision on whether to archive attachments is a System Preference made by the System Administrator.
If a person's workstation is using Outlook 2003, the emails will archive, but the attachments will not archive.
This is done this way because:
1.The decision to archive attachments is a business decision. If emails are archived, the company decides whether to archive attachments. However, an individual user's archiving of attachments can be turned off in the User Preferences Outlook Tab for the type of Outlook you are using (Outlook Installed, Outlook 365, or Private Exchange Server). This is done for flexibility.
2.Attachments are archived on the company's file system. They are not stored inside the database. The path to the location is stored inside of the database, but the file itself is on the file system. This means that they need to be in a central location where all users can have access to the attachment.
3.Archives can be deleted if the user has the task rights. This is done from the View Cleint With Files Screen.
Do Not Archive Email Attachments or Blank
This tells Outlook not to archive attachments. If you want to save an attachment to the View Client With Files area, you will need to save the attachment manually and then associate it with the contact's name.
Archive Both Received And Sent Attachments
Attachments Sent or Received will be archived.
Archive Only Received Attachments
Only email attachments that are received will be archived. Email attachments that you send are not archived, but the email body may be archived based on your user preference.
Archive Only Sent Attachments
If you are archiving emails, only attachments you send will be archived. Attachments received by you will not be archived.
Embedded Images vs Email Attachments
An image in the body of the email is called an Embedded Image. These can be signatures, logos, or meaningful images. They have names beginning with "Image". You can tell Advisors Assistant to archive these, with the name Image plus a number or you can skip archiving these items. Use the check box to determine the behavior.
Embedded Images will show on the attachments list of the email. For a screen shot of how they appear, click HERE.
The "Path Root" is the location where you want the attachment stored. When the System Administrator designates the storage location for the email archives, Advisors Assistant will add additional folders. First, it will create a folder called "Outlook Attachments." Then it will create sub folders A through Z.
It is not recommended that you choose your C drive. Even if you are a single user system, if you ever expand, other users will not have access to your C drive. They will have a C drive and the attachments will not be found there.
Archiving of Attachments is not available with Outlook Web App at this time.
This folder is established so that you can easily move all the attachments to a larger drive simply by moving this top folder. Experience tells us that many users will only choose the drive and will not designate a particular folder on the drive. This would require at least 26 drag and drops or copy commands to move all of the attachments. By forcing a "top folder" this is reduced to one operation.
The folder can be expressed as a UNC path or a mapped drive path.
For each active producer or disabled producer, a producer folder is created when you click on Yes below, a folder with the producer's internal key will be created.
For example:
Producer 10001
Producer 10002
Under each producer, A through Z folders will be created.
For example:
Producer 10001
A
B
C
....
M
Madison James
SampleFile.jpg
ClientPicture.jpg
Note: Backing Up Advisors Assistant does not back up your email attachments. Emails are stored on your server and should be included in your regular server backup.
Matching Producer Numbers To Producer Names
To find out who belongs to a producer number click on Admin | Maintain Producers and then double click on the producer's name on the lookup list. On the Modify Producer Screen, click on the Information Icon in the lower right of the screen.

Getting The Outlook Archive Producer Folder Number
A Through Z Folders
Before you click Yes on the screen below, be sure you have enough storage on that drive for your ongoing attachments.

Click Yes And Folders Are Created
These folders are created under each producer's folder and are sub folders which are used to store attachments based on the recipient's last name or business name. Using the example path in the Screen shown above, an attachment called Sample.JPG sent to or from James Madison would be stored as:
N:\EmailAttch\Outlook Attachments\Producer 10001\M\Madison James\Sample.JPG
Your system needs access to the drive and folder you choose for the storage of the Outlook Attachments. If it does not have access, you will be notified when you start Outlook.
For example, if you are on a laptop and your Root Folder is on your network and you are away from the office, you may not have access.
However, the next time you have access, Advisors Assistant will archive the email and the attachment. Plus, the Look Back feature can also go back and archive unarchived emails.
When you don't have access to the File Location Path Root, Advisors Assistant will not archive any email that has an attachment. Other emails will still be archived in the notes area. Later, when you have access, you can run Process Unarchived Emails in the Advisors Assistant Outlook Add-in Tools section of Outlook.
You Must Have Rights To Write To The Root Folder
In order for you to store the archived attachment, you must have rights within Windows to write to that folder. Your network administrator can take care of that.
The Exchange Web Service Default Domain and the Exchange Web Service Default Login Page URL are fields that are different for every Exchange Server account. This information is provided by the Exchange Service Administrator.
Setting up Advisors Assistant with Exchange Web Services is covered in detail in the help topic Setting Up For Outlook Web App.
Exchange Web Service Default Domain
The domain name is provided by the Exchange System Administrator.
Exchange Web Service Default Login URL
This field is also supplied by the Exchange System Administrator
Apply These Setting To All Users
Checking this box saves re-entering the data for users on the User Preference Screen.
CC'd Emails And Attachment Archives
If the contact being CC'd has that email address stored in Advisors Assistant, then the attachment will be archived in the path for the CC's name. This will cause the attachment to be stored twice, but it also provides the flexibility to delete one attachment while retaining the other. Disk space costs about 10 cents per GB (1,000 MB) Storing a 1MB file costs about 1/10th of a cent. Most attachments are smaller than 1 MB, so the flexibility comes at a very low cost.
Viewing Archived Email Attachments
You can view an email attachment either at the top of the email in the email archive or by using the Email Attachment Perspective on the View Client With Files Screen.
Deleting Archived Email Attachments
You can delete archived attachments just as you can delete associated files. You must have the task security to delete associated files. This is assigned by your System Administrator.
Email Attachments become part of View Client With Files and are therefore tracked in the file history.
Insurance Commission Preferences allow the administrator to make a system wide choice on how certain commissions are handled.

System Preferences Insurance Commissions
Use Direct Pay Settings On Rate Tables
This setting will set the direct pay settings for all producers on the policy. It saves time because you only have to set direct pay in one place. Do not use this setting if you are splitting commissions on a single policy and some of the producers are paid directly and others are paid by the agency.
Use Direct Pay Settings on Policy Screen
If some producers on an individual policy are paid directly by the Insurance Company and others who are splitting the policy are paid by the agency, you must use this setting so that you can make the choice on a policy by policy basis.
This tab only shows if your Advisors Assistant is a hosted database.
Region
Choose the region / country. This setting will affect how dates and currencies are displayed. Leaving the field blank defaults to the United States.
Show Masked Account / Policy Numbers
This choice will only show a few characters at the end of the policy or account numbers for identification of the product. This is recommended if you are using a mobile device that could be lost.
Show Complete Account / Policy Numbers
This choice will show the entire account and policy number on all browsers.
If you are not using one of the Partners listed on the sidebar menu, you can remove their icon on a system wide basis.
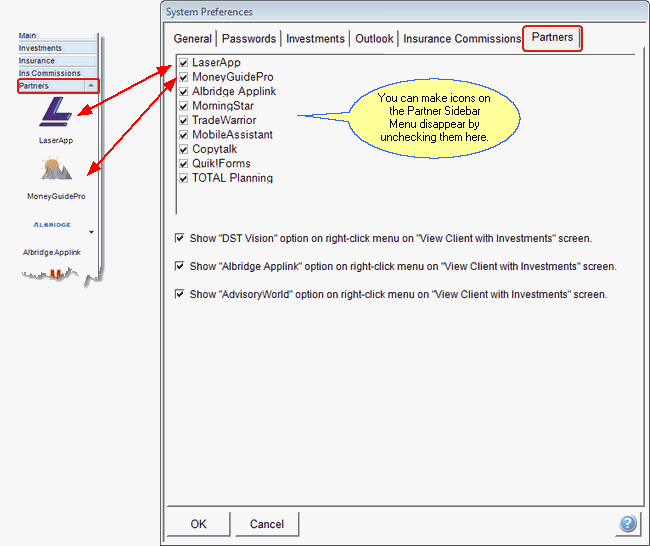
To remove a partner icon from the list, just uncheck the box next to the name.
Repositioning Partner Icons
The partner menu can show 4 icons without scrolling. It's a good idea to position the partners in the order of most used to least used.
Highlight the name of a partner and user the Move Up and Move Down buttons to reposition the icons on your list. This applies to the entire system.
Controlling The Right Click Investment Account Menus
The bottom of the screen lets you control which partners show up on the right click menus at the bottom of the View Accounts and View Investments Screen.
All of the names shown on the list can be given right click access. Unchecking the name will take it off of the Right Click Menu.
Docupace is a document and workflow management system that is often adopted by Broker Dealers because of it's straight through processing.

System setup for Docupace. There is also a user setting in User Preferences
The information required on the screen above is provided by Docupace or the user's Broker Dealer or RIA's custodian who will be processing the forms.
Be sure to:
1.Enable Docupace Integration by checking the box.
2.Fill in the values on the screen above using information provided by either Docupace or your Broker Dealer.
3.Click on the Test Connection Button. If Advisors Assistant does not connect, do not go any farther. You have something filled in wrong and you need to check the values entered.
4.Fill in the User Preference if you are going to use a Docupace User ID other than the same User ID you use to log into Advisors Assistant.
5.System Administrator fills in the Docupace Rep ID under Admin | Maintain Producers in Advisors Assistant. This connects the Primary Producer field in the Contact Record to the Advisor in Docupace.
For information about how to use Docupace with Advisors Assistant, click HERE
There are multiple help topics for AdvisorVault, including how to set it up. Click HERE for AdvisorVault Setup information.
Insurance Products
When the Insurance Product Class is designated as an Annuity, you can break out the annuity products on their own tab. In addition, the settings on this screen lets you control if these annuity products are shown on the other tabs, either Insurance (View Client With Insurance) or Investments (View Client With Investment Accounts)
Investment Products
Investment products may also appear on this tab based on the Investment Account Type drop down. If you check the Annuity Box in the Investment Account Type (Admin | Drop Down Lists | Investment Account Type), any investments in those accounts will appear under the Annuity tab.
What Puts An Annuity On The View Client With Annuities Screen
The annuity must be entered in the Insurance Module and the Product Class must be set to "Annuity."

Turning On The Annuities Tab on View Client Screen
Showing The View Client With Annuities Tab
If either of the above fields is set to View Client With Annuities Tab OR Show on Both Screens, The View Client with Annuities Screen will be available.
Restart Advisors Assistant to have the tab appear.
Hiding The View Client With Annuities Tab
To make the View Client With Annuities unavailable, set each of the fields above to only show in their own module. Do not select View Client With Annuities or the option to show on both screens.
Restart Advisors Assistant to have the tab appear.
Annuities In The Insurance Module
You must have the optional insurance module to be able to enter Annuity Class insurance products.
Show On View Client With Insurance Screen
Setting this option will ignore the View Client With Annuities Tab. Annuities will show up on the View Client with Insurance Screen.
At start-up of Advisors Assistant, unless there is a View Client With Annuities selected in the Investment Option, the Annuity Tab will not appear on the View Client screen.
Show On View Client With Annuities Screen
Selecting this option will cause the Annuity Tab on the View Client Screen to appear the next time you start Advisors Assistant. Any insurance products which have the Product Class of Annuity will be shown under View Client With Annuities.
You must restart Advisors Assistant before the Annuities Tab will show up.
Show On Both Screens
Annuities will show on both the View Client with Annuities Screen and View Client with Insurance Screen.
You must restart Advisors Assistant before the Annuities Tab will show up.
Annuities In The Investment Module
The sub accounts that fund the annuities in the Investment Module will show on the Annuity Tab provided you have checked the Annuity Box on the Investment Account Type drop down and the System Preferences are set below.
Show On View Client With Investments Screen
Annuities will not be shown in the View Client With Annuities Screen. The View Client With Annuities Screen will not show up unless you have set the Insurance Module to show them.
Show On View Client With Annuities Screen
The Annuity Tab will show the Annuity products. They will not be shown on the View Client with Investment Accounts Screen.
You must restart Advisors Assistant before the Annuities Tab will show up.
Show On Both Screens
Annuities will show on both the View Client with Annuities Screen and View Client with Investments Screen.
You must restart Advisors Assistant before the Annuities Tab will show up.
Use this tab to select your local region to affect date formats, currency symbols, and other local settings.

System Preferences For Mobile Application
Masked Account / Policy Numbers
Because mobile devices can be lost, you can set the mobile device to only show partial account and policy numbers. If you are using the program in your office with a browser, you may want to show complete numbers.
This only affects the AAMobile2 program.
The Mobile Application Tab is only available to Hosted Users.
In order to access National Life Group's FTP site for downloading data, you must store the passwords in Advisors Assistant. They are stored encrypted.

You must activate the National Life Group module before this tab shows on the screen
The FTP User Name and Password are provided by National Life Group. Be sure to test the connection to validate that the credentials work.
Note: For the tab to show up in System Preferences, National Life Group's download must be activated by your System Administrator.
Validate Before Removing Files
National Life does not clean up the files on their site. It is your job to delete files when you no longer have a use for them. Check this box and the following message will appear after processing.
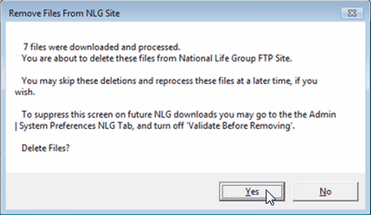
Leave it unchecked, and Advisors Assistant will automatically remove files after processing.
For information about how to process the downloads, click HERE.
See Also
Investment Disclosure Information
Turning Off One User's Attachment Archiving
Insurance Commissions Direct Pay