Setting Up Exchange Server

Contents
Click on File | Preferences | Outlook Sync Tab
![]() Outlook Synchronization Part 1 of 3 (3:59)
Outlook Synchronization Part 1 of 3 (3:59)
![]() Outlook Synchronization Part 2 of 3 (5:35)
Outlook Synchronization Part 2 of 3 (5:35)
![]() Outlook Synchronization Part 3 of 3 (5:05)
Outlook Synchronization Part 3 of 3 (5:05)
The use of Advisors Assistant with Outlook Web App (OWA) must be authorized by the Advisors Assistant Administrator. This is done in the System Preferences.
The New User Wizard will step you through these screens.
Step 1: System Preferences And OWA
Before doing the individual user preferences, the first step in setting up Exchange Server integration is to set the System Preferences on the Outlook / Outlook Web App Tab. Skip this step if you have already done the system preferences.

Setting Up Exchange Server with Outlook Web App
A.Check the box Allow User To Select Private Exchange with Outlook Web App.
B.Imported Name Types: If you are importing names from other Exchange Accounts, it is a good idea to check the box to restrict new name types so you don't end up with every name type in Advisors Assistant in all those little exchange databases.
C.Email Attachments: Decide if you will be archiving email attachments. Unless everyone has access to the location you choose, you should allow everyone to choose their own location in their User Preferences. It is not recommended that you archive "embedded attachments" unless you want to save multiple copies of clients' logos and signatures that are at the end of messages.
D.Exchange Server Domain: Fill in the domain used to contact your exchange server. This information will come from your Exchange Server Administrator.
E.Web App URL: Fill in the Exchange Web Service Default Domain and the Default Login Page for Exchange Web App. This default delivered with exchange is the Domain + /ews/Exchange.asmx. HOWEVER, many administrators change the default for security purposes as shown above.
Step 2: Set Up The Advisors Assistant User Preference To Access Exchange Server
In order to sync Exchange with Advisors Assistant, each user's mailbox must be checked. This requires that Advisors Assistant use the mailbox's User Credentials.
")
Setting Up Private Exchange Server (Not Outlook 365)
You should also test the connection using the Test Connection button.
Advisors Assistant To Exchange Synch
The available choices on this drop down list depend on whether the System Administrator allows Outlook, Exchange, or Both to be chosen. Selecting None will turn off all Synch for the user.
Connect To Exchange Using
There are two options you can use.
Your Windows Login
This is an option for single sign on and will usually be implemented through web site programming. Only choose this option if your administrator instructs you to do so.
Outlook 365 / Exchange User ID and Password
This option is the typical User ID and Password that would be used for any non-enterprise edition of Advisors Assistant.
Real Time Synch Calendar Events To Exchange Check Box
When you enter an event in the Advisors Assistant Calendar, do you want the event to automatically be sent to Exchange? When this box is checked, when you save a calendar event in Advisors Assistant, that event will get synced to Exchange for the Calendar being viewed.
If you set up or edit an appointment in Advisors Assistant and this box is checked, it will automatically go into Exchange when you OK out of the event in Advisors Assistant no matter how many days into the future the even is set to occur.
Note: If you change a calendar event in Exchange and that event is more than a week into the future, it may not be automatically changed in Advisors Assistant. You should make changes and additions to your calendar from Advisors Assistant when possible.
The usual selection is to automatically Synch Calendar Events..
Exchange Web APP URL
If the Apply To All Users Box is checked on the System Preferences, this field will be filled in for you and grayed out. If it is available, you will need to get the information from the Exchange Service System Administrator. The example below is a typical Exchange address, but can be modified for individual servers.
Example
Https://MyDomain.com/EWS/Exchange.asmx
Exchange Login User ID
Most small Exchange Server setups will use a User ID and Password to Log Into Exchange.
The Exchange Login can also be accomplished using Windows Authentication if you are part of a domain and your Exchange Server uses Windows Authentication. (This is an advanced feature, so if you don't know what this means, just ignore it.)
User ID and Password
Your User ID is the ID you use to sign into Exchange. It is assigned by the Exchange Administrator.
Your Windows Login (Active Directory)
Some Enterprise Systems that use Active Directory and your Windows Credentials (Login) to automatically provide a Single Sign On to Exchange. Your Exchange Administrator can give you guidance on this.
When Windows Login is selected, the regular User ID and Password fields will not be available.
Exchange Web App Domain
If the Apply To All Users Box is checked on the System Preferences, this field will be filled in for you and grayed out. If it is available, you will need to get the information from the Exchange Service System Administrator
Example
MyDomain.com
Login Password
This is the Password you use for OWA.
Some Enterprise Systems that use Active Directory may elect to have Single Sign On to Exchange. In that case, this field will not be available.
Step 3: Click on Test Connection
If your setup is correct, the Test Connection Button will report a successful test. If the test fails, test your login credentials with your Exchange Server Outlook Web Application.
Step 4: Set Up User Preference For Archiving and / or Forwarding
![]() Setting Up Email Archiving (6:14)
Setting Up Email Archiving (6:14)
The archiving of the emails is controlled on a user by user basis. Each user has their own login. Go to User Preferences by clicking on File | Preferences at the top menu.
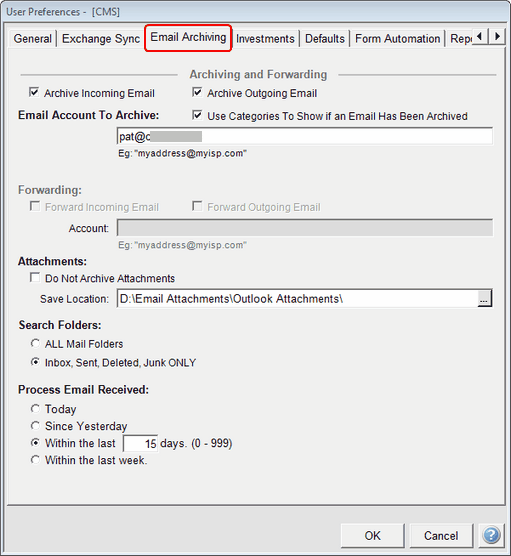
On the User Preference Screen:
A.Email To Archive: Usually, you will want to archive both incoming and outgoing email (sent and received).
B.Email Account: Enter your email address for the account.
C.Forwarding: If you want to forward all of your email to another account for archiving, you can set it up here by entering the email address of the account.
D.Attachments: If the System Administrator has given you permission to choose your own location to save attachments, you can enter that location here. It should be on a location you and your office have access to. The C drive is NOT recommended because everyone has their own C drive and each is really a different location.
E.Search Folders: This applies to incoming email since your sent email goes out of the Outbox. If you have rules that place emails in different folders as they arrive, you should choose all folders. Otherwise, for faster interactions with Exchange, choose the Inbox, Sent, Deleted, and Junk.
Step 5: Set Up The Advisors Assistant User Look Back Preference
Each individual user has a login to Exchange Server. When they run OWA, they log in. Advisors Assistant also has to log in to archive their mail from Exchange.
A.The default search folder defaults to the 4 main folders. This only applies to the look back feature. Users are given the opportunity to change this value when they start the look back feature.
B.Select how far back to look. A few days is normally sufficient. The first time, you may want to choose several weeks to pick up old emails. Users can change this value when they start the look back feature.
See Also
More About Private Exchange Servers
Exchange and Outlook Web App Overview (OWA)