Setting Up Office 365
Click on File | Preferences | Outlook Sync Tab
![]() Outlook Synchronization Part 1 of 3 (3:59)
Outlook Synchronization Part 1 of 3 (3:59)
![]() Outlook Synchronization Part 2 of 3 (5:35)
Outlook Synchronization Part 2 of 3 (5:35)
![]() Outlook Synchronization Part 3 of 3 (5:05)
Outlook Synchronization Part 3 of 3 (5:05)
The Outlook Sync Tab contains the information that Advisors Assistant needs to know which variety of Outlook you are using and how to sync your calendar and archive your email.
When you are not using Outlook Installed Locally, it also provides information for logging into your email box on the Internet.
Outlook in Office 365 uses Exchange Server and Exchange Web App, but Outlook 365 has a different way of connecting to its dedicated Exchange Server.
Note: From time to time, Microsoft will change their login interface. Some of the Microsoft Screens shown are subject to change.
System Preferences And Outlook 365
There are two major things decided by the Advisors Assistant System Administrator:
1.Which integration program the user can choose in User Preferences. If you are not using Outlook Installed Locally, Exchange Server, or Google for Work, you can restrict its use.
2.If and where email attachments are stored.
3.Restrictions on name types assigned when contacts are imported from Outlook.

System Preferences Must Allow Outlook for Office 365 to be Set Up
Before setting any user up, the System Administrator should navigate to the System Preferences, Outlook Tab, and fill in the applicable fields.
Outlook 365 User Preferences
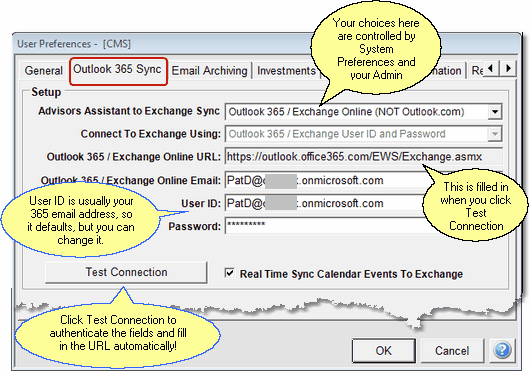
First you need to tell Advisors Assistant which Outlook method you will be using. This is done from the File | User Preferences | Outlook Sync Tab.

Your System Administrator controls what Outlook choices are available available among the various Outlooks
Advisors Assistant To Exchange Sync
This field tells Advisors Assistant which Outlook you are using. Based on the Outlook you choose in the drop down list, the correct fields for you to fill in will show on the screen.
For Outlook In Office 365, choose the item shown on the screen above.
Connect To Exchange Using
The only option is to use your Outlook 365 User ID and Password.
Office 365 Exchange Online URL
This URL has to do with how Advisors Assistant communicates with Exchange Online when it syncs the calendar and your email. It is not the URL that you use to login to Outlook 365.
The Test Connection Button will fill this in for you.
Office 365 Exchange Online Email
This is the email address for your Outlook 365 email box. It is also what you will usually use to sign into the Office 365 portal on the internet.
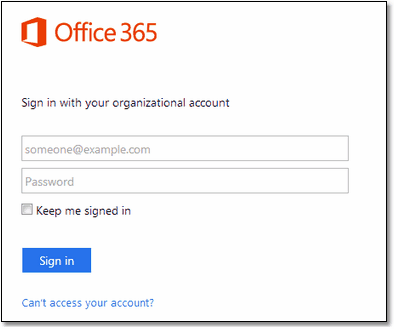
As of this writing, the login URL for Outlook 365 was https://login.microsoftonline.com/

The Office 365 Sign In Screen
Outlook 365 User ID
Most of the time, this will be your Outlook 365 email address, but it does not have to be. This is why we provide a separate field for the User ID.
Outlook 365 Password
Enter the password chosen for your user account for Office 365. If you have difficulty typing it in, click on the Show Password box to see what you are typing.
Real Time Sync Calendar Events To Exchange (In Development)
When you check this box, anytime a calendar event is entered into Advisors Assistant, the Advisors Assistant will connect to your Office 365 Calendar and put the event into your Office 365 Calendar.
This only works from Advisors Assistant to Office 365. It does not work in the other direction because, for security reasons, Office 365 does not know you are using other calendars. In order for that to take place, Microsoft would need to let us run code on their server.
However, you can sync the Outlook Calendar to Advisors Assistant manually using the Outlook 365 icon on the Sidebar Menu.
Test Connection Button
This button does two things:
1.It will test that you have filled in your User ID, Password, and Email Address correctly by testing you login.
2.It will ask Microsoft for the URL that Advisors Assistant can use to talk to your Outlook 365 Account directly from Advisors Assistant.
Troubleshooting The Connection
If the Test Connection Button does not work, before calling our Technical Support, please do the following:
1.Click on Show Password on User Preference Screen.
2.Attempt to connect through your web browser by clicking on https://login.microsoftonline.com (link at the time of this writing of help.)
3.Copy and paste the User ID and Password into the Office 365 Login Screen. (Highlight the field on the Advisors Assistant screen, click Control-C and place the cursor into the browser field and press Control-V)
4.If you can't log into Office 365 from the Microsoft Login Screen, the Test Connection Button will not work and you have an issue on the Microsoft side. Double check your ID and Password.
Email Archiving And Outlook 365
![]() Setting Up Email Archiving (6:14)
Setting Up Email Archiving (6:14)
Archiving with Outlook 365 and Exchange (Outlook 365 uses its own Exchange Server) is done differently because the emails are not on your local station. They only exist on the web site. Therefore Advisors Assistant tells Exchange to send a copy of the email to Advisors Assistant and then Advisors Assistant checks the email addresses and either stores it or ignores it.

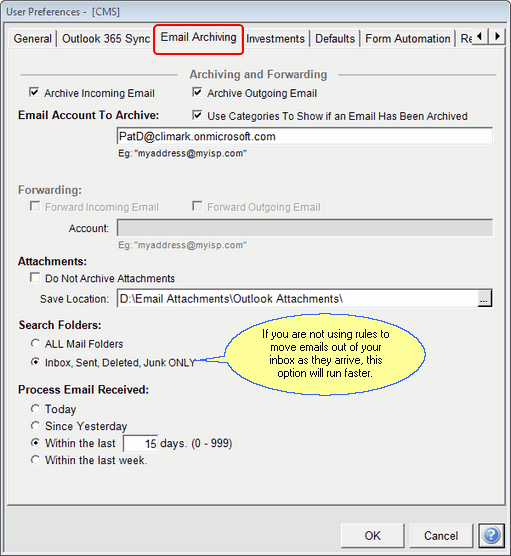
Email Archiving Tab for Outlook 365 in User Preferences
Archiving and Forwarding
Choose whether you want to archive incoming, outgoing emails, or both.
Forwarding is not available with Outlook 365 and Exchange. Enterprises can already set up their emails to forward automatically by using the tools Exchange provides.
Email attachments can be archived. This is controlled at the System Preference level. Embedded attachments, graphics included in the body of the email are not archived. (How many copies of a client's signature are needed?)
Save Location
The Save Location can be controlled by the System Preferences. The Advisors Assistant Administrator may allow users to set locations that are different from the main system location. This is useful in Enterprise installations when the user is not connected to the network where attachments are usually stored. It lets the user store their attachments in their own location.
The field is not available unless the System Admin provides permission.
If you occasionally need to archive a graphic embedded in the body of an email, right click on it, copy it to your Windows Clipboard and paste it into a graphics program where it can be saved as a file and save it under View Client With Files.
To archive attachments:
1.Be sure your User Preferences are set up to archive emails.
2.Be sure your User Preferences have not turned off Archiving Attachments. (The check box next to attachments.)
3.Your System Administrator must set System Preferences to archive attachments and choose a location for the attachments.
IMPORTANT: If you are using remote access of any kind and you do not have access to the disk drive where the emails are set to be archived, neither the email or the attachment will be archived, but you can use the Look Back feature to archive both the email and the attachment the next time you have access to that file location.
Search Folders
You can save time by having Advisors Assistant only look in your 4 main folders. When email is received it is normally put into the Inbox and Advisors Assistant will archive them from there.
All Mail Folders
This is ONLY useful if you are using Outlook Rules to move emails to other folders as they come in and before they are read.
Inbox, Sent, Deleted, Junk Only
This is the recommended choice unless you are using rules to move mail to other folders on arrival OR if you move mail manually to other folders and want theLook Back feature to find them.
Process Email Received
Advisors Assistant has a unique feature which allows you to look back through your email boxes and reprocess a number of days, up to 999 days. (The high number of days is for a one time look back. You would not want to look back more than several days because of the time involved.)
This is a Look Back feature is especially valuable the first time you do the email archive. It tells Advisors Assistant how far back to look for emails when you invoke it through Outlook's Tools Menu.
If you want Advisors Assistant to look back 3 months, you could set 90 days and then change the number of days after the first archive is complete.
Try setting 15 to 30 days. Then, every week or so, tell Outlook to look back to double check that emails were archived.
For more information on the Look Back Feature, click HERE.
When contact information is imported from Outlook, a key field is established in Advisors Assistant so that it will not duplicate that contact when exporting to Outlook and the Primary Producer is established for the contact..
IMPORTANT: If you plan to populate your database from Outlook, be sure to import the contacts from outlook BEFORE doing exports to Outlook. If you export first, a name from a Producer A can be matched with a name in Outlook that really belongs to Producer B. This is because Outlook does not track producers as Advisors Assistant does.
If more than one producer's contacts are in the database and you want to use Outlook with that producer's contacts, be sure to always import for that producer first before doing any exporting.
The import will attempt to detect duplicate names.
The Outlook User Preferences cover two major areas:
1.If, and how you want to use the Auto Sync feature for calendar events.
2.When you import names from Outlook, to whom does the producer default. This can be changed at import time. It just pre-fills the field to save time.
For more information about Importing please click HERE.
See Also
Overview Of Available Outlooks
Setting Up Outlook Installed Locally
|
Remember, if Outlook is installed on your computer, and you are using Outlook (installed) to check your Office 365 email, you should set up Advisors Assistant for Outlook Installed on your computer. You can only use one Advisors Assistant method of syncing with Microsoft email at a time. |
