Advisors Assistant View Screen

Contents
![]() Tour of the Advisors Assistant View Screen (7:53)
Tour of the Advisors Assistant View Screen (7:53)
Advisors Assistant View Screen Overview
Advisors Assistant uses unique View Screens to help you easily view, add, and update contact information. The View Screens also help you easily navigate to the different categories of information you've stored about your contacts, such as Notes, Links, Markets, and Calendar Events.
•The top half of the View Screen shows you contact demographic information, addresses, and phone numbers.
•The bottom half of the View Screen has different information depending on the Tab you are viewing, such as Notes, Links, or Markets.
•On the left side of the View Screen is a Sidebar that gives you quick access to the most commonly performed functions in Advisors Assistant, such as the Calendar and the Selection Reports.
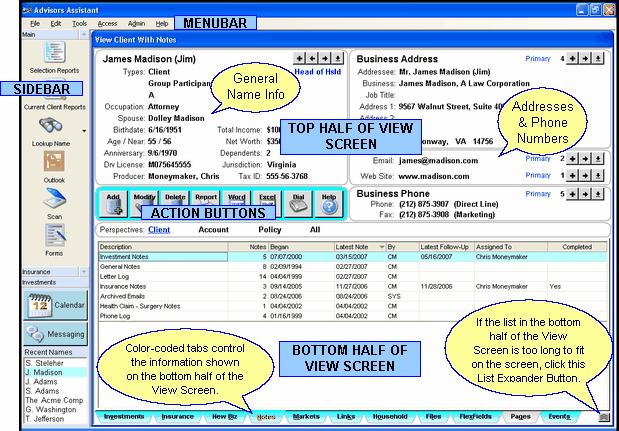
The Top Half Of The View Client Screen
A description of each area in the top half of the view screen is listed below. A single click in most of these areas (except for Email Address and Web Site Address) will take you to the edit screen for that section so that you can modify that information.
The area in the upper left containing the name, type of name, income, etc.
Name Demographics Area
Clicking in the upper left area of the screen containing the name demographics will take you to the Modify Name Screen so that you can edit the name information.
To add a new name to Advisors Assistant, click on the Plus Button ![]() located next to the name you are viewing.
located next to the name you are viewing.
To lookup and navigate to a new name, click on the Down Arrow Button ![]() next to the name you are viewing, or click on the Lookup Name Button in the Sidebar, or press Alt-Q on your keyboard.
next to the name you are viewing, or click on the Lookup Name Button in the Sidebar, or press Alt-Q on your keyboard.
To scroll backwards or forwards through the names in alphabetical order, click on the Arrow Buttons ![]() that point to the right and left next to the name you are viewing.
that point to the right and left next to the name you are viewing.
The area in the upper right containing the address information
You can store an unlimited number of Addresses for every contact in Advisors Assistant.
Clicking in the upper right area of the screen containing the address information will take you to the address edit screen for that address.
To add a new address, click on the Plus Button ![]() .
.
To see a list of all the addresses for the name you are viewing, click on the Down Arrow Button ![]() in the address area.
in the address area.
To scroll through the addresses for this name, click on the Right Arrow Button ![]() in the address area.
in the address area.
The Email and Web Site Address section
You can store an unlimited number of Email and Web Site Addresses for every contact in Advisors Assistant.
When you click on the Email Address shown, Advisors Assistant loads your default email program and places the address in the To field of the email.
When you click on the Web Site Address shown, Advisors Assistant loads your Internet browser and navigates you to that web site.
To add a new email or web address, click on the Plus Button ![]() in the email or web site area.
in the email or web site area.
To see a list of all the email/web addresses, click on the Down Arrow Button ![]() in the email or web site area.
in the email or web site area.
To scroll through the email/web addresses for this name, click on the Right Arrow Button ![]() in the email or web site area.
in the email or web site area.
The area in the middle right containing the phone information
You can store an unlimited number of Phone Numbers for every contact in Advisors Assistant.
Clicking on the phone number itself will take you to the phone edit screen for that phone number.
To add a new phone number, click on the Plus Button ![]() .
.
To see a list of all the phone numbers for the name you are viewing, click on the Down Arrow Button ![]() in the phone area.
in the phone area.
To scroll through the phone numbers for this name, click on the Right Arrow Button ![]() in the phone area.
in the phone area.
The Action Buttons Near The Middle Of The View Screen
![]() Add Action Button
Add Action Button
The Add Action Button will allow you to add new information to the bottom half of the View Screen, depending on which screen (tab) you are currently viewing. For example, if you are viewing the Markets Screen, clicking on the Add Action Button will allow you to add a new Market.
![]() Modify Action Button
Modify Action Button
The Modify Action Button will allow you to modify the information you are viewing in the bottom half of the View Screen. To modify information, highlight it and click the Modify Action Button. For example, if you are viewing the Markets Screen, highlight the Market you wish to edit and click on the Modify Action Button.
![]() Delete Action Button
Delete Action Button
The Delete Action Button will allow you to delete the information you are viewing in the bottom half of the View Screen. To delete information, highlight it and click the Delete Action Button. For example, if you are viewing the Markets Screen, highlight the Market you wish to delete and click on the Delete Action Button.
![]() Quick Report Action Button
Quick Report Action Button
The Report Action Button will allow you to print a summary report of the information you are viewing in the bottom half of the View Screen. For example, if you are viewing the Notes Screen, clicking on the Report Action Button will print a summary of all of that contact name's Notes.
![]() Word Action Button
Word Action Button
The Word Action Button will open Microsoft Word and allow you to print a letter or document to the contact name you are currently viewing.
![]() Excel Action Button
Excel Action Button
The Excel Action Button will open Microsoft Excel and send the data you are viewing in the bottom half of the View Screen into an Excel spreadsheet. For example, if you are viewing the Investment Screen, clicking on the Excel Action Button will send the list of client's investments to an Excel Spreadsheet.
![]() Dial Action Button
Dial Action Button
The Dial Action Button will open the Advisors Assistant Auto-Dialer so that you can call one of the current contact's phone numbers using the Windows Dialer or Skype.
Right click on the Dial button to get a QR Code with the contact's information on it. For more information about QR Codes, click HERE.
![]() Help Action Button
Help Action Button
The Help Action Button will open the Advisors Assistant Help for the current screen you are viewing or editing.
The Bottom Half Of The View Client Screen
The information in the bottom half of the View Screen changes depending on which Tab you have selected. For example, if you are sitting on the Notes Tab you will be viewing a summary of the contact's notes in the bottom half of the View Screen.
The Tabs are color coded: a white tab indicates no information has been added to that View Screen; a blue tab indicates information has been added to that View Screen. The Tab highlighted in red is the information you are currently viewing. Each View Screen has its own Help giving you details about that particular view.
![]() Expanding Your Lists
Expanding Your Lists
If the list in the bottom half of the View Screen is too long to fit on the screen, you can expand the list by clicking on the List Expander Button (![]() ) located in the bottom right corner of every View Screen.
) located in the bottom right corner of every View Screen.
The Sidebar To The Left Of The View Client Screen
The Sidebar located to the left of the main View Client Screen contains quick shortcuts to the most commonly performed functions in Advisors Assistant.
 Selection Reports
The Advisors Assistant Selection Reports allow you to pull information out of your database based on the criteria you enter. Once you have selected a group of names or products, you can then print reports, send letters or emails to those names, or export those names into another file format.
 Current Client Reports
The Current Client Reports will give you access to all of the Advisors Assistant Reports for the current name you are viewing.
 Lookup Name
The Lookup Name Icon will allow you to look names up in your database in a variety of ways: by name, phone, address, email address, web address, investment account number and policy number. The Lookup Name By Name Screen is also available using the hot key of Alt-Q, and allows you to look up names by last name, first name, tax ID number, address, city, state, and primary name type.
![]() Outlook
Outlook
The Outlook Icon will initiate the Outlook Synchronization from Advisors Assistant, allowing you to synchronize your contact and calendar information with Outlook for use with any PDA that synchronizes with Outlook.
You must set up your Outlook Preferences in the File | Preferences area before you can synchronize with Outlook.
![]() Scan
Scan
The Scan Icon will open Imaging Assistant, allowing you to scan documents into your contact's Files section of Advisors Assistant.
![]() Forms
Forms
The Forms Icon will open Laser App or Quik! Forms, which are application automation programs sold separately from Advisors Assistant. Clicking the Forms Icons will open the program you've purchased and pass the contact information over to that application software to help you fill in your applications quickly and easily.
 Calendar
The Calendar Button will open the Advisors Assistant Calendar. The Calendar runs in a separate window, so you can have both the Calendar and Advisors Assistant open at the same time.
![]() Messaging
Messaging
The Messaging Button will open the Advisors Assistant Messenger, which allows you to send instant messages to other users logged into Advisors Assistant.
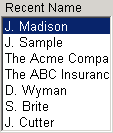 Recent Names List
The Recent Names List gives you quick access to the last names you were recently viewing. Just click on the name to change to that contact record. You can set how many names you'd like Advisors Assistant to remember for the list in the Advisors Assistant Preferences.
The Menubar At The Very Top Of The View Client Screen
The Menubar located at the very top of the main View Client Screen contains some common Windows functions as well as other database functions that are performed less frequently, such as setting your User Preferences.
File
Use the File Menu to set User Preferences, change your Windows Printer Setup, and Exit Advisors Assistant.
Edit
The Edit Menu contains Windows functions such as Copy and Paste.
Tools
Located in the Tools Menu are some functions such as the Global Notes Search and Personal Contact Wizard, as well as navigation options for all of the tools located on the Sidebar for use with voice activated software.
Access
If you are using the MultiProducer version of Advisors Assistant, the Access Menu will be visible. This is used for changing the list of names you are working with if you have access to more than one contact list.
Admin
All Administrative functions are available through the Admin Menu.
Help
Access to Help as well as information about your Advisors Assistant Program is available through the Help Menu.
Activate
The Activate Menu allows you to Activate the modules you purchased with Advisors Assistant. It is only visible during your Trial Period or when you are logged in as the System Administrator.
You can resize the View Screen so that it fills the area by dragging the edges or corners. The screen has a minimum size, but does not have a maximum size.
Double clicking on the word Perspectives on the View Screen will automatically resize the View Screen for you. This is especially nice when you have two monitors and they are different sizes.
Also, clicking on the Fit To Screen Icon ![]() will resize the screen.
will resize the screen.
See Also
|
Pressing Alt-Q is the same as clicking on the down arrow in the name demographics area. It will take you to the Name Lookup Screen so you can navigate to a new name.
You can sort the list by clicking on the column heading and you can vary the width of each column by dragging the divider between the column headings to the size you want. Advisors Assistant will remember the column widths on a user by user and screen by screen basis.
You can always tell which View Screen you're on by looking at the title in the Window Bar.
Double Click on the word "Perspectives" under the Action Buttons and the View Screen will size automatically. |