Create Client Vaults For Multiple Clients
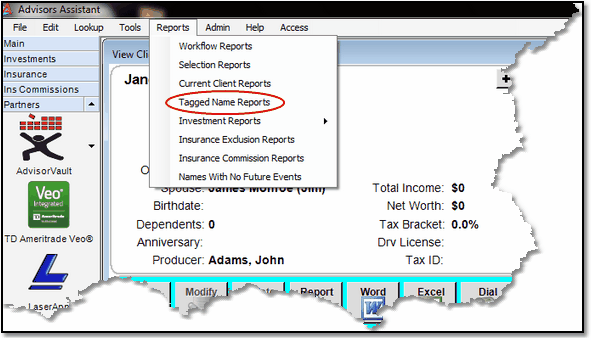
From Any View Client Screen, Click On Selection Reports OR from the Top Menu, click on Reports | Tagged Names Reports
You can add batches of vaults to AdvisorVault from inside of Advisors Assistant by either using Selection Reports or Tagged Names Reports.
Using Tagged Names To Create Client Vaults
Tagging Names is a good way to set up several vaults at a time. It is especially valuable if there is no set criteria, such as type of name (A Clients vs B Clients, etc.) you can use for who gets a vault.

Tagging Names For Setting Up Vaults
Step 1: Choose Tagged Name Reports from the Reports Menu
The Reports Menu is on the Top Menu as shown above.
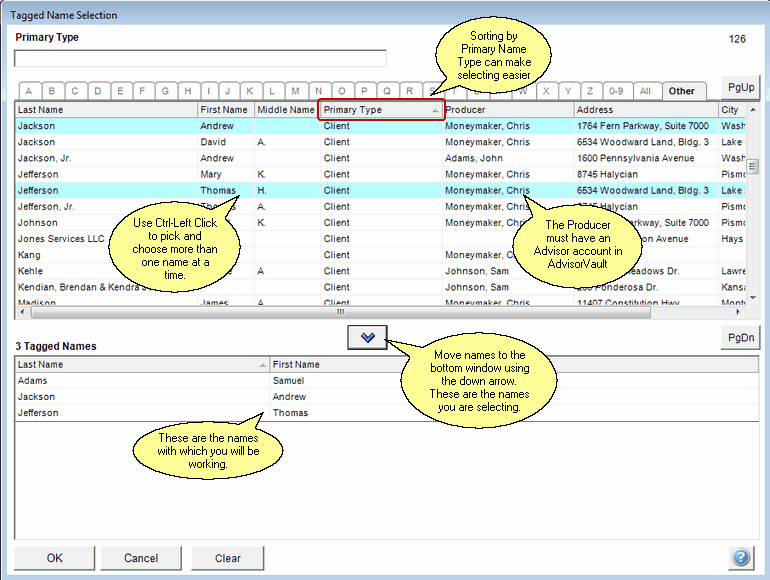
Step 2: Tag The Names You Want To Select
If you sort the names by Primary Type by clicking on the column heading, it may make it easier to find the names you want.

Selecting the names to create the vaults
After you have tagged the names, click OK.
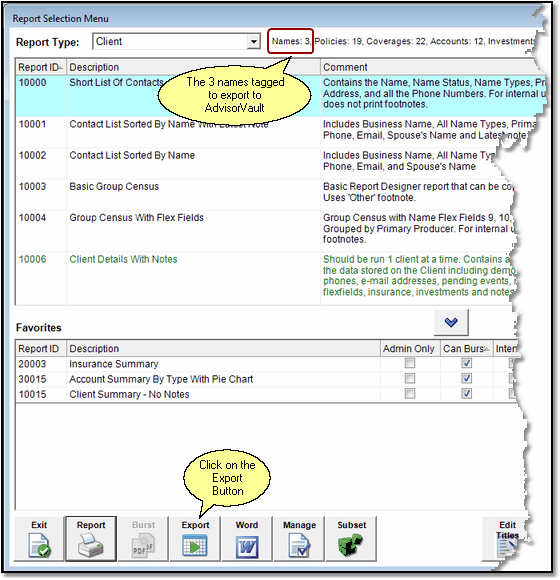
You will be taken to the Selection Reports Menu. On this screen, just click on the Export Button.

Click on Export to select where you want to send the name.
The Export Button lets you select where you want to send the names. You will be exporting the names to AdvisorVault.
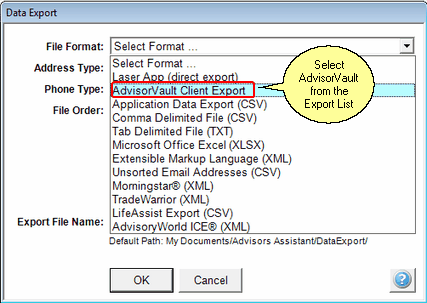
The next menu is a complete list of all of the export formats.

Choose AdvisorVault from the list.
Choosing AdvisorVault begins the export. There are no other choices to be made.
After the export, a results screen will appear. The right-most column is the most important.

Results Screen showing all contacts exported successfully.
The screen above is a powerful screen because if there are any issues, you can easily correct them or make a list to correct them later.

This screen shows mixed results, but they are easy to correct
When all of the requirements of AdvisorVault are not met, the export can fail. In this case, the Results Screen will provide you with the reason why the particular contact failed to export.
When a name already exists in AdvisorVault, it will automatically be updated.
Advisors Assistant makes every effort to inform users why names don't successfully export. Each name must meet the same requirements for the individual name exports.
Failures To Export To AdvisorVault
If you have several failures, you should:
| 1. | Show just the failures on the list. |
| 2. | Click on the Excel Button so you can print the list. |
| 3. | Click on the Subset Button to create a Subset of the names. Using Subsets lets you just work with the names that need fixing. |
Using Selection Reports To Create Client Vaults
This procedure closely follows the method used above. Please read that section first because everything in the Tagged Names Section from Step 3 onward is the same as Step 4 onward below.
Selection Reports is another way of selecting multiple names to export to AdvisorVault. You can create hundreds of vaults at the same time, but remember, if you make a big mistake and creates hundreds of vaults you don't need:
| 1. | You could run out of space or use more space than you planned. |
| 2. | You have to remove them one vault at a time from AdvisorVault, AND |
| 3. | You need to remove the reference to that vaut in Advisors Assistant. |
Step 1: Click On Selection Reports On The Sidebar Menu
Selection Reports is in the main section. For more information on Selection Reports, Click HERE.
Step 2: Complete The Selection Criteria
For a complete discussion of the Selection Reports Criteria Screens, Click HERE.
Step 3: Click On the Search Button
Step 4: Click On The Export Button
See Step 3 in the Tagged Names Section above for more information.
Step 5: Choose AdvisorVault for the Export Format List
See Step 4 in the Tagged Names Section above for more information.
Step 6: View Results
See Step 5 in the Tagged Names Section above for more information.
See Also
Create A Vault For The Contact Being Viewed
Single Sign On To Your Advisor Vault
Bursting Reports Into Individual PDF Files
Using AdvisorVault From Inside Advisors Assistant
Creating Individual Client Vaults From Inside Advisors Assistant
Using Selection Reports To Create Multiple Client Vaults At The Same Time
Uploading Burst PDF Reports To Clients' Vaults
Viewing Files Stored In AdvisorVault From Inside Advisors Assistant
Keeping Advisors Assistant and AdvisorVault Synchronized
|
Walk before you run. Create individual vaults first, then use Tagged Names. Then use Selection Reports. Learn to use a few vaults before you create lots of vaults. |
