Add A File To A Client Vault
Click on the Files Tab on any View Client Screen
Topic Overview
Caution: When you upload files, especially reports, be sure you view the reports and files before uploading to verify that the files are the correct files and that the reports have the information on them that you expect.
There are different ways to add files to AdvisorVault. The method to use depends on the file being added.
| • | Burst Reports that automatically go into the clients' vaults are added from the AdvisorVault icon on the Sidebar Menu. |
| • | A file stored on your local or network Windows file system can be added by using the Add Button on View Client With Files. |
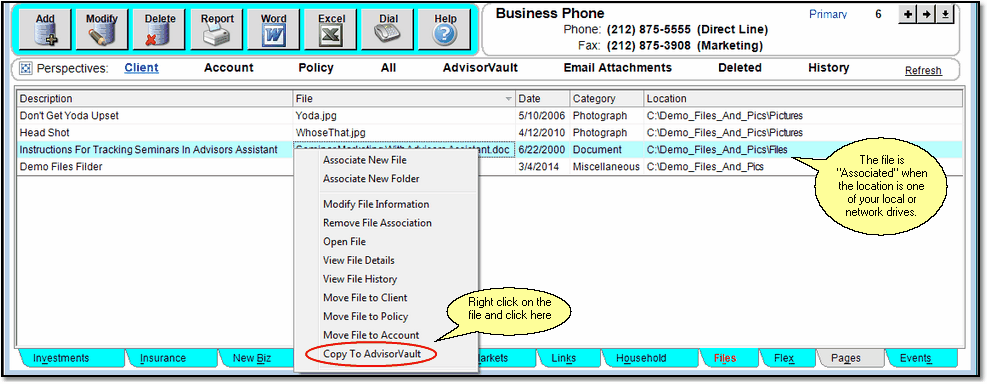
| • | A file stored on your local file system and associated with the contact being viewed can be added by right clicking on the file. This does not include files stored in any document storage systems. For more information on associating files with a contact in Advisors Assistant, please click HERE. |
Files stored in the cloud or on file management systems cannot be sent directly to AdvisorVault. You must first save those files to your local file system and then they can be copied up to AdvisorVault.
Copying Files To AdvisorVault Stored On Local & Network Drives
This section refers to files stored on your local computer or your local network. They don't have to be associated with a contact name or listed on the View Client With Files.
To send a file to AdvisorVault which is not associated with a contact's name (In you list of files on the View Client With Files Screen,) just follow these steps:
Step 1: Navigate to the View Client With Files Screen
Go to the View Client With Files Screen for the client or contact whose vault to which you want to add the file.
Step 2: Click on the AdvisorVault Perspective.
Wait while Advisors Assistant retrieves your folder and file list.
Step 3: Click on the Add Action Button
![]() Use this button when the file is not on your associated files list, but it is available on your local workstation or local network.
Use this button when the file is not on your associated files list, but it is available on your local workstation or local network.
Step 4: Choose the File To Send To AdvisorVault
This is just the standard Windows file picker.
Step 5: Choose the AdvisorVault Folder to which you want to send the file.
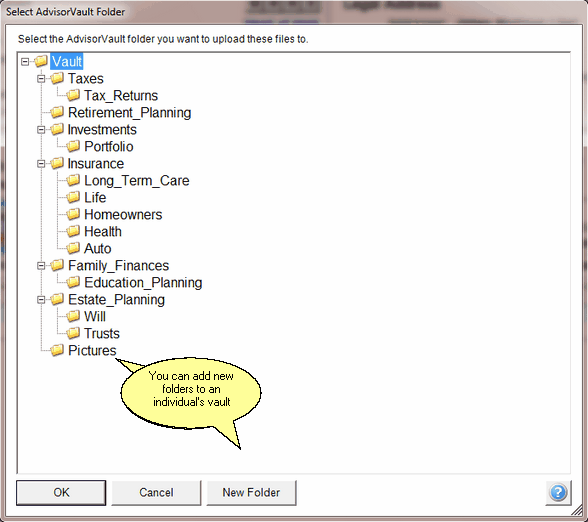
Advisors Assistant will display the folder list for the client being viewed. You can then click on the folder to which you wish to send the file or use the New Folder Button to create a new folder in AdvisorVault.

Current client being viewed AdvisorVault folder list.
When you click OK, Advisors Assistant will copy the file to Advisors Assistant and then display the file.
When you add a new folder, it is recorded in the client's file history.
Copying Associated Files Under View Client With Files Tab
Associated files are those that reside on your local file system. They do not include files stored on document management systems.
Copying an associated file is easier than copying other files because Advisors Assistant already knows where the file is stored, so you don't have to navigate to it.

Right Click File Menu
Step 1: In Advisors Assistant, Navigate To The Contact Name
Choose the contact name in Advisors Assistant that has the vault to which you wish to send the file.
Step 2: Click on the Files Tab
Step 3: Click on Perspective Listing The File
You need to have the associated file on the list of files so you can right click on it.
Step 4: Right Click on the File
Right Click on the file you want to send to AdvisorVault to bring up the right click Menu.
Step 5: Choose Copy To AdvisorVault
Choose the AdvisorVault function from the Menu.
Step 6: Choose the Folder In AdvisorVault
This is the same as Step 5 under Copying Files To AdvisorVault Stored On Local & Network Drives.
See Also
Single Sign On To Your Advisor Vault
Bursting Reports Into Individual PDF Files
Using AdvisorVault From Inside Advisors Assistant
Creating Individual Client Vaults From Inside Advisors Assistant
Using Selection Reports To Create Multiple Client Vaults At The Same Time
Uploading Burst PDF Reports To Clients' Vaults
Viewing Files Stored In AdvisorVault From Inside Advisors Assistant
Keeping Advisors Assistant and AdvisorVault Synchronized
|
AdvisorVault sends an email to your client when the file is uploaded to their vault. See more about the emails sent to clients by clicking HERE. |
