Exporting Data
Click on the Export Button from the Report Selection Menu Screen.
Exporting Data Overview
You can export data from Advisors Assistant into other file types such as an Excel spreadsheet or a
.CSV file (comma separated file.) If you're using this export for sending broadcast emails, detailed steps are available in the Sending Broadcast Emails (All Emails) Help.

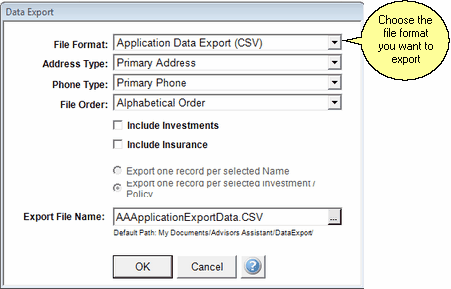
Once you have run your Selection Report, click on the Export Button on the bottom of the Report Selection Screen to create an export file. Details about each field are below:
File Format
Select the format for the data you're exporting. Follow the link for the underlined formats for more information.
Examples
Laser App (CSV File)
Comma Delimited File (CSV)
Excel (XLS)
Extensible Markup Language (XML)
lifeAssist
Email Addresses (CSV) - less data than the regular CSV file
There is a special file layout in the CSV format called Unsorted Email Addresses. This contains the main fields needed for email campaigns and is designed for uploading into email programs, such as iContact.
Address Type
Select which address you wish to export if you wish other than the Primary Address to be used. If the contact you've selected has that address type, it will be exported. Otherwise the Primary Address will be used.
Example
If you select the Joint Address, of the names you selected if they have a Joint Address it will be used. Otherwise the contact name's Primary Address will be used.
Phone Type
Select which phone number you wish to export if you wish other than the Primary Phone to be used. If the contact you've selected has that phone type, it will be exported. Otherwise the Primary Phone will be sent.
Example
If you select the Business Phone, of the names you selected if they have a Business Phone it will be exported. Otherwise the contact name's Primary Phone will be sent.
File Order
Select the order of the names you're exporting.
Examples
Alphabetical Order
Birthdate Order
Zip Code Order
Include Investments
If you'd like Investment Data to be exported, check mark this box. You must have included Investment Data in the selection report criteria to export it.
Include Insurance
If you'd like Insurance Data to be exported, check mark this box. You must have included Insurance Data in the selection report criteria to export it.
Export File Name
Advisors Assistant will call the file AAEXPORT.XXX. You change the file name using Windows Explorer after the file has been created.
File Location
Advisors Assistant will default to saving the file to the My Documents/Advisors Assistant/Data Export/ folder of the workstation that is creating the export file. You can click in this field and change the location to which the file should be saved.
Once the file has been created, you will receive a message asking if you'd like to open the file. Select Yes or No.
See Also
|
Advisors Assistant will overwrite the AAEXPORT file each time you export new data. So if this is a file you wish to use later, be sure to change the name of the file through Windows Explorer. |
