Add/Modify Address

Contents
To add an Address, click on the Plus Button (![]() ) in the address section. To modify an Address, either click on the Address itself or click on the Down Arrow Button to the right of the Plus Button, highlight the address you wish to change and click the Modify Button.
) in the address section. To modify an Address, either click on the Address itself or click on the Down Arrow Button to the right of the Plus Button, highlight the address you wish to change and click the Modify Button.
![]() Add/Modify Address Tutorial (6:17)
Add/Modify Address Tutorial (6:17)
Addresses Overview
•You can have multiple addresses associated with a contact name in Advisors Assistant.
•The Primary Address is the Address that will display on the View Client Screen by default, and that will print on any reports that only print one address.
•All of these fields are available to be exported in a mail merge with Microsoft Word.
•You can copy addresses to another name in your database through the Address Lookup Screen. Additional help is available for copying addresses in the Copying Addresses and Phone Numbers Help.

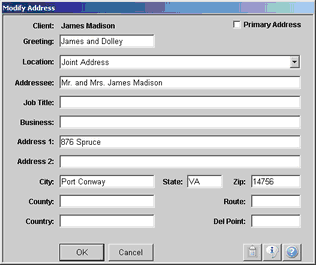
Add / Modify Address Screen
Note: There is a setting in System Preferences which can limit the number of addresses entered for an address location to one address. For more information about this feature, click HERE. If your addresses are limited by the System Administrator, you will get a message if you try to add more than one address per location.
Details about each field name are listed below:
Primary
The primary check box indicates that this address is the primary address and it is the address that will show by default on the View Client Screens.
Changing The Primary Address
You cannot uncheck the primary box. If you want another address to be primary, modify that address and check the primary box. When you save that address Advisors Assistant will uncheck the previously primary address.
Greeting
This is the text associated with the salutation that would be put on a letter. It's similar to a nickname. Each address has its own greeting, so you can match the salutation in a letter with a particular type of address. Do not enter the word Dear as part of the greeting and do not enter punctuation.

Type in a freeform name or choose from the list.
The Greeting field has a drop down list which has items on it depending on whether you have designated a spouse in the Contact's Modify Name Screen and if you have entered a Nickname in the Contact and Spouse's record.
You can also just type in a value such as the examples below.
Examples
John
John and Mary
Mr. Smith
Location
The Address Location describes the type of address. You can either select one of the pre-defined Locations or add/edit your own Locations. You can also set a Default Address Location through the User Preferences.
Examples
Home
Business
Joint Address
Claims Department
"Legal Address" is often used in filling in forms and form automation. If you designate a legal address, please return to the Add / Modify Name Screen and save the name information so that the form automation will pick up that there is a legal address.
Note: There is a system preference set by the Administrator which can limit each contact to only one address per location.
Addressee
The Addressee is the first line of the address on an envelope or label. It can be different from the Name. The Addressee would typically include any professional designations, and can be customized for each address you add.

Use the drop down list or type in a freeform value
The Addressee field has a drop down list which has items on it depending on whether you have designated a spouse in the Contact's Modify Name Screen and if you have entered a Nickname in the Contact and Spouse's record.
You can also just type in a value such as the examples below.
Examples
Mr. John Smith
John Smith, MD
The Smith Family
John and Mary Smith
Job Title
Titles are usually used for business addresses. It would normally appear as the second line of an address.
Examples
Chief Financial Officer
President and CEO
Business
Use this field for the name of the business. It would normally be the third line of an address.
Examples
The Acme Corporation
Learn More University
Smith & Company
Address 1
This is the first line of the street address. It can have both the street name and a suite or apartment number. For consistency of printing addresses and bar coding, Address 1 should always contain the main street address.
If you add a suite or apartment number, place a comma after the main part of the address. This will make it easy to use tools such as zip + 4 programs. You can also enter apartment numbers and suite numbers in the Address 2 field.
Examples
123 E. Main Street
123 E. Main Street, Suite 145
Address 2
This is the second line of the street address. It would be used for any address information which would not fit or you do not want to put on the first address line. In the address block it would print as the line just above the City, State, and Zip / Postal Code.
Examples
Building 14
P.O. Box 1423
Pacific Business Park
Address 3
An additional line for the street address, if needed.
City
This is where the name of the City associated with the address goes. The city is filled in automatically when you enter the zip/postal code if the zip/postal code is in the Postal Code List.
State
This is the name of the State, Province, or other region associated with the address. The State is filled in automatically when you enter the zip/postal code if the zip/postal code is in the Postal Code List.
Zip/Postal Code
The Zip/Postal Code for the address. Advisors Assistant maintains a list of Zip/Postal Codes so that if the code is in the Postal Code List the City and State will be filled in automatically.
County
The County/Parish in which the address is located.
Route
The Carrier Route for this address. This is useful for bulk mailings to get deeper discounts. You would mainly get this with a prospect list import.
Country
For International Addresses, the Country in which this Address is located.
Del. Point
This is the Delivery Point for the Address. This is useful for bulk mailings. You would get this with a prospect list import, it isn't information you would typically type in manually.
Comment
This is an information only field and can be used for information such as if the address is temporary or when to use this address. It is not searchable and appears on no reports.
![]() Copy To Clipboard Icon
Copy To Clipboard Icon
Copies the Address to the Windows Clipboard so that you can paste it into another Windows program. Once you've copied information to the Windows Clipboard, you can use CTRL-V or Edit | Paste to paste the information into the other program.
![]() Information Icon
Information Icon
Shows when the record was created and last edited, and the initials of who created and edited the record.
![]() Help Icon
Help Icon
Opens Help for this window.
Many times you have two spouses both listed as clients in your database, but when you send a letter out you only want one letter to be sent to the household and you want the letter to be addressed to both spouses. You would use a Joint Address Type to do this.
How to setup a Joint Address
1.Add a Joint Address code to your Address Type list. For details about adding codes please refer to the Add/Modify Abbreviations Help.
2.Decide which of the two clients will be the "Head Of Household." Be sure to mark that client's record as the "Head Of Household," and for the other spouse make sure they are not set up as the "Head Of Household."
3.In the "Head Of Household" record, add a new address and set it up as a Joint Address. The Greeting and Addressee Fields should have both names listed (see example below.)
4.When you run a Selection Report for mailings, make sure you select only "Head Of Household" records. And when you export the names to Word for the letters make sure you select the Joint Address Type to have the correct address printed in Word.
Sending One Mail Piece Per Household
When selection report data searches are exported to word or other destinations, the address exported will be the address you choose in the drop down. However if that address location does not exist, the system will export the Primary Address.
This feature can be used to mail just one piece per household as long as you designate a head of household for EVERY household, even those with only one member.
Example:
James and Dolly Madison live with Jimmy in a household. James is the Head of Household. (Dolly and Jimmy are contacts, but they are not the HOH.) In Jame's contact record, create a Joint Address with the Addressee set to "James and Dolly Madison." You could call it Household Address or anything you like.
In the Joint Address, the Greeting would be "James and Dolly."
Andrew Jackson lives alone. He has a Primary Address. He is a one person household, so designate him as Head of Household also.
In your Selection Report search, check the box "Include Only Heads of Household" along with any other criteria you want to use.
Then export the data to Word and choose "Joint Address" for the address type.
James and Andrew will be in the list because they are Heads of Households. Dolly and Jimmy will not be selected.
Jame's mailing will go to their Joint Address. Since Andrew does not have a Joint Address, his address will default to his primary address.
Both will have their mailing sent to the proper address and the correct greeting.
How To Modify An Address
To make changes to an address that has already been added to Advisors Assistant, navigate to the address you wish to change and click anywhere in the address section at the top of the View Client Screen. The Modify Address Screen will open so that you can make your changes. Click the OK Button to save your changes, or the Cancel Button to leave the screen without saving your changes.
You can also click on the Down Arrow Button in the address section to open the Address Lookup Screen, highlight the address you wish to change, and click the Modify Button.
How To Delete An Address
To delete an address from your database, click on the Down Arrow Button in the address section to open the Address Lookup Screen, highlight the address you wish to delete and click the Delete Button. You'll need to confirm the deletion.
See Also