Upload Burst Reports To AdvisorVault
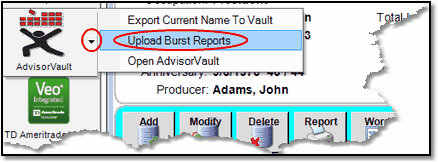
Click on Partners On The Sidebar Menu and then Click on the down arrow on the AdvisorVault Icon. Choose Upload Burst Reports
Using AdvisorVault for report delivery is both professional and saves lots of time. This translates into saving money.
Burst Reports Overview
Burst reports are individual PDF files containing individual reports from a report run for multiple clients. Whenever the page number starts over, Advisors Assistant creates a new PDF file for that client's report.
Burst reports have a naming convention so that AdvisorVault and Advisors Assistant can select the client's vault. All of the reports that are burst are named this way:
•First the client's name is listed, last name first.
•Then a dash is added.
•A number is then added corresponding to the contact's unique ID in the Advisors Assistant database. This number is only unique in that database. It is used to identify the contact record even if names are identical.
•An underscore is then added and finally the name of the report plus .PDF.
If you do the same report run for the same clients, the report files will be overwritten in Advisors Assistant and if you send the same report name up to AdvisorVault, they are also over written.
Creating Burst Reports
A full topic is devoted to creating Burst Reports from the various reports menus. Click HERE for that information.
Uploading Burst Reports To AdvisorVault
Uploading burst reports is both automated and easy. These procedures are ONLY for burst reports which have been created by Advisors Assistant using the naming convention described above.
Uploading Burst Reports is a security task in Advisors Assistant role based security and is controlled by the Advisors Assistant System Administrator.
Step 1: Review Before Upload
It is very important that all reports are reviewed before uploading. The bursting process still takes you to the report viewer after creating the individual PDF files.
Step 2: Choose Upload Burst Reports
From the Partner Section on the Sidebar Menu, click on the down arrow next to AdvisorVault.

Do Not Confuse This With Uploading Other Files
Choose Upload Burst Reports from the Sidebar Menu. This is not for uploading any files other than those created by the Advisors Assistant Burst Reports feature.
Step 3: Verify Reports Were Reviewed
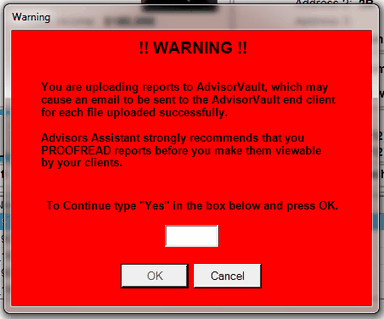
The user must verify that they have reviewed each report. This to protect the advisor from users who like to click "Yes" without reading the screen.

Verify That Reports Were Reviewed
In addition to the verification, the Administration Process Logs record which reports are sent to AdvisorVault so that reports can be traced back to who typed "Yes" in the red box above.
Step 4: Select The Reports
You can use Ctrl-Click to pick and choose the reports you want to send. Shift-Click also works to highlight several reports with just one click.

Select only the files you have reviewed and want to send
Note: Reports with the same name as a previously sent report will overwrite the last report. This is done to match AdvisorVault's behavior when reports are uploaded manually, and to prevent you from running out of space. It also allows you to replace an entire batch of reports if you need to. To save a history, save them to various folders on your local computer, such as "AdvisorVault Reports\AdvisorVault March 14 Reports."
Step 5: Review Results
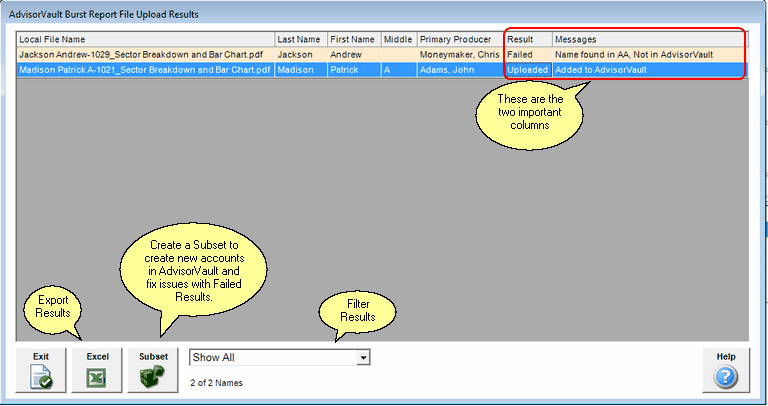
After the reports are uploaded, the Upload Results Screen will appear. Check the Result and Messages column so that you can resolve any failures.

Results are shown on this sheet.
You can export the results to Excel to print
Client Notifications & Email Templates
The email template that AdvisorVault uses to notify clients that something has been put in their vault is based on how AdvisorVault interprets how the file was uploaded.
AdvisorVault views the PDF file upload as a "Advisor File Upload" event and uses the email template associated with file uploads.
Even though this is a PDF file being uploaded, the "PDF Report Distribution" event is not used. This is reserved for manually uploading PDF reports from the AdvisorVault web site.
See Also
Single Sign On To Your Advisor Vault
Bursting Reports Into Individual PDF Files
Using AdvisorVault From Inside Advisors Assistant
Creating Individual Client Vaults From Inside Advisors Assistant
Using Selection Reports To Create Multiple Client Vaults At The Same Time
Uploading Burst PDF Reports To Clients' Vaults
Viewing Files Stored In AdvisorVault From Inside Advisors Assistant
Keeping Advisors Assistant and AdvisorVault Synchronized
|
Before actually bursting the reports, you can do a report selection and run the reports directly into the viewer and view the entire run. Save the criteria from the first run and use the Load Button on the report filter screen to load that same criteria. |
