Maintain Users and Departments
From the Admin Menu, click on Users and Departments.
Maintain Users Overview
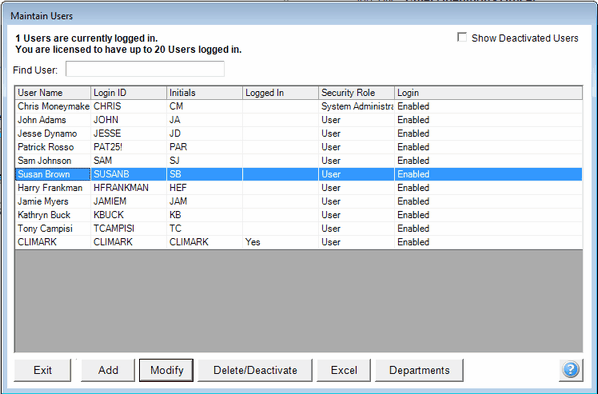
Use this screen to Add, Modify, Delete, or Deactivate users. The first step is to either click the Add Button to add a new user or select the user you want to change and chose what you want to do.
Finding A User
When there are many users, just type part of the first or last name in the Find User box. The highlight will home in on the name(s) that matches the typed letters when you stop typing.

Add, Deactivate, or Remove Users
Add Button
To add a new user, click the Add Button. This will start the Add User Wizard.
Modify Button
To modify a current user, highlight the user and click the Modify Button. Or, double click on the user's name.
Delete / Deactivate Button
Deleting a user takes their name out of the system. Not all users can be completely deleted.
Users cannot be deleted if:
•They have completed any workflows. Deleting a user would remove the name of who completed a workflow and destroy the workflow history.
•They have completed any calendar events. Like workflows, this would destroy the calendar assignments.
Deactivate vs Delete
Deactivating a user does not remove the name so they will still show up for previous events and workflows. However, a deactivated user will not show on any of the drop down lists for user assignments and will not be able to log into the system.
Excel Export
To move the user list to an Excel spreadsheet, click on the Excel Button.
Departments
Departments are groups of users. You can click on the Departments Button to create a new department, or modify an existing department. For an overview of departments, click HERE.
Additional information about the fields on the User Screens is available in the Add/Modify User Help.
See Also
|
Always set up each person with their own User Code. That way you can track what additions and changes that user has been making to the Advisors Assistant Database. |
