Add/Modify User And Passwords

Contents
From the Admin Menu, click on Maintain Users. Then click the Add Button to add a new user or highlight an existing user and click the Modify Button.
Adding A New User
If you are adding a user from scratch, even if the user's name is not in Advisors Assistant as a contact, there is an Add User Wizard to guide you through all of the steps.
Modify User Overview
The Modify User Screen allows you to edit an existing user. Each person that will be working in Advisors Assistant should be set up with their own User Account.
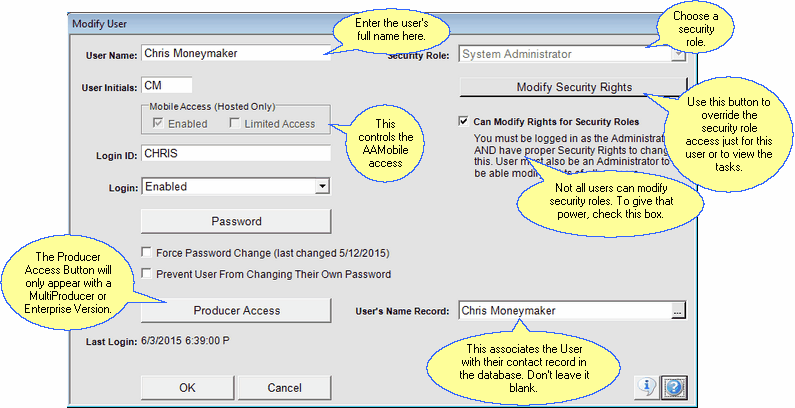
Details about how to fill in each field are below.
User Name
The User Name is the full name of the person who will be using this account with Advisors Assistant. This is not to be confused with the Login ID.
Examples of User Names
Chris Moneymaker
Sandra H. Moore
User Initials
The User Initials are simply that - the initials of the person we are creating the user account for. You should enter all 3 initials unless a person does not have a middle initial.
Examples Of User Initials
CM
SHM
This field associates the User with their contact record in the database. It is necessary for workflow and some calendar assignments. Click on the field and find the contact name or click on Add to add a new contact for this user.
This field was added in 2015, so you may need to back-fill some user's records.
Login ID
The Login ID is the name that the person will enter to log into Advisors Assistant in order to identify themselves.
Examples of Login IDs
ChrisM
Chris487
Login Drop Down List
Click on the arrow for the following choices:
Enabled
This user can login at any time.
Disabled
You can use this to temporarily disable the user from logging in. Use as a security precaution for vacations, etc. Disabled users' names remain on the drop down user lists.
Disabled users cannot log in to Advisors Assistant
Deactivated
If you deactivate a user, they will not be able to log in and their names will not appear on lists of users.
The preferred way to deactivate a user is through the Maintain Users Screen. There is a special wizard to use that will reassign workflows and calendar events.
Unless you are on a hosted system, these check boxes will be grayed out and not active.
Enabled
Unless this box is checked, the user will not have access from phones and mobile devices. If the user loses his phone, you can uncheck this to disable the device without disabling the user's desktop login.
If this is checked, the mobile user cannot change or add contact information. They can add notes and control their own calendar.
This does not work off of the View Only task rights. It controls Mobile Access only.
Force Password Change
Click on the Force Password Change Button to force the user to change the password that is associated with this user account. See the Change Password topic for more information.
When the user first logs in, they will be forced to change their password so that only the user knows the password.
Can Modify Rights For Security Roles Checkbox
Checking this box will give a user (who is not an administrator) the ability to modify the rights of other users and access this screen.
Password Button
Click on the Password Button to assign a password to this user. You can enable strong passwords through the System Preferences menu under Files on the Main Menu.
Producer Access Button
This pertains to MultiProducer and Enterprise systems only. Click on the Producer Access Button to set up the Producers that this user account will have access to. See the Getting Started With Producer Rights for more information.
Security Role
The Security Role drop down allows you to select a predefined set of tasks that this user account will have access to. For example, the System Administrator role has access, by default, to all tasks available in Advisors Assistant. Other roles may have access to some tasks, like adding or modifying notes, but be restricted from others, like deleting calendar events. You can establish the predefined roles by going to the Security Role Lookup Screen.
Aside from establishing a predefined set of rules for each Security Role, you can also override the permissions for each available task by clicking on the check boxes below the Security Role drop down.
For example, let's say that you have defined a Security Role called Assistants. The Assistant role has not been granted permission to add or modify abbreviations. However, there is one assistant who you want to be able to add or modify abbreviations. What you would do is assign this person the role of Assistant and then, in the area below, find Add/Modify Abbreviations and place a check in the Override column.
The reverse can also be accomplished in the case of when a Security Role allows access to a certain task, but there is a particular person who you do not want to have access to this task. You would assign the user the role, and then unselect the checkbox in the Override column for the task that you do not want that person to have access to.
Last Login & Password Change
These fields are maintained by the system and can be referred to by the administrator.
See Also
Getting Started With MultiProducer Rights