Calendar And Contact Synchronization
How To Get To This Screen
Calendar And Contact Synchronization
Regardless of which version of Outlook (Local, Office 365, or Web App) the Outlook Synchronization is about the same.
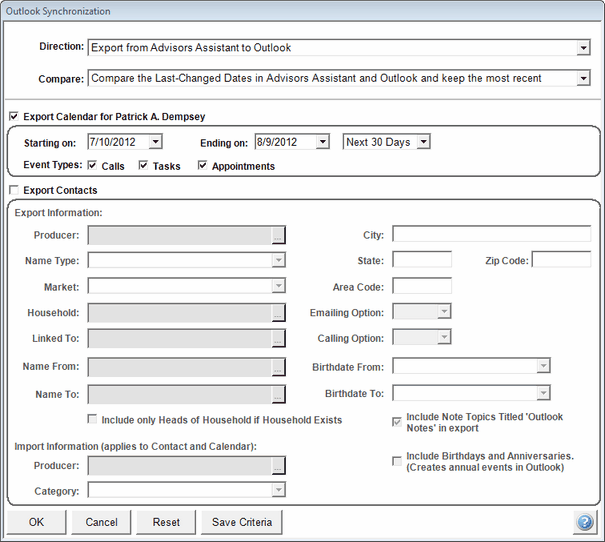
The Outlook Synchronization Screen allows you to select which data you wish to synchronize with Outlook. The options change depending on which option you've selected at the top: Export Data to Outlook, Import Data from Outlook, or Both Import and Export.

Outlook Synchronization Screen
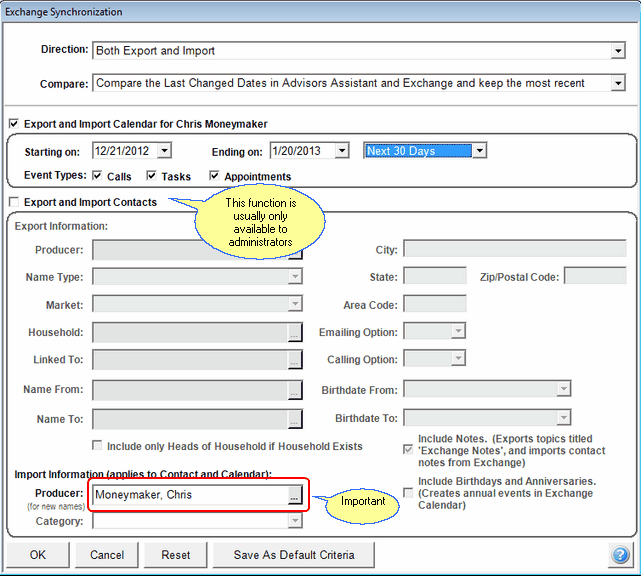
Above and Below are examples of the Outlook Synchronization Screen (Above) and the Exchange / OWA Synchronization Screen (Below). The operate virtually identically.

Synchronization Screen For Exchange Server Using Outlook Web App (OWA)
How to Synchronize with Outlook or Outlook Web App's Exchange Server
| 1. | Click on the Outlook or Exchange Icon in the Sidebar. |
| 2. | Select whether you wish to Export from Advisors Assistant to Outlook, Import from Outlook to Advisors Assistant, or Both Export and Import. Different options become available on the screen depending on your selection. |
There are several options that allow you to target the contacts in Advisors Assistant that you want to export to your Outlook.
Direction
Use this option to decide whether you want to go from Advisors Assistant to Outlook or Outlook to Advisors Assistant
Compare Assumptions
Use Last Changed Date
When updating records, if one of the records has changed, this option will consider the record that was last changed to be the record that is dominant. That record will end up in both databases.
Assume Outlook Is Most Recent
When updating records, if one of the records has changed, this option will consider the Outlook record, regardless of when it was changed, to be the record that is dominant. That record will end up in both databases.
Assume Advisors Assistant Is Most Recent
When updating records, if one of the records has changed, this option will consider the Advisors Assistant record, regardless of when it was changed, to be the record that is dominant. That record will end up in both databases.
Calendar Export Options (Check The Box To Activate Export)
To export calendar items from Advisors Assistant you must check the box, Export Calendar for [User Name]. Otherwise, the fields will be dimmed.
Starting On
Enter the date on or after which you want calendar events to be synchronized.
Ending On
Enter the date on or before which you want calendar events to be synchronized.
Length of Time
Chose the number of days you want to export to. This field will change the Ending On Date.
Event Types
Check the boxes for the types of events you want to sync. Tasks will include Workflows when going from Advisors Assistant to Outlook.
Contact Import / Export Options (Check The Box To Activate Import and/or Export)
The checkbox label changes based on the Direction you choose at the top of the screen.
The fields in this section are designed to give you outstanding control over the contact information you send to Outlook. When you fill in the fields, they are "cumulative." This means they work on the basis of AND. For example, if you choose City as Boston and Name Type as Client, you will export only Clients with a
Producer
If you want to limit the names you send to Outlook to those of one Primary Producer, choose the producer by dropping down the list.
Name Type
Use this field to limit your export to only one type of name in Advisors Assistant. If you want to export only two types of names, just do two exports, changing the Name Type for the second export.
If you don't want to IMPORT all of your contacts from Outlook, you can use Outlook Categories and the Name Type field to limit the names that come from Outlook. CALL OUR TECH SUPPORT for more information and help on this function.
Market
Markets and Areas of Interest are great ways to tag names. Use this to export based on those tags.
Household
If you want to export only members of a particularHousehold or Group, choose the household or group from the Household Lookup List.
Linked To
Links are another way to limit the export to Outlook. You can export just those contacts linked to another contact.
Name From / Name To
This will let you export only one name or one grouping of names based on an alphabetical list.
City / State / Zip (Postal) Code
Filling in any of these fields will match against all of the addresses in Advisors Assistant. For example, if you fill in Boston for the City, the contact will be exported if any of the contact's addresses has a city field with "Boston".
Area Code
Filling in any of these fields will match against all of the phone numbers in Advisors Assistant. For example, if you fill in 714 for the Area Code, the contact will be exported if any of the contact's area codes equals "714".
Emailing Option
This matches against the Email Option in the Name Record.
Birthdate From / Birthdate To
Use this to choose an age range for your export.
Include Only Heads Of Household If Household Exists
If there is a household that matches the other criteria, only the Head of Household will export instead of all members of the household.
Include Note Topics Titled Outlook Notes
Notes that you want to sync with Outlook must be located in a Note Topic called "Outlook Notes". We do this so that you don't end up with millions of notes being sent to Outlook. If you check this box, Advisors Assistant will also import Outlook Notes and create a note topic called "Outlook Notes" if one does not exist.
Include Birthdays and Anniversaries
There is a little know feature in Outlook. If Outlook stores the Birthday or Anniversary, you will get a task in your calendar reminding you of the contact's birthday and anniversary. Check this box if you want to export Date of Birth and Anniversary Date to Outlook, but be ready to get all of those reminders. There is no way to remove them with another export. Importing from Outlook does not add calendar events to the Advisors Assistant calendar.
Import Information (applies to Contact and Calendar)
You must select Import as the "Direction" for these fields to become active.
Producer
This field allows you to choose the Primary Producer to be associated with the contact record when it is written to Advisors Assistant/. If left blank, no Primary Producer will be assigned to the name in Advisors Assistant. It is recommended that you fill this in, otherwise you will need to update every contact record with the producer's name.
Category
This drop down list comes from the Advisors Assistant Name Type, but it compares the item chosen here with the Category in Outlook. Therefore, if you want to only import a particular Outlook Category, first make sure there is a Name Type entry
Additional Outlook Sync Information
Here is some more information that may be helpful.
| • | If you are exporting data the Export Calendar option is always defaulted to On, since that is the most popular feature of the Outlook Synchronization. You can turn this off and save your criteria to have it defaulted to Off. |
| • | You decide if you wish to export the calendar, contacts, or both by checking the appropriate boxes. |
| • | When exporting the calendar, select the date range you'd like to export. Advisors Assistant defaults to one month, but you can select a Starting Date and select another option such as This Week, etc. to have Advisors Assistant select an Ending Date. Or you can manually select an Ending Date to export. |
| • | When exporting contacts, you can send all contact names in Advisors Assistant or select a targeted list of names by filling in the criteria. For example, you can send just Clients by selecting your Name Type code for Client, or just send contacts within a specific Zip Code to Outlook. |
| • | When exporting contacts, you can select if you'd like to send Notes to Outlook. Since Advisors Assistant has the ability to have many notes but Outlook only has 1 note, you must have a Note Topic named Outlook Notes in the contact record to export notes to Outlook. Only the notes in the topic Outlook Notes are synchronized with Outlook. |
NOTE: If you export birthdays and anniversaries Outlook will set up an event in the Outlook Calendar each year for these dates. If you do this it will increase the time it takes for your synchronization, and it uses a lot of computer resources so you may not be able to use your Outlook at all while the synchronization is happening.
Importing Data Options
| • | When importing the calendar, select the date range you'd like to import. Advisors Assistant defaults to one month, but you can select a Starting Date and select another option such as This Week, etc. to have Advisors Assistant select an Ending Date. Or you can manually select an Ending Date to import. |
| • | When importing contacts, you should select the Producer Name so that Advisors Assistant knows to which Producer to assign the contacts. Be sure to check with your Advisors Assistant Administrator before bringing contacts into the database because it can affect all users. This function is often available only to administrators. |
| • | When importing contacts, Advisors Assistant will import all contacts from the main Contact List in Outlook unless you specify an Outlook Category to import. |
Importing anniversaries and birthdays FROM Outlook never adds calendar items to the Advisors Assistant Calendar even if the event is already in Outlook due to a previous export from Advisors Assistant.
| 3. | Once you have entered your criteria to Export and/or Import with Outlook click on OK and the synchronization will begin. |
If you want to save the criteria you put in for future Imports and/or Exports click on the Save Criteria button. If you have entered criteria that you want to clear out click on the Reset button, it will restore the fields to their default settings. If you are in the Outlook Synchronization screen and you do not want to perform the operation, click on the Cancel button to exit out of the screen.
NOTE: Outlook does not INITIALLY import Spouse Information. If you have previously exported Spouse Information to Outlook from Advisors Assistant, it will be maintained, but if you are initially populating Advisors Assistant from Outlook, the spouse listed in Outlook will not be imported. There is not enough information about the spouse in Outlook to prevent duplicate imports.
Populating Advisors Assistant With An Outlook Or Exchange Import
This function is usually reserved to the System Administrator because it can affect other users in the system.
If you are planning to import contacts from Outlook and the contacts were not previously exported from Advisors Assistant to Outlook, please click HERE to read some important information.
Saving Your Criteria
You can save your Synchronization Options so that if you wish to perform your default synchronization you can just open the Outlook Synchronization and click OK.
Once you have filled out the Outlook Synchronization Screen with your default settings, click the Save Criteria Button. The next time you open the Outlook Synchronization these criteria will appear. You can of course change the screen at that point if you wish to perform a different synchronization.
See Also
Setting Up For Outlook Web App
Setting Up For Outlook Installed Locally
Deleting Calendar Events & Outlook
Pushing Outlook Contacts And Calendar Events To Your Phone
|
Before you import data from Outlook, be sure your database is backed up. If you get unexpected results, restoring is the only way to get back to where you were. |
