Calendar Day View
On the Sidebar Menu, click Calendar near the bottom. Then Click on Day at the top left of the Calendar Screen.
Overview
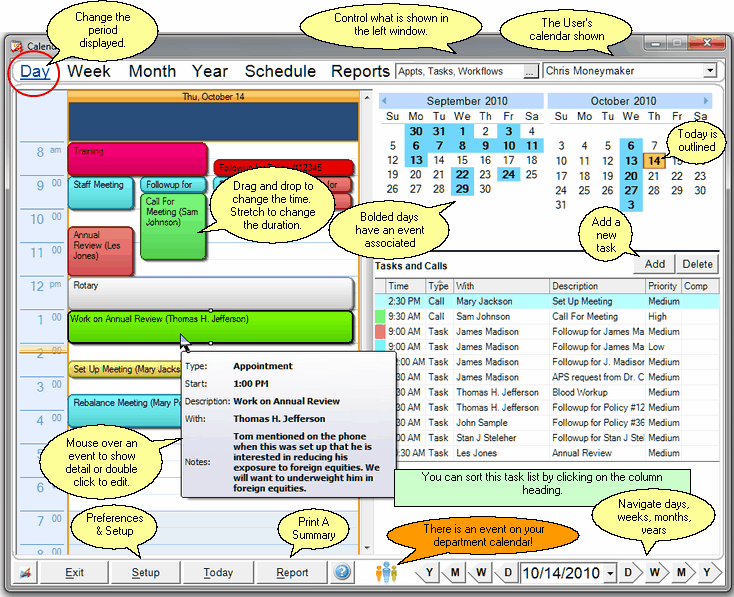
The calendar has different "views" which show different amounts of detail without having to double click on the event. The screen below is the Day View which displays one day's events.
This view separates the tasks and calls from the appointments, with appointments displayed on the left.

Calendar Day View
Add An Event
Double click on a time to add a new calendar event, or click on the Add Button on the right middle of the screen and choose the Event Type on the Add / Modify Event Screen.
Seeing Details
You can see the event's details by just placing the mouse pointer on the event on the left side of the screen. After about a second, details will show up.
This hover help feature is also available in the Week and Month Views.
Making Changes
You can see the event's details AND make changes to an event by double clicking on the event. This is the case for the appointments on the left and the Tasks and Calls on the right.
Drag And Drop
You can drag and drop appointments to a different time. You can also stretch an appointment by clicking once on the appointment and grabbing the appointment's "handle" at the center bottom of the appointment with the mouse. Hold down the left mouse button and drag the handle to lengthen the appointment's box.
Scrolling To Different Days, Weeks, Months, Or Years
At the bottom right of the calendar screen, you can click on the D, W, M, or Y buttons to go forward or backward a Day, Week, Month, or Year respectively.
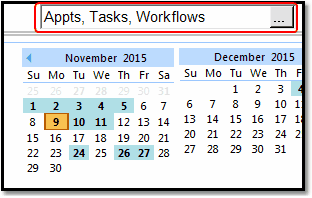
You can control the graphic display on the left side of the screen.. When you click the ellipse, you will get the View Options Screen.

Click the Ellipse for the list
If your list is too crowded, you can take types of events off of the list using the Display Control.
Navigating To The "With" Name(s)
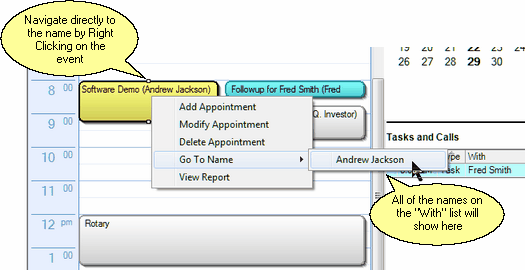
You can change the View on the View Client Screen from the Day View Calendar Screen by right clicking on the Event.

Event Right Click Menu
When you right click, choose Go To Name and a list of all the contacts associated with the event will show. Click on the name to which you want to navigate.
Task and Call List
When you're viewing the calendar in the Day View, Tasks and Calls will be shown in the Task List located in the lower right corner of the screen.
•You can sort the Tasks and Calls by clicking on any of the column titles shown.
•You can modify an existing Task or Call by double clicking on the event. Additional information about adding Tasks and Calls is listed below.
•You can right-click on any Task or Call to open a menu of available functions, such as adding or deleting events. One of the available functions is to go to that contact's name record in the Advisors Assistant Database. When you select the "Go To Name" option in the right-click menu, you can select the name you'd like to go to (if more than one name is listed for the event, you will have a choice of names to view.)
The Calendar Setup Screen
Click on the Setup Button at the bottom of the Screen to set your personal options:
•Default colors for each type of event
•Other users who can access your calendar
•Default appointment length
•Time increments (15 or 30 minutes) on the calendar
•Default Priority
•Notification Sound
•Rollover options
•Advance notice of appointment
Calendar Reports
Calendar reports have their own filter. Click on Reports at the TOP of the screen for the report filter. For a quick printed report of the graphic depiction of the current screen, click on the Report Button at the BOTTOM of the screen.
If you are a member of a Department, then you will automatically have access to the department's calendar. However, you must navigate to that calendar before seeing the calendar items on it. The calendar events are separated so that users know when they are doing department business and their own business.
When you see ![]() at the bottom of your personal calendar in the Day View, it means that there is an event due in your department calendar. When you see the icon, click on the Calendar User drop down list in the upper right corner of the screen and choose your department. That will move you to your department calendar.
at the bottom of your personal calendar in the Day View, it means that there is an event due in your department calendar. When you see the icon, click on the Calendar User drop down list in the upper right corner of the screen and choose your department. That will move you to your department calendar.
For more information about departments and how they are set up, click HERE.
Workflow Task Listings
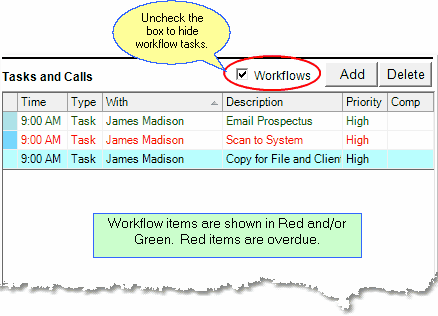
Workflows are listed in the task listing by default, but you can hide them by unchecking the workflow checkbox.

Workflows show in Red or Green and can be hidden.
Items that are either Red or Green are workflows. Red events are overdue and green events are on time. For a workflow event to be shown, it must be an active event. Future events are not put into the calendar until they become active.
Workflow Event Restrictions
Workflow events can not be repositioned using drag and drop. They are controlled by the workflow events.
See Also
Setting Up Your Calendar Options
Completing Multiple Events At The Same Time
Transferring Multiple Events At The Same Time
Deleting Multiple Events At The Same Time
|
After dragging and dropping, be sure to double click on the appointment to check the details to be sure that all are appropriate for the new time. One technique is to put all of the follow-ups, etc. on department calendars. Then, when people come and go, you don't need to do reassignments. |
