View Client With Insurance

Contents
![]() View Client with Insurance Tutorial (5:41)
View Client with Insurance Tutorial (5:41)
![]() Add Policy Tutorial (9:10)
Add Policy Tutorial (9:10)
![]() Getting Started - View Screen Tour (7:53)
Getting Started - View Screen Tour (7:53)
View Client With Insurance Overview
Advisors Assistant gives you the ability to track any insurance product from any company, and to store all of your client's insurance products in one location. You'll have quick access to the details of each policy, and be able to print a variety of insurance reports.
The View Client With Insurance Screen shows you a summary of all of the policies that have been added to this client's record. Some basic information about the policies is shown on this main View Screen, but much more detailed information is also available for each policy.
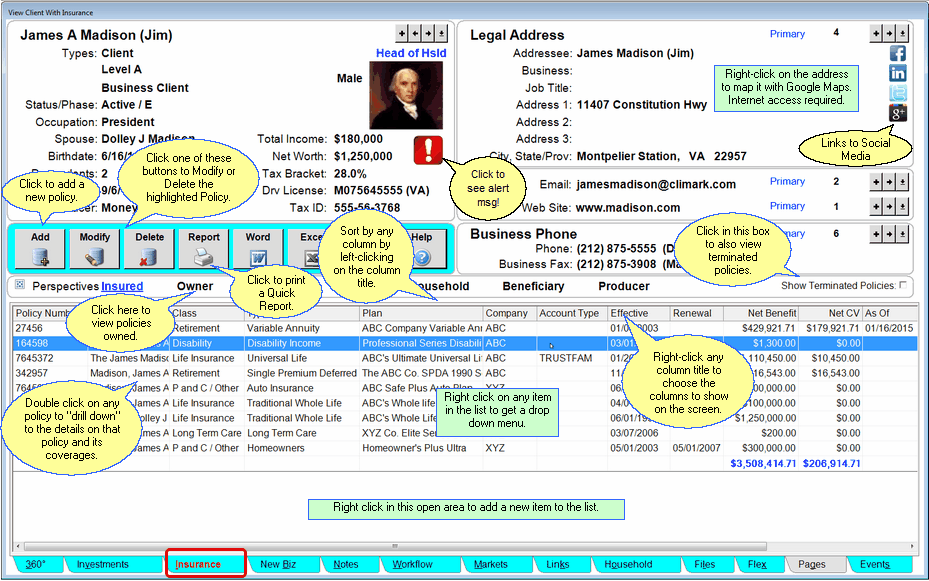
To see more information about any individual policy, double click on the policy from the list. You will then "drill down" to the next set of policy screens.
•Instead of showing contact information in the top half of the screen, details about that policy are shown.
•The Tabs across the bottom of the screen will change, to allow you to track additional information about that policy.
•Advisors Assistant remembers the last Policy View Screen you were sitting on when you last viewed the policy screens, and that is the screen that will open when you return.
•Each View Screen for the policies has its own Help, explaining the details about that particular screen.
•As with every View Screen in Advisors Assistant, you can left-click on the column titles to sort the policies by that column. A single click will sort the column in ascending order, and another click will sort the column in descending order. Advisors Assistant will keep your View Screen sorted in this order until you change it. Each User in Advisors Assistant can sort their Policies by a different column. You can right-click any column title to choose which columns to show on the screen.
•Right-click the address on the View Screen to map that address with Google Maps.
•To print a summary of all of the Policies for the client you're currently viewing, click on the Quick Report Button in the middle of the screen.
Policy Perspectives
Perspectives allow you to view the information on the current View Screen in different ways. The View Client With Insurance Screen can have up to 4 Perspectives.
Lists the policies that are owned by the client name you are viewing.
Lists all of the policies for which this client is insured.
Lists all of the policies for which this client is listed as a "group with" name.
Lists all of the policies for which this client is listed as a payor.
Alert Icon ![]()
The Alert Icon indicates that there is an important note that should be read before contacting the client. Click on it to read the note. For information on how to set up the Alert Notes, click HERE.
Links To Social Media
You can link directly to your client's social media pages by clicking on one of the icons in the address block. If the icon is in color, then there is an address stored for that link. If the icon is grayscale, there is no address. On the screen above, Google+ does not have a link.
For more information about how to put in the address, click HERE.
![]() Expanding Your Lists
Expanding Your Lists
If the list in the bottom half of the View Screen is too long to fit on the screen, you can expand the list by clicking on the List Expander Button (![]() ) located in the bottom right corner of every View Screen.
) located in the bottom right corner of every View Screen.
The Show Terminated Policies box works off of the Termination Date ONLY. If you fill in a Termination Date and it is on or before the system date, unchecking the box will remove the policy from the list.
The Policy Status does not control viewing of terminated policies because users can call the status anything they desire.
The Expiration Date does not affect viewing of terminated policies.
Adding and Modifying Policies
•To Add a new Policy, click on the Add Action Button in the middle of the screen. The Add Policy Wizard will open to walk you through adding a policy, and additional help is available for the Wizard. You can also right click in the list or the open area below the list.
•To Modify an existing policy, highlight the policy in the list and click on the Modify Action Button in the middle of the screen. You can also double click on the policy to open the Policy View Screens, then click in the top half of the View Policy Screen to edit that policy. You can also right click on the policy in the list.
•More details about Adding and Modifying Policies is available in the Add/Modify Policies Help.
Adding Names to Advisors Assistant
You can add a name quickly and easily to Advisors Assistant at any time. To add a name to Advisors Assistant, click the Plus Button (![]() ) to the right of the current name you're viewing on the View Client Screen. To avoid adding duplicate names we recommend you look the name up first by opening the Name Lookup Screen. For more help about adding names, please see the Add/Modify Names help topic.
) to the right of the current name you're viewing on the View Client Screen. To avoid adding duplicate names we recommend you look the name up first by opening the Name Lookup Screen. For more help about adding names, please see the Add/Modify Names help topic.
Group Insurance Products
If you're selling Group Insurance, you can designate a policy as a Master Policy so that others in the group can be added to the policy and have a contract appear under their name also. Some basic steps for tracking Groups are available in the Group Insurance Overview Help.
To set up a Group Master Policy, follow these steps.
1.Highlight the policy on the View Client with Insurance Screen.
2.Click on the Modify Button.
3.Check the Group Master Box near the upper right of the screen.
4.Click the OK Button.
A '*' in front of the policy number on the View Client With Insurance Screen means that this policy is a Master Policy and can be copied to Group Participants using the View Client With Groups Screen. When you are on the Owner or Payor Perspectives, several policies with the same number may be listed. Sorting by Policy Number will bring the group policies to the top of the list.
See Also
Policy Coverage Model Explained