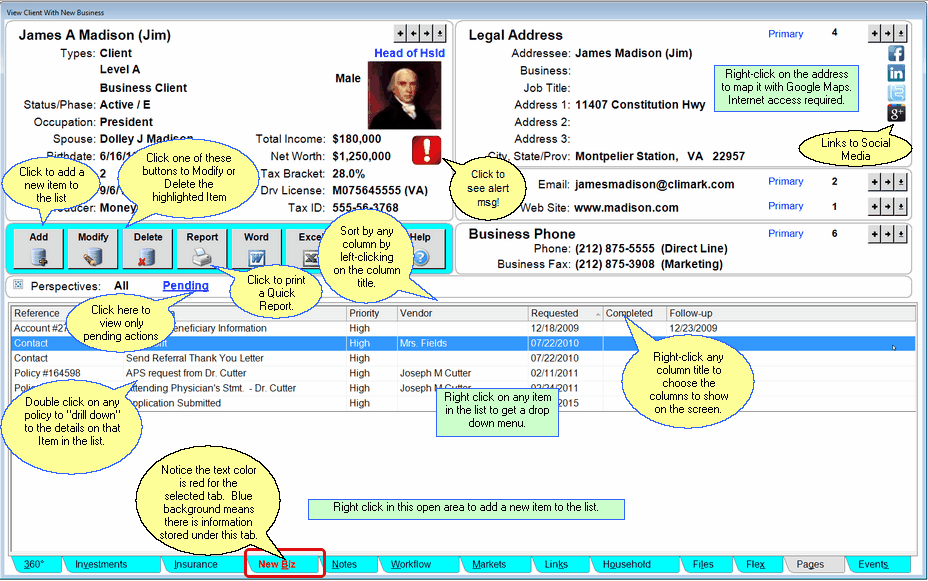
View Client With New Business
![]() New Business Tutorial (4:10)
New Business Tutorial (4:10)
![]() Getting Started - View Screen Tour (7:53)
Getting Started - View Screen Tour (7:53)
View Client With New Business Overview
With Advisors Assistant you can track New Business Action Items to make sure that specific tasks are being completed for prospects and clients. These Action Items can also be associated with an Insurance Policy or Investment Account if you have purchased the optional modules.
For prospecting, New Business can be used to track which stage of the sales process a prospect is in.

View Client With New Business Screen
The New Business section allows you to add action items to a contact's name, policy, or investment and even assign follow-up tasks relating to the action item. You can then print reports of all outstanding new business actions, and have a history of what actions have been completed.
The View Client With New Business Screen shows you a summary of the New Business Actions you've added to the contact you're currently viewing, as well as:
Reference
This column shows if the Action is related to the Contact, an Insurance Policy, or an Investment Account.
Action
The New Business Action Item.
Status
Shows if the Action is Pending or Completed.
Vendor
If a Vendor Name was selected for the Action, it is shown here.
Completed
The Completed Date that's been entered.
Follow-up
The latest Follow-up date that's been entered.
When you're entering Action Items into Advisors Assistant you can also attach Follow-Up Dates to each Action. When you add a Follow-Up date a Task is automatically added to the Advisors Assistant Calendar, insuring that you won't forget about important follow-ups. The View Screen shows the latest Follow-Up Date that was entered.
As with every View Screen in Advisors Assistant, you can left-click on the column titles to sort the Topics by that column, or right-click any column title to choose which columns to show on the screen. If you wish to see the most recently completed Actions at the top of the list, click twice on the Completed column title to sort the actions by the Completed Date. Advisors Assistant will keep your View Screen sorted in this order until you change it. Each User in Advisors Assistant can sort their New Business by a different column.
You can also right-click on the address shown on the View Screen to map that address with Google Maps. Internet access is required for this feature.
To print a summary of all of the New Business Action Items for the contact you're currently viewing, click on the Quick Report Action Button in the middle of the screen.
Perspectives
Perspectives allow you to view the information on the current View Screen in different ways. The View Client With New Business Screen has three Perspectives.
All
Lists All of the New Business Action Items for that contact record.
Pending
Lists only Pending New Business for that contact record.
Completed
Lists only Completed New Business for that contact record.
Alert Icon ![]()
The Alert Icon indicates that there is an important note that should be read before contacting the client. Click on it to read the note. For information on how to set up the Alert Notes, click HERE.
Links To Social Media
You can link directly to your client's social media pages by clicking on one of the icons in the address block. If the icon is in color, then there is an address stored for that link. If the icon is grayscale, there is no address. On the screen above, Google+ does not have a link.
For more information about how to put in the address, click HERE.
![]() Expanding Your Lists
Expanding Your Lists
If the list in the bottom half of the View Screen is too long to fit on the screen, you can expand the list by clicking on the List Expander Button (![]() ) located in the bottom right corner of every View Screen.
) located in the bottom right corner of every View Screen.
Adding New Business
•To add a new New Business Action to a name, click on the Add Action Button in the middle of the View Screen.
•To Modify an existing New Business Action, highlight the Action and click on the Modify Action Button in the middle of the View Screen.
•More help is available for adding and modifying new business in the Add/Modify New Business Help.
Adding Names to Advisors Assistant
You can add a name quickly and easily to Advisors Assistant at any time. To add a name to Advisors Assistant, click the Plus Button (![]() ) to the right of the current name you're viewing on the View Client Screen. To avoid adding duplicate names we recommend you look the name up first by opening the Name Lookup Screen. For more help about adding names, please see the Add/Modify Names Help.
) to the right of the current name you're viewing on the View Client Screen. To avoid adding duplicate names we recommend you look the name up first by opening the Name Lookup Screen. For more help about adding names, please see the Add/Modify Names Help.
See Also
Archiving Any Email To Any Contact
