View Notes

Contents
To get to this screen click on either the Add or Modify Action Buttons in the middle of the View Client With Notes Screen. You can also double click on an existing Note Topic to open this screen.
![]() View Notes Screen (5:36)
View Notes Screen (5:36)
View Notes Overview
The View Notes Screen helps you manage your notes. From this screen you can:
•Add new Note Topics
•Add new Note Entries or Notes to an existing Note Topic
•Modify and Delete notes
•Print notes
•Search through the notes for the contact name you're currently viewing.
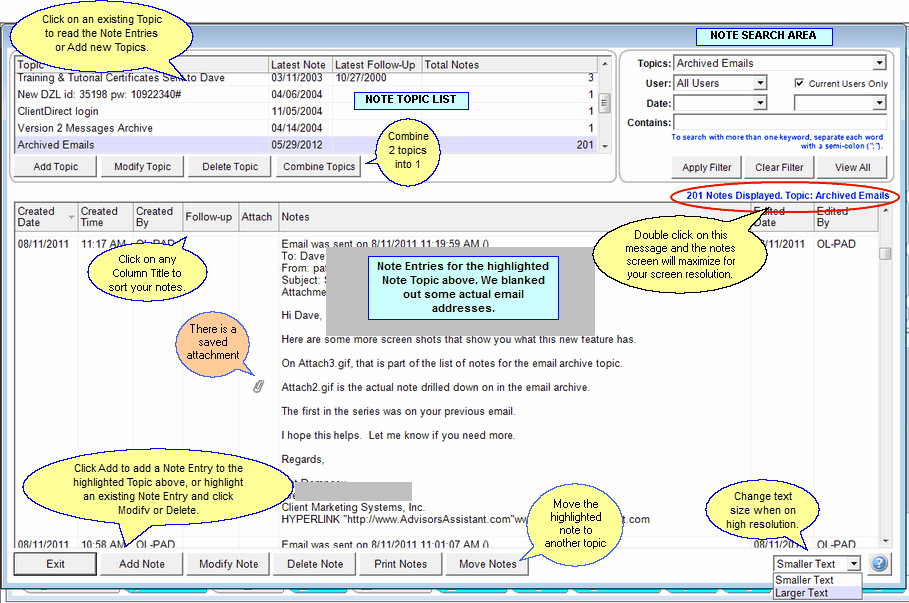
From the View Notes Screen, you can Sort the Notes by clicking on the different Column Titles. You can sort the individual Note Entries by:
•Date Created
•Who created the note (By)
•Follow-up Date
•Beginning text of the note itself
You can Sort the Note Topics:
•Topic Name
•Latest Change Date
•Latest Follow-up Date
•Number of notes within the Topic (Total Notes)
Note Topics
Before you can start adding notes to a contact name you must first add a Note Topic.
The Note Topics are designed to help you organize your notes, for faster and easier access to the notes you need.
You can have as many Note Topics as you need for every contact name in your database, and you can name the Note Topics anything you'd like. You might name your Note Topics generic titles like General Notes, Insurance Notes, and Investment Notes. Or if a special claim or situation arises you can add a new Note Topic to group all notes pertaining to that situation together.
There are also some Note Topics that are added by Advisors Assistant. The Letter Log Note Topic is added when a letter or email is sent through Advisors Assistant. The Email Archive Note Topic is added if you turn on the Email Archiver in Advisors Assistant. More information about the Email Archiver is available in the Email Archive Help.
You do not need to add a new Note Topic for every note you add to the database. The Note Topics are designed to organize your notes, so the individual Note Entries should be added within a few main Note Topics to group notes together.
How to add Note Topics
1.From the View Client With Notes Screen, if the contact does not have any existing Note Topics click on the Add Action Button in the middle of the screen. If the contact already has existing Note Topics, double click on any existing Note Topic to open the View Notes Screen and click on the Add Topic Button in the top left corner of the screen.
2.Enter the name of your new Note Topic and click OK.
Once you enter the name of the Topic you will immediately be taken to the Add Note Screen to add the individual Note Entry.
How to modify Note Topics
1.From the View Client With Notes Screen double click on any Note Topic to open the View Notes Screen.
2.From the View Notes Screen, highlight the Note Topic you wish to modify and click the Modify Topic Button in the top left corner of the screen.
3.Edit your Topic name.
4.Click OK to save the new Note Topic name.
How to delete Note Topics
This will delete all of the notes that are saved within the Note Topic!
1.From the View Client With Notes Screen highlight the Note Topic you wish to delete and click the Delete Action Button in the middle of the screen.
2.Click OK to confirm that you wish to delete that Note Topic. This will delete all of the notes that are saved within the Note Topic!
Note Entries
Once you add your Note Topic, you can then add individual Note Entries or Notes within that Topic.
You can have an unlimited number of Note Entries for every Note Topic. Additional details about adding and modifying Note Entries is available in the Add/Modify Notes Help.
How to add Note Entries
•From the View Client With Notes Screen highlight the Note Topic to which you wish to add note. Click on the Add Action Button to add a new note to the Topic you've selected.
•From the View Notes Screen, highlight the Note Topic to which you wish to add the note and click on the Add Note Button at the bottom of the screen.
How to modify Note Entries
•From the View Client With Notes Screen double click on the Note Topic that contains the existing note you wish to modify. Then either double click on the individual note you wish to modify or highlight the individual note you wish to modify and click the Modify Note Button at the bottom of the screen.
•From the View Notes Screen, highlight the Note Topic that contains the existing note you wish to modify. Then either double click on the individual note you wish to modify or highlight the individual note you wish to modify and click the Modify Note Button at the bottom of the screen.
For higher resolution monitors, if the text is too smaller, you can select Larger Text in the lower right corner of the screen. This will display less information on any one screen, so you may need to scroll more. Smaller Text will display more notes on the screen, causing less scrolling, but you may need to squint a little.
How Text Size Works
When you ask for larger or smaller fonts, the system does a calculation based on the smallest HEIGHT the screen sizes. If your screen resolution and the screen height of the notes is very close to this minimum size, you will not see a change.
The change does not take place in full points. Fractional points are used. Sometimes, you may not see a change because the calculation produces a very small change.
Searching Notes
With Advisors Assistant you can search through your notes to find all notes that contain a specific keyword, or are written within a date range.
You can search just one contact's notes, or you can do a global search through all of the notes in your entire database. More details about searching notes are available in the two help topics listed below:
Current Users Only Checkbox
This controls the drop down list of users. If you don't want to search all users and you only want the list of users to show users who have current logins to Advisors Assistant then this box should be checked.
Printing Notes
Notes can be printed in a variety of ways. You can print notes from the View Client With Notes Screen, from the View Notes Screen, and there are also notes available in some Contact Reports in the Advisors Assistant Selection Reports.
How to print a Summary of all notes for one contact
•From the View Client With Notes Screen, click on the Quick Report Action Button in the middle of the screen. The report will be shown on the screen, and you can click on the Printer Icon to print the entire report or save the report as a .pdf document.
•From the View Notes Screen, click the View All Button in the top right corner of the screen. All of the notes will then be listed in the grid. Click the Print Notes Button at the bottom of the screen. The report will be shown on the screen, and you can click on the Printer Icon to print the entire report or click the Floppy Disk Icon to save the report as a .pdf document.
How to print just one Note Topic for one contact
1.From the View Notes Screen, highlight the Note Topic you wish to print.
2.Click on the Print Notes Button at the bottom of the screen. The report will be shown on the screen, and you can click on the Printer Icon to print the entire report or click the Floppy Disk Icon to save the report as a .pdf document.
Moving Notes
You can move one note at a time to another topic by highlighting the note and clicking on the Move Note button.
Combining Entire Topics
Use the Combine Topics Button to combine two topics into one topic. All the notes from the highlighted topic will be moved to a new topic chosen on a topic list screen which will come up when you click on Combine Topics.
Saving Email Attachments
The option for saving email attachments is set up in the System Preferences, Outlook Tab.
You can set up the preferences to save only attachments or also to save images embedded in the email.
See Also
Preferences For Saving Attachments
Choosing The Topic To Move The Note
Archiving Any Email To Any Contact