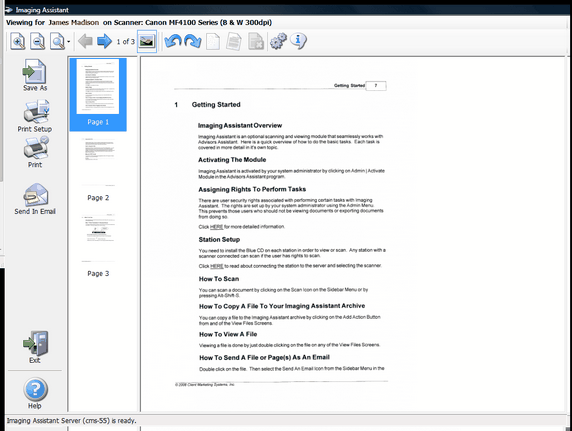
Viewer Screen
Double Click on any file on any View Screen with the Files Tab selected. The Imaging Assistant Viewer Screen will only load if the document was originally scanned with Imaging Assistant.
Overview
Files scanned with Imaging Assistant are viewed with a special file viewer. These files have a .TIF extension. If the file was not scanned with Imaging Assistant, it will be viewed by the program associated with that file extension by Windows.

Viewer With 3 Page Document
Note: The Viewer does not allow you to modify the file. If you want to modify a file, you will need to use Save As and modify it with a program which will modify TIF or JPG or PDF files. Then you will need to re-scan the document as a new document. Once a document has been stored in Imaging Assistant it cannot be added to or modified.
Viewer Functions
![]() Save As
Save As
Scanned documents are stored as compressed TIFF files. If you have the rights to save a file from the viewer, you can use the Save As feature to save the file as a TIF, JPEG, or PDF file.
![]() Print Setup
Print Setup
Print Setup allows you to set printer properties for printing.
![]() Print
Print
If you have rights to print documents, you can print it by clicking on this icon.
![]() Send In Email
Send In Email
If you have the security rights to email, click on this icon to automatically attach the document to an Email as a PDF.
![]() Exit
Exit
Click here to Exit the Viewer.
Viewer Tool Bar

Imaging Assistant Viewer Screen
Zoom In
Click to zoom in 10% for each click.
Zoom Out
Click to zoom out 10% for each click.
Choose Zoom From List
Click to drop down a list to zoom to various degrees, such as Actual Size.
View Previous Page
Takes you back one page.
View Next Page
Takes you forward one page.
Page X of Y Being Viewed
This shows the page number being viewed and the total number of pages scanned.
Some government agencies require that verify that you have scanned the actual number of pages that you put into the document feeder so that a page did not get skipped due to a misfeed. Use this feature to check the number of page images scanned.
Toggle Thumbnails On Off
Thumbnail images can be to the left or right of the page. This is controlled in the setup. Click on this icon to turn off or on the thumbnail views.
You can use Ctrl-Click or Shift-Click to highlight more than one thumbnail.
Rotate Pages
You can rotate whatever pages are highlighted. The pages will be stored as shown, so if you rotate and then save the scans, you will save them rotated.
Spot And Dust Removal
With today's scanners, this is not normally needed. It will remove tiny spots. It will also degenerate the scan if you use it several times, especially if you are scanning at lower resolutions.
Straighten
This function attempts to determine if the document is skewed, and the direction. It will then attempt to straighten the document a small increment.
You can use the Undo to reverse one click on this icon.
Undo Last Operation
Click here to reverse the last ONE operation.
Setup Scanner And System Setup
Use this icon to set up communications with the document server and to select the scanner. If the viewer can't find the Document Server, it will take you to the Setup Screen automatically.
About Imaging Assistant
Click here to view the version of Imaging Assistant, the name of the Document Server, and the contact information for Client Marketing Systems, Inc.
See Also
|
Files not scanned with Imaging Assistant do not use this viewer. They are viewed or opened using the program that Windows associates with the file. These files do not use the Imaging Assistant security because if you happen to be viewing a word document using Microsoft Word, you will be able to print or save it regardless of the security settings in Advisors Assistant. Remember, you can only use Save As because you cannot change the file already archived. If you save the file to your hard drive, you will need to put the new file in the archive if you want it under Imaging Assistant control. |
